M55302/169C321 Amphenol, M55302/169C321 Datasheet - Page 13
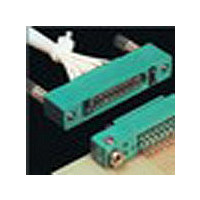
M55302/169C321
Manufacturer Part Number
M55302/169C321
Description
Manufacturer
Amphenol
Datasheet
1.M55302169C321.pdf
(33 pages)
Specifications of M55302/169C321
Lead Free Status / Rohs Status
Not Compliant


Low Mating Force
contact installation instructions,
repair/replacement
Using the thumb, push the plunger portion of the Extraction
Tool through the holder body into the damaged contact until a
slight resistance is felt. DO NOT PUSH PLUNGER HARD
ENOUGH TO CLOSE THE GAP BETWEEN IT AND THE
HOLDER BODY. The contact is now ready to be removed.
While maintaining slight pressure on the plunger, withdraw
tool and contact through the front of the connector body. Dis-
card damaged contact.
CONTACT REPLACEMENT/INSERTION -
MB, PC SERIES *
Using tweezers or fingers, carefully place the replacement
contact TAIL FIRST into the appropriate contact cavity in the
front of the connector. Push contact tail into the cavity until
the tail centers in the molded locating ribs. DO NOT push
against the bristle wires.
Position the tube end of the 11-10372 Insertion Tool over the
brush contact wires. Be careful not to bend any bristle
strands. Before final seating of the contact it is necessary to
make provisions for proper dressing of the contact tail back
SEAT PLUNGER AND REMOVE CONTACT AND TOOL
into the printed circuit board hole. In the case of a 90° tail sit-
uation, extra care must be taken to dress the contact as it is
being seated.
Push contact into cavity using the Insertion Tool until a posi-
tive stop is felt. Remove tool. Contact is now ready for termi-
nation.
CONTACT REMOVAL - IO-C SERIES
Contact removal is accomplished from the rear of this con-
nector series. Determine which contact is to be removed and
locate its corresponding wire in the wire bundle. Position wire
in Removal Tool (white). Slide tool along wire and insert into
rear of connector body. A moderate amount of resistance will
be encountered until the contact retention tines are deflected,
and then a positive stop will be felt. Then, holding the wire in
tension with the thumb against the tool serrations, withdraw
tool, wire and contact in one steady motion. Cut off and dis-
card damaged contact.
CONTACT REPLACEMENT/INSERTION - IO-C SERIES
Using accepted industry procedures, strip wire end to be ter-
minated 1/8 to 5/32 inch. Care should be taken not to nick
wire strands. Assemble the M22520/2-01 Crimp Tool and
SEAT CONTACT WITH INSERTION TOOL
Daniels K743 Positioner and place Tool Selector in correct
setting for wire size being used as follows:
AWG
22
24
26
28
SEL
5
4
3
2
Insert stripped wire end into contact wire well. Strands should
be visible in wire well inspection hole. Bottom contact and
wire assembly in Positioner and close handles of Crimp Tool
to complete crimp. Handles will not open unless full crimping
cycle has been completed. Position crimped wire and contact
in Insertion tool (brown). Snug insertion tip around contact.
Insert contact and wire assembly into rear of connector. Push
tool gently forward until contact is fully seated. Withdraw tool
and remove from wire. A slight pull on the wire assures reten-
tion. Redress wire bundle.
* Except for MB with compliant contacts; consult Amphenol, Sidney,
NY for details.
INSERT REPLACEMENT CONTACT
11
Related parts for M55302/169C321
Image
Part Number
Description
Manufacturer
Datasheet
Request
R

Part Number:
Description:
Standard Card Edge Connectors DIN 96POS
Manufacturer:
AVX Corporation
Datasheet:
Part Number:
Description:
Connector,DIN-41612,PCB Mount,RECEPT,96 Contacts,PIN,0.1 Pitch,WRAP POST Terminal,HOLE .099-.111
Manufacturer:
AVX Corporation

Part Number:
Description:
Board to Board / Mezzanine Connectors POLARIZING KEY
Manufacturer:
Amphenol
Datasheet:
Part Number:
Description:
Cable Specification: PU CABLE, UL20549 24AWG*8C+AD,OD= 6.0mm
Manufacturer:
Amphenol