IS-DEV KIT-7D NKK Switches, IS-DEV KIT-7D Datasheet
IS-DEV KIT-7D
Specifications of IS-DEV KIT-7D


Related parts for IS-DEV KIT-7D


IS-DEV KIT-7D Summary of contents
Page 1
... CL01 Intelligent Controller Users Manual B.doc Toll Free 1.877.2BUYNKK (877.228.9655) • Phone 480.991.0942 • Fax 480.998.1435 Revision B CL01 Intelligent Controller Version 1.4 (For IS-Dev Kit-7 and IS-Dev Kit-7D) NKK SWITCHES 7850 E. Gelding Drive Scottsdale, AZ 85260 Toll Free 1-877-2BUYNKK (877-228-9655) Phone 480-991-0942 Fax 480-998-1435 e-mail < ...
Page 2
CL01 Intelligent Controller Users Manual 7850 East Gelding Drive • Scottsdale, AZ 85260-3420 Table of Contents ..........................................................................................................2 1. General Controller Features ...................................................................................3 2. Compatible Dev Kits and Logic Boards.................................................................3 3. Operational Overview..............................................................................................4 4. Operational Details ...................................................................................................7 5. Communication Protocol .........................................................................................11 ...
Page 3
... The following is a list of Dev Kits with a CL01 controller. • IS-Dev Kit-7 for two OLED (64x48) SmartSwitches • IS-Dev Kit-7D for two OLED (52x36) SmartDisplays The following is a list of compatible Logic Boards and switches. • IS-L02L1 Logic Board for two OLED (64x48) SmartSwitches • ...
Page 4
... OLED modules dimmer. Press the right hand switch to make both OLED modules brighter. The brightness can be one of 16 levels between 0 and F where F is the maximum brightness. At the F level the OLED has a rated life of 15,000 hours. The dimmer the level is set the longer the life of the OLED. ...
Page 5
... Each of these variables can have a value between 01H to FFH (1 to 255). The timer for a given switch will be disabled if the T1 value is set to zero. For T2 the zero value is defined as 256. Pressing either switch will reset the timers for both switches. Holding down either switch will prevent both timers from running. The CL01 Intelligent Controller Users Manual B.doc Toll Free 1.877.2BUYNKK (877.228.9655) • ...
Page 6
... The current version of the controller can only handle 64x48 format images. The OLED switches show the full image while the OLED displays will only show the middle 52 pixels of the top 36 lines of the image. The image is handled from top left to bottom right as shown below. ...
Page 7
... Step 2: Display dim and bright on the two switches and allow for adjustments of the brightness. There are 16 brightness levels (0 to F). When the internal timer is expired, the controller proceeds to Step 3. Every time a switch is pressed, the timer gets reset switch is held depressed the timer does not run. Switch activity are not reported to host. ...
Page 8
... Set update flag for switch switch 1 action address for switch 2 is equal zero or the attribute for the location is not programmed then take no action. Step 6B: If switch 2 is pressed then: 1 ...
Page 9
... Set update flag for switch switch 2 action address for switch 2 is equal zero or the attribute for the location is not programmed then take no action. Step 6C: If timer for switch 1 expires then: 1 ...
Page 10
... If current address for switch 2 is equal ((end address for switch 2) +1) then: n. Read the attributes for end address location for switch end location action address for switch 2 is equal zero then put current address for switch 2 = start address for switch 2 and set update flag for switch 2. ...
Page 11
... B. If the byte is not a command ignored. When the controller executes a subroutine and expects additional information timer is set. If the expected data byte is not received in 64ms, the controller transmits 6CH 6EH and terminates the routine the byte value is not acceptable (invalid range, option, etc.), the controller transmits 6EH and terminates the routine ...
Page 12
... ASCII HEX format. (Detail below) [address 1] is two bytes with value of 0001H to FFFFH sent in ASCII HEX format. This is the address for the image that switch 1 displays upon power up/reboot. [address 2] is two bytes with value of 0001H to FFFFH sent in ASCII HEX format. This is the address for the image that switch 2 displays upon power up/reboot ...
Page 13
... FFFFH sent as ASCII HEX format. [attribute block] is eight bytes transmit in ASCII HEX format. The address and attribute block are saved at this address. When the controller reads the attribute block it compares the requested address to the saved address and if they do not match controller knows that the attribute block is not programmed and ignores it ...
Page 14
... Example: Start at address 00A1H. Send 2E 33 and the left switch displays the image stored at address 00A2H. Send 2E 33 again and the left switch displays the image stored at address 00A3H. Command to increment address on right switch This command displays an image on right switch at the address+1 ...
Page 15
... CL01 Intelligent Controller Users Manual 7850 East Gelding Drive • Scottsdale, AZ 85260-3420 Example: Start at address 1004H. Send 2E 35 and the left switch displays the image stored at address 1003H. Send 2E 35 again and the left switch displays the image stored at address 1002H. ...
Page 16
... Two bytes send in HEX format. The command sets the timers with the given values and activates them. If either switch is pressed or the timers expire the values are lost. These values are over written by the values stored on the microSD flash in the current address ...
Page 17
... This command turns on the 16V supply to the OLED module. command format: 26H transmit format: (xxH) (xxH) (xxH) Note: This command should only be used when the OLED displays are in the off mode. CL01 Intelligent Controller Users Manual B.doc Toll Free 1.877.2BUYNKK (877.228.9655) • Phone 480.991.0942 • Fax 480.998.1435 51H 71H ...
Page 18
... ASCII HEX format (01H to 80H). This is the number of data bytes (1 to 128 bytes). [data 128 bytes sent in ASCII HEX format. The controller sends the [data] to both OLED modules as a command. ...
Page 19
... The Mode Select Switch has two settings; “Switch” is for the OLED (64x48) switches and “Display” is for the OLED (52x36) displays. The Connector is for the installation of the Logic Boards onto the controller. One pin is keyed to reduce miss mates. Note: Improper installation of the Logic Boards could damage either/both the Logic Board and The Batt/PWR switch has three positions: battery, off, line power ...
Page 20
CL01 Intelligent Controller Users Manual 7850 East Gelding Drive • Scottsdale, AZ 85260-3420 Controller Schematic CL01 Intelligent Controller Users Manual B.doc Toll Free 1.877.2BUYNKK (877.228.9655) • Phone 480.991.0942 • Fax 480.998.1435 www.nkkswitches.com • Email engineering@nkkswitches.com Page 0110 ...
Page 21
CL01 Intelligent Controller Users Manual 7850 East Gelding Drive • Scottsdale, AZ 85260-3420 Two OLED SmartSwitch logic board CL01 Intelligent Controller Users Manual B.doc Toll Free 1.877.2BUYNKK (877.228.9655) • Phone 480.991.0942 • Fax 480.998.1435 www.nkkswitches.com • Email engineering@nkkswitches.com Page 21 ...
Page 22
... CL01 Intelligent Controller Users Manual 7850 East Gelding Drive • Scottsdale, AZ 85260-3420 Two OLED SmartDisplay logic board CL01 Intelligent Controller Users Manual B.doc Toll Free 1.877.2BUYNKK (877.228.9655) • Phone 480.991.0942 • Fax 480.998.1435 www.nkkswitches.com • Email engineering@nkkswitches.com Page 0110 ...
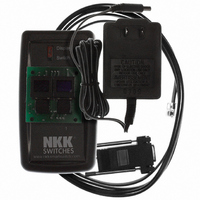
Page 23
CL01 Intelligent Controller Users Manual 7850 East Gelding Drive • Scottsdale, AZ 85260-3420 Container size Board photo CL01 Intelligent Controller Users Manual B.doc Toll Free 1.877.2BUYNKK (877.228.9655) • Phone 480.991.0942 • Fax 480.998.1435 www.nkkswitches.com • Email engineering@nkkswitches.com Page 23 of ...
Page 24
... A two byte value ranging from 0001H to FFFFH representing the 65536 memory locations for pictures and attributes on microSD flash. 8. Firmware issues The problems found in the most current version are listed below and get resolved in the following version. Version V1.4 No firmware issues at this time. ...