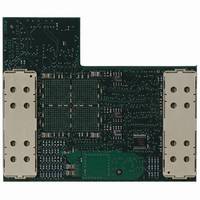
ATICE50POD Atmel, ATICE50POD Datasheet - Page 41

ATICE50POD
Manufacturer Part Number
ATICE50POD
Description
REPLACEMENT POD FOR ICE40,ICE50
Manufacturer
Atmel
Datasheet
1.ATICE50MEM.pdf
(73 pages)
Specifications of ATICE50POD
Accessory Type
POD Replacement Kit
For Use With/related Products
AVR ICE40 and ICE50
Lead Free Status / RoHS Status
Contains lead / RoHS non-compliant
- Current page: 41 of 73
- Download datasheet (2Mb)
5.3
ICE50 User Guide
Device Selection
5. Press the next button. Now select ICE50 as target and then chose the part to
Figure 5-3. AVR Studio 4 Screenshot
1. In AVR Studio go to Debug->ICE50 Options. Device Selection is highlighted and
2. Select between the following clock sources:(This will affect the fuse settings for
3. Different start-up times can be selected from the Start-up time pulldown menu.
4. Part frequency can be selected from the frequency pulldown menu as shown in
emulate. Press finish to complete the wizard. AVR Studio will now be ready for
use. See Figure 5-3. Parts that are downloaded and available in ICE50 are
shown highlighted. If a part in grey colour is selected the tool for downloading
new parts is launched. See download new parts for ICE50.
it is possible to choose from different parts in the pulldown menu. Note the icon
to the left for each part name. Click this icon if this part is to be loaded into the
ICE50. A total of four part files can be contained in the ICE50 at the same time.
Some part files contain two AVR emulator parts. The status bar at the right side
indicates how many part files ICE50 contains.
For ATmega128 it is also possible to choose ATmega103 compatibility mode.
the actual part).
– Internal XTAL Oscillator
– Internal RC Oscillator
– External Clock
(This will affect the fuse settings for the actual part.)
Figure 5-4 or the frequency can be typed in the editor box.
Configuring AVR Studio
2523A–AVR–11/02
5-3
Related parts for ATICE50POD
Image
Part Number
Description
Manufacturer
Datasheet
Request
R

Part Number:
Description:
EMULATOR IN CIRCUIT MEGAAVR
Manufacturer:
Atmel
Datasheet:

Part Number:
Description:
DEV KIT FOR AVR/AVR32
Manufacturer:
Atmel
Datasheet:

Part Number:
Description:
INTERVAL AND WIPE/WASH WIPER CONTROL IC WITH DELAY
Manufacturer:
ATMEL Corporation
Datasheet:

Part Number:
Description:
Low-Voltage Voice-Switched IC for Hands-Free Operation
Manufacturer:
ATMEL Corporation
Datasheet:

Part Number:
Description:
MONOLITHIC INTEGRATED FEATUREPHONE CIRCUIT
Manufacturer:
ATMEL Corporation
Datasheet:

Part Number:
Description:
AM-FM Receiver IC U4255BM-M
Manufacturer:
ATMEL Corporation
Datasheet:

Part Number:
Description:
Monolithic Integrated Feature Phone Circuit
Manufacturer:
ATMEL Corporation
Datasheet:

Part Number:
Description:
Multistandard Video-IF and Quasi Parallel Sound Processing
Manufacturer:
ATMEL Corporation
Datasheet:

Part Number:
Description:
High-performance EE PLD
Manufacturer:
ATMEL Corporation
Datasheet:

Part Number:
Description:
8-bit Flash Microcontroller
Manufacturer:
ATMEL Corporation
Datasheet:

Part Number:
Description:
2-Wire Serial EEPROM
Manufacturer:
ATMEL Corporation
Datasheet:


