CAPTOUCHSENSESK Silicon Laboratories Inc, CAPTOUCHSENSESK Datasheet - Page 9
CAPTOUCHSENSESK
Manufacturer Part Number
CAPTOUCHSENSESK
Description
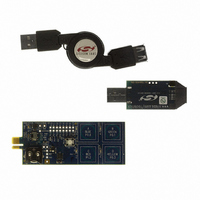
KIT STARTER CAP TOUCH SENSE
Manufacturer
Silicon Laboratories Inc
Series
ToolStickr
Datasheet
1.CAPTOUCHSENSEDC.pdf
(14 pages)
Specifications of CAPTOUCHSENSESK
Sensor Type
Touch, Capacitive
Interface
USB
Embedded
Yes, MCU, 8-Bit
Utilized Ic / Part
C8051F931
Accessory Type
Cap Touch Sense Starter Kit
Silicon Family Name
C8051F93x?
Silicon Manufacturer
Silicon Labs
Core Sub-architecture
80C51
Core Architecture
8051
Rohs Compliant
Yes
Development Tool Type
Hardware / Software - Starter Kit
Lead Free Status / RoHS Status
Lead free / RoHS Compliant
Voltage - Supply
-
Sensitivity
-
Sensing Range
-
Lead Free Status / Rohs Status
Lead free / RoHS Compliant
For Use With
C8051F931
Lead Free Status / RoHS Status
Lead free / RoHS Compliant, Lead free / RoHS Compliant
Other names
336-1475


7.3. Running and Stopping Code Execution
Once the IDE is connected to the device and the firmware is loaded, the IDE can start and stop the code execution.
The following steps can be performed using the buttons on the toolbar or using the options in the Debug menu.
1. To start code execution, click the green “Go” button on the toolbar or use the Debug → Go menu option. The
2. To stop code execution, click the red “Stop” button on the toolbar or use the Debug → Stop menu option. The
All debug windows and watch windows are refreshed when the device is stopped. If any of the values in these
windows have changed since the last time the device was halted, the new value is shown in red text instead of
black text.
7.4. Configuring the Capacitive Touch Sense Switches
The CapTouchSenseDC_SwitchSensitivity example includes code that allows the configuration of the capacitive
touch sense switches. This code is executed the first time firmware is run or when the code constants are removed
from Flash memory (e.g., using the Erase Code Space command).
1. Start code execution by clicking the green “Go” button on the toolbar or using the Debug → Go menu option.
2. Put your finger on touch sensitive switch A and press and release the mechanical switch.
3. Repeat Step 2 for the remaining three switches. The LED will turn on to indicate which switch to put your finger
4. Touching each switch should now light up the corresponding LED.
7.5. Restoring the Memory Game Demo
The CapTouchSenseDC_Memory_Game can be restored in the CapTouchSense daughter card using the
following steps.
1. Close the current project or open a new instance of the Silicon Laboratories IDE.
2. Connect to the target.
3. Click the download button on the menu bar or use alt-D.
4. Click Erase All Code Space. Click OK to erase all code and the configuration values stored in the scratchpad
5. Browse for the HEX file named CAPTOUCHSENSEDC_MEMORY_GAME.hex.
6. Click Download.
7. Disconnect from the target to start executing code. The red and yellow will light up to indicate that no calibration
8. Press the S2 switch to begin configuration. Be careful not to touch the capacitive touch sense switches while
debug commands in the IDE (single-step, multiple-step, set breakpoint, and others) are disabled when the
device is running. While the firmware is running, pressing any switch on the daughter card will turn on the
corresponding LED. The less sensitive switches will require a firmer touch to turn on the LED, and the more
sensitive switches will require only a light touch. The first time the firmware runs, it will enter the configuration
mode described in Section 7.4.
device will halt code execution and all of the registers and pins on the device will hold their state.
The blue LED will light up to indicate that no calibration values are present. If the blue LED is not on, press the
mechanical switch (S2) to start configuration.
on.
memory.
values are present.
ToolStick-CapTouchSenseDC
Rev. 0.2
9
Related parts for CAPTOUCHSENSESK
Image
Part Number
Description
Manufacturer
Datasheet
Request
R

Part Number:
Description:
SMD/C°/SINGLE-ENDED OUTPUT SILICON OSCILLATOR
Manufacturer:
Silicon Laboratories Inc
Part Number:
Description:
Manufacturer:
Silicon Laboratories Inc
Datasheet:
Part Number:
Description:
N/A N/A/SI4010 AES KEYFOB DEMO WITH LCD RX
Manufacturer:
Silicon Laboratories Inc
Datasheet:
Part Number:
Description:
N/A N/A/SI4010 SIMPLIFIED KEY FOB DEMO WITH LED RX
Manufacturer:
Silicon Laboratories Inc
Datasheet:
Part Number:
Description:
N/A/-40 TO 85 OC/EZLINK MODULE; F930/4432 HIGH BAND (REV E/B1)
Manufacturer:
Silicon Laboratories Inc
Part Number:
Description:
EZLink Module; F930/4432 Low Band (rev e/B1)
Manufacturer:
Silicon Laboratories Inc
Part Number:
Description:
I°/4460 10 DBM RADIO TEST CARD 434 MHZ
Manufacturer:
Silicon Laboratories Inc
Part Number:
Description:
I°/4461 14 DBM RADIO TEST CARD 868 MHZ
Manufacturer:
Silicon Laboratories Inc
Part Number:
Description:
I°/4463 20 DBM RFSWITCH RADIO TEST CARD 460 MHZ
Manufacturer:
Silicon Laboratories Inc
Part Number:
Description:
I°/4463 20 DBM RADIO TEST CARD 868 MHZ
Manufacturer:
Silicon Laboratories Inc
Part Number:
Description:
I°/4463 27 DBM RADIO TEST CARD 868 MHZ
Manufacturer:
Silicon Laboratories Inc
Part Number:
Description:
I°/4463 SKYWORKS 30 DBM RADIO TEST CARD 915 MHZ
Manufacturer:
Silicon Laboratories Inc
Part Number:
Description:
N/A N/A/-40 TO 85 OC/4463 RFMD 30 DBM RADIO TEST CARD 915 MHZ
Manufacturer:
Silicon Laboratories Inc
Part Number:
Description:
I°/4463 20 DBM RADIO TEST CARD 169 MHZ
Manufacturer:
Silicon Laboratories Inc