27316 Parallax Inc, 27316 Datasheet
27316
Specifications of 27316


Related parts for 27316


27316 Summary of contents
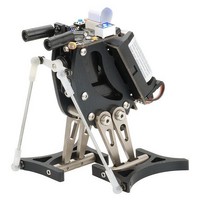
Page 1
... The Penguin’s microcontroller is an embedded BASIC Stamp2px24 module, the fastest and most powerful BASIC Stamp in the Parallax lineup. The Penguin requires three hours to assemble, after which PBASIC programming challenge to exploit all of the robot’s capabilities. Copyright © Parallax, Inc. • Penguin (#27313-27316) • v1.0 7/12/2007 Web Site: www.parallax.com Forums: forums.parallax.com Sales: sales@parallax ...
Page 2
... FTDI 232RL mini USB programming port • (2) CR123 batteries for 6V power supply • Blue power indicator LED • expansion I/O port, Vss and Vdd header for Ping))) distance sensor or RF modules Copyright © Parallax, Inc. • Penguin (#27313-27316) • v1.0 7/12/2007 Page ...
Page 3
... If you encounter a missing part contact us immediately and we’ll put it in the mail for you. The best way to do this is by e-mail to sales@parallax.com, or you can call us at (888) 512-1024. Copyright © Parallax, Inc. • Penguin (#27313-27316) • v1.0 7/12/2007 www.parallax.com home page. ...
Page 4
... BODY KIT MECHANICAL DRAWINGS Copyright © Parallax, Inc. • Penguin (#27313-27316) • v1.0 7/12/2007 Page ...
Page 5
... Press the standoffs against the servo body when tightening the screws. This will ensure proper spacing when the servos are mounted in the Penguin body panels. Copyright © Parallax, Inc. • Penguin (#27313-27316) • v1.0 7/12/2007 Page ...
Page 6
... Penguin-CenterServos.bpx ' {$STAMP BS2px} ' {$PBASIC 2.5} Center CON 1875 StrideServo PIN 6 TiltServo PIN 7 DO PULSOUT StrideServo, Center PULSOUT TiltServo, Center PAUSE 15 LOOP Copyright © Parallax, Inc. • Penguin (#27313-27316) • v1.0 7/12/2007 ' Centered servo pulse ' Center stride servo (J1) ' Center tilt servo (J2) Page ...
Page 7
... Press it onto the servo so that close to cross-wise to the Penguin body as possible, it may not be perfectly perpendicular because the spline is toothed. For fine-tuning, this can be corrected with calibration-in-software using sample code available for free download from the Penguin product page. Copyright © Parallax, Inc. • Penguin (#27313-27316) • v1.0 7/12/2007 Page ...
Page 8
... If it takes force to move the legs you have one of two problems: either the metal parts have bound, or the screws are too tight into the body panels. Tighten everything enough to remove “slop” but not so tight that parts are unable to move freely. Copyright © Parallax, Inc. • Penguin (#27313-27316) • v1.0 7/12/2007 Page ...
Page 9
... Next, use the 1.5 mm hex key to tighten the 4-40 long 0.149” diameter stainless steel shoulder screws into the ankle. Then Penguin will now stand up without assistance. Four (4) 4-40 ¼” long 0.149” diameter stainless shoulder screws hold the ankle to the feet. Copyright © Parallax, Inc. • Penguin (#27313-27316) • v1.0 7/12/2007 Page ...
Page 10
... Don’t force it beyond the point at which the ball link is easily screwed into the foot. Copyright © Parallax, Inc. • Penguin (#27313-27316) • v1.0 7/12/2007 Page ...
Page 11
... If you run it too fast the drill will plunge into the plastic and you’ll crack the servo horn. Take your time and use a low drill speed. Copyright © Parallax, Inc. • Penguin (#27313-27316) • v1.0 7/12/2007 Page ...
Page 12
... Press the assembled servo horn onto the tilt servo, positioning it cross-wise to the Penguin body. Do not over-tighten the screw; you may need to take off the horn and re-center the servo if it gets moved during the next step. Copyright © Parallax, Inc. • Penguin (#27313-27316) • v1.0 7/12/2007 Page ...
Page 13
... If the tilt servo is not horizontal, remove the screw and very gently pull the horn off of the spline. Re-run Penguin-CenterServos.bpx, which should bring the feet together. Replace the horn on the spline, and replace the screw. Copyright © Parallax, Inc. • Penguin (#27313-27316) • v1.0 7/12/2007 Page ...
Page 14
... Penguin using (2) 2-56 1/4" button socket cap stainless steel screws and the 0.050” hex key. You’ll need to fold the tilt servo’s wire over to tighten the board against the top of the Penguin. Copyright © Parallax, Inc. • Penguin (#27313-27316) • v1.0 7/12/2007 Page ...
Page 15
... When you mount this board be sure that the servo wires are not preventing it from properly seating into position. Plug the servos back in. Connect the stride servo to J1 and the tilt servo to J2; make sure the white leads are on the right as shown in the photo. Copyright © Parallax, Inc. • Penguin (#27313-27316) • v1.0 7/12/2007 Page ...
Page 16
... It’s also possible to hide them in the Penguin’s body, but that requires substantial attention to detail considering the lack of free space. Step 16: Penguin is finished Congratulations. Your Penguin is complete and ready for programming! Copyright © Parallax, Inc. • Penguin (#27313-27316) • v1.0 7/12/2007 Page ...
Page 17
... Use a dab of Loc-Tite on the threads of the shoulder screw so it stays screwed into position in the body panel. Copyright © Parallax, Inc. • Penguin (#27313-27316) • v1.0 7/12/2007 Picture Page ...
Page 18
... P12 Speaker P13 Hitachi HM55B Compass – CLK (clock) P14 Hitachi HM55B Compass – CS (chip select) P15 Hitachi HM55B Compass – DIN/DOUT (data in/out) Copyright © Parallax, Inc. • Penguin (#27313-27316) • v1.0 7/12/2007 Direction Output Output Output Output Input Input/Output ...
Page 19
... HM55B Graphical Viewer for the HM55B • Smart Sensors and Applications (a Stamps in Class Text) • IR Remote for the Boe-Bot Text (a Stamps in Class Text) • Ping))) Ultrasonic Sensor Documentation Copyright © Parallax, Inc. • Penguin (#27313-27316) • v1.0 7/12/2007 www.parallax.com Code Incorporating a Calibrated Compass Penguin-CalibratedCompassTest.bpx Penguin-AutonomousNavigation-CalibratedCompass ...
Page 20
... LOOP ReadIr: FREQOUT LEmitter,1,6300 LeftIr = ~IrInput FREQOUT REmitter,1,6300 RightIr = ~IrInput RETURN Copyright © Parallax, Inc. • Penguin (#27313-27316) • v1.0 7/12/2007 ' Frequency semitones = 1 octave ' Play the frequency ' lower frequency by 1 octave ' Prepare debug screen ' Update debug screen with ' status of IR sensors ...
Page 21
... VAR OUTC DIRC = %1111 DO FOR LEDDisplay = PAUSE 750 NEXT LOOP Copyright © Parallax, Inc. • Penguin (#27313-27316) • v1.0 7/12/2007 ' Set IR LEDs as outputs ' and the IR receiver input ' Charge capacitors for ' photoresistor R/C circuit ' Prepare debug screen ' Update debug screen with " ...
Page 22
... HIGH Enable IF (y.BIT10 = 1) THEN NegMask IF (x.BIT10 = 1) THEN NegMask Heading = x ATN -y Heading = Heading */ 360 RETURN Copyright © Parallax, Inc. • Penguin (#27313-27316) • v1.0 7/12/2007 ' Transceives to/from Din/Dout ' Sends pulses to HM55B's Clock ' Controls HM55B's /Enable ' Reset command for HM55B ' Start measurement command ' Get status/axis values command ' 11 -> ...
Page 23
... ELECTRONICS 4.1. PENGUIN SCHEMATIC Copyright © Parallax, Inc. • Penguin (#27313-27316) • v1.0 7/12/2007 Page ...
Page 24
... Copyright © Parallax, Inc. • Penguin (#27313-27316) • v1.0 7/12/2007 Discharge time Energizer 270 mins / 4.5 hours Rayovac 240 mins / 4.0 hours Duracell 225 mins / 3.8 hours Panasonic 210 mins / 3.5 hours Sanyo 150 mins / 2 ...