8203 3M, 8203 Datasheet - Page 22
8203
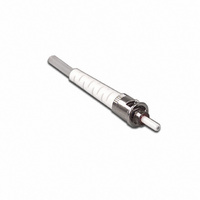
Manufacturer Part Number
8203
Description
CONN F/OPTIC EPOXY FC SM 126UM
Manufacturer
3M
Type
Floorr
Specifications of 8203
Connector Style
FC
Simplex/duplex
Simplex
Mode
Singlemode
Mounting Type
Free Hanging (In-Line)
Fastening Type
Threaded
Ferrule Material
Zirconia, Ceramic
Color
White
Lead Free Status / RoHS Status
Vendor undefined / Vendor undefined
Features
-
Connector Type
-
Lead Free Status / Rohs Status
Lead free / RoHS Compliant
Other names
5400791719
54007917199
80-6107-6537-4
80610765374
8203 CONN FC/PC3 SM
MF8203
54007917199
80-6107-6537-4
80610765374
8203 CONN FC/PC3 SM
MF8203
Available stocks
Company
Part Number
Manufacturer
Quantity
Price

Company:
Part Number:
82036012A
Manufacturer:
S/PHI
Quantity:
6
Company:
Part Number:
8203602PA
Manufacturer:
S/PHI
Quantity:
9
Part Number:
8203CB-F
Manufacturer:
HIFN
Quantity:
20 000


11.7 Place the connector ferrule in
11.10 Place the jig on the lapping film.
11.13 Beginning with a light
11.16 Wipe a layer of alcohol onto
the polishing jig to verify that
it fits properly. The fit should
allow for easy movement of
the ferrule.
pressure, move the jig in a
figure eight pattern.
the rubber pad.
11.8 If the ferrule does not fit
11.11 Place the ferrule in the jig
11.17 Before the alcohol
11.14 The speed of your figure
Note: The jig will feel much easier
properly, there are two possible
causes. The first is that there
is adhesive on the ferrule. To
remove the adhesive, use the
scissors and gently scrape
away the adhesive.
until it stops.
evaporates, place the 0.05
Micron Lapping film (pale
yellow) on the rubber pad
shiny side down.
eights should be between one
and two per second.
After you have done 5 figure
eights, increase to a medium
pressure and polish until all of
the adhesive has been
removed. Then, polish one
additional figure eight only.
to push immediately after the
adhesive has been removed.
22
11.12 Hold the connector as shown.
11.15 Clean the second rubber pad.
11.18 Clean the lapping film with a
Note: The SM Final Polish film
11.9 The second possibility is that
the hole in the jig may have
adhesive in it. Saturate a pipe
cleaner with isopropyl alcohol
and move it back and forth in
the jig to remove the adhesive.
lint free cloth moistened with
isopropyl alcohol.
may be used for up to 8
connectors.
Related parts for 8203
Image
Part Number
Description
Manufacturer
Datasheet
Request
R

Part Number:
Description:
CONN SOCKET 20POS W/O STRAIN
Manufacturer:
3M
Datasheet:

Part Number:
Description:
CONN SOCKET 50POS W/O STRAIN
Manufacturer:
3M
Datasheet:

Part Number:
Description:
CONN SOCKET 80POS W/STRAIN REF
Manufacturer:
3M
Datasheet:
Part Number:
Description:
CONNECTOR RECEPT W/STRAIN 20POS
Manufacturer:
3M
Datasheet:
Part Number:
Description:
3M-MINI-CLAMP/PLUG/WMIC/2MM/3POS/TYPE A/ORANGE/3M LOGO
Manufacturer:
3M
Datasheet:
Part Number:
Description:
3M-MINI-CLAMP/PLUG/WMIC/2MM/4POS/TYPE A/YELLOW/3M LOGO
Manufacturer:
3M
Datasheet:
Part Number:
Description:
3M-MINI-CLAMP/PLUG/WMIC/2MM/4POS/TYPE A/ORANGE/3M LOGO
Manufacturer:
3M
Datasheet:
Part Number:
Description:
3M-MINI-CLAMP/SKT PANELMOUNT/WMIC/2MM/3POS/TYPE A/RED/3M LOGO
Manufacturer:
3M
Datasheet:
Part Number:
Description:
3M-MINI-CLAMP/SKT PANELMOUNT/WMIC/2MM/3POS/TYPE A/YELLOW/3M LO
Manufacturer:
3M
Datasheet:
Part Number:
Description:
3M-MINI-CLAMP/SKT/WMIC/2MM/3POS/TYPE A/ORANGE/3M LOGO
Manufacturer:
3M
Datasheet:
Part Number:
Description:
3M-MINI-CLAMP/SKT PANELMOUNT/WMIC/2MM/3POS/TYPE A/ORANGE/3M LO
Manufacturer:
3M
Datasheet:
Part Number:
Description:
3M-MINI-CLAMP/SKT PANELMOUNT/WMIC/2MM/4POS/TYPE A/RED/3M LOGO
Manufacturer:
3M
Datasheet:
Part Number:
Description:
3M-MINI-CLAMP/SKT/WMIC/2MM/4POS/TYPE A/YELLOW/3M LOGO
Manufacturer:
3M
Datasheet:
Part Number:
Description:
3M-MINI-CLAMP/SKT PANELMOUNT/WMIC/2MM/4POS/TYPE A/YELLOW/3M LO
Manufacturer:
3M
Datasheet: