A103-007 EAGLE SIGNAL, A103-007 Datasheet - Page 3
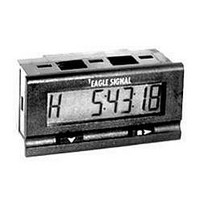
A103-007
Manufacturer Part Number
A103-007
Description
Totalizing Counter
Manufacturer
EAGLE SIGNAL
Datasheet
1.A103-007.pdf
(4 pages)
Specifications of A103-007
No. Of Digits / Alpha
7
Digit Height
12mm
Counting Speed
10kHz
Operating Temperature Range
0°C To +55°C
Signal Input Type
Dry Contact, PNP Or NPN Sensor, Encoder
Ip/nema Rating
IP65 / NEMA 4X
Counter Supply Voltage
115/230VAC
Mounting Type
Panel
Rohs Compliant
NA
Lead Free Status / RoHS Status
na


S E T U P
INSTALLATION
Battery Installation - The unit is shipped with two battery, which are not
installed. Remove the battery cover by pushing inward and down. Install
the batteries in the two slots. The two batteries are capable of sustaining
the output for 6 months at 50% duty cycle (To extend the battery life to 5
years utilize an external DC supply or the AC option module for powering
the output). Once the battery is in place the unit will go into a self test
mode, and all the segments on the LCD display will be illuminated. The self
test mode is exited by depressing the Next key, which will then display the
model number (7). Depress the Next key again to ready the unit for
operation.
PROGRAMMING
1 .
2 .
3 .
4 .
i n t
o F F
o n
u P
Battery Slots
Count Direction: Determines if the count value will increment from zero and change the state of the
output at the preset (Up), or decrement from the Preset and change the state of the output at zero
(Down).
Preset Lock: When enabled the preset value can not be changed through the front panel.
Output Mode - Determines whether the output will activate prior to reaching the preset (or zero for
down counting) and then release when that value is achieved (Interval), or will be Off prior to reaching
the preset (or zero for down counting) and then activate when that value is achieved (On-Delay).
Front Panel Reset Enable: When active (ON) the count value, when being displayed, can be reset by
pressing the Next/Reset key. If set to OFF, the total value can only be reset through the remote input.
Programming parameters can be accessed, when the Program Enable input is active, by
pressing the Down key. To edit a parameter use the Down key to scroll until the
desired parameter appears on the screen. Pressing the Next key will cause the leftmost
digit of that value to begin to flash. Use the Next and Down keys in combination to
choose individual digits and change their value.
Front Panel Installation - Place the unit in the panel through the
33mm x 68mm cutout. Slide the included gasket over the rear of the
unit, then slide the panel mount bracket into place so that the 4 tabs
catch in the groves on the top and the bottom of the unit (the bracket
should be oriented so that the tabs are on the side nearest the panel).
Use the provided panel mount screws to tighten the bracket until there
is a secure seal against the gasket.
3
Related parts for A103-007
Image
Part Number
Description
Manufacturer
Datasheet
Request
R

Part Number:
Description:
Totalizing Counter
Manufacturer:
EAGLE SIGNAL
Datasheet:
Part Number:
Description:
Totalizing Counter
Manufacturer:
EAGLE SIGNAL
Datasheet:
Part Number:
Description:
Totalizing Counter
Manufacturer:
EAGLE SIGNAL
Datasheet:
Part Number:
Description:
Rate Counter
Manufacturer:
EAGLE SIGNAL
Datasheet:

Part Number:
Description:
Counter Display Panel
Manufacturer:
EAGLE SIGNAL
Datasheet:

Part Number:
Description:
Indicator, Time; Digital; 10 to 28 VDC; Panel; EAGLE SIGNAL Brand
Manufacturer:
Veeder-Root
Datasheet:

Part Number:
Description:
Power Supply
Manufacturer:
EAGLE SIGNAL
Datasheet:
Part Number:
Description:
Power Supply
Manufacturer:
EAGLE SIGNAL
Datasheet:
Part Number:
Description:
HV Input/Power Supply/Relay Module
Manufacturer:
EAGLE SIGNAL
Datasheet:
Part Number:
Description:
LV Input/Power Supply/Relay Module
Manufacturer:
EAGLE SIGNAL
Datasheet:
