CVC C-TON Industries, CVC Datasheet - Page 2
CVC
Manufacturer Part Number
CVC
Description
CALIBRATOR VOLT .59" LCD BLU
Manufacturer
C-TON Industries
Series
CVCr
Type
Calibratorr
Datasheet
1.CVC.pdf
(2 pages)
Specifications of CVC
Includes
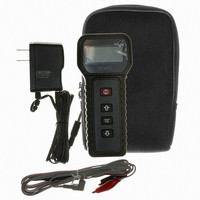
AC Adapter, Battery, Case, Test Leads
Style
Handheld
Display Type
LCD
Function
Voltage, Current
Features
Auto Off, Backlight
Ranging
Auto
Lead Free Status / RoHS Status
Lead free / RoHS Compliant
Display Digits
-
Display Count
-
Other names
CDPM1009
Available stocks
Company
Part Number
Manufacturer
Quantity
Price

Company:
Part Number:
CVCB360AT
Manufacturer:
RiverElet
Quantity:
14 636
Company:
Part Number:
CVCB540AT
Manufacturer:
RiverElet
Quantity:
1 364
Company:
Part Number:
CVCO33CL-0110-0150
Manufacturer:
Crystek Corporation
Quantity:
135
Company:
Part Number:
CVCO33CL-0390-0410
Manufacturer:
Crystek Corporation
Quantity:
135
Company:
Part Number:
CVCO33CL-0415-0435
Manufacturer:
Crystek Corporation
Quantity:
135


POWER ON/OFF
plugged into the EXT POWER jack. The AC adapter disconnects the
internal battery.
button for at least 2 seconds. The LCD annunciators will cycle and then
hold steady when the CVC is turned on. Release the ON/OFF button
within 5 seconds after cycling stops or the unit will turn off.
seconds. The LCD annunciators will start to cycle when the CVC is turned
off. Release the ON/OFF button as soon as the display starts to cycle or the
unit will turn on again.
SELECTING OUTPUT MODE
as shown below. If the test leads are plugged into the mA XMTR or mA
OUTPUT jack, or no leads are plugged in, “mA” will turn on. If the load
resistance is too high or the leads are left open, “OVERLOAD” will turn
on. If the leads are plugged into the VOLTS OUTPUT jack, “V” will turn
on. If the load resistance is too low or the leads are shorted, “mA” may
stay on or turn on.
Fig 1. Voltage Output
Fig 3. Simulate a 2-Wire mA Transmitter Loop With External 12 to
30V DC Supply. A similar connection can be used to extend output
range of CVC beyond 300 ohms. A 24V source will allow CVC to source
into an impedance of >1000 ohms.
Compact Current & Voltage Calibrator
With LCD Numeric Display
Operating Instructions
C-TON I
Make sure that the battery is installed or the AC adapter is
To turn the CVC on, press and hold the upper red ON/OFF
To turn off, press and hold the ON/OFF button for at least 5
Plug the test lead assembly into the appropriate output jack
NdusTrIes
• PO B
Ox
172 • S
Fig. 2 mA Source Output
unaPee
, nH, 03782 • uSa • P
MANUAL SELECTION OF OUTPUT LEVEL
press the
AUTO RAMPING
to 10 V) and back in 1.0 mA (or 1.0 V) steps, with 5 seconds between each
step. See below to change the ramp end points and step time interval.
seconds. “RAMP” will turn on and the output will start ramping within the
minimum and maximum values programmed into the CVC. It will start at
the output value manually set on the CVC before the key is pressed.
RAMP/TIME key again.
CHANGING THE AUTO RAMPING END POINTS AND STEP TIME
seconds) press the
“RAMP” and “TIME “ turn on. “mA” will turn off. Set the time duration for
each step increment from 1.0 to 20.0 seconds, in 1.0 second increments
by using the
again. “TIME” will turn off and the appropriate “mA” or “V” will flash.
“RAMP” will remain on.
the first end point, press the RAMP/TIME key again. The appropriate “mA”
or “V” and “RAMP” will flash.
store the second end point and exit the programming mode, press the
RAMP/TIME key again. The second value stored will be displayed along
with the appropriate “mA” or “V”.
SETTING THE AUTO POWER OFF DELAY TIME
mediately (within 2 seconds) press the
RAMP/TIME key until “TIME” turns on. All other annunciators are off. Set
the time delay from the last key press until the unit automatically turns
OFF by using the
1.0 to 20.0 minutes in 1.0 minute increments. If the delay time is set to
00.0 minutes, the Auto Power Off Delay function is disabled. This is useful
when the unit is used on a bench with the AC adapter.
again. “TIME” will turn off and the appropriate “mA” or “V” will turn on.
HOne
To increase the output, press the
The output is preprogrammed to ramp between 4 to 20 mA (or 2
To start ramping the output, press the RAMP/TIME key for 2
To stop the ramping and return to manual mode, press the
Press and hold the RAMP/TIME key, and immediately (within 2
To store the desired time interval, press the RAMP/TIME key
Set the first end point by using the
Set the second end point by using the
With the unit ON, press and hold the RAMP/TIME key, and im-
To store the desired time delay, press the RAMP/TIME key
(603)456-2655 •
key. New output value will be displayed on the display.
and
key without releasing the RAMP/TIME key until
and
keys.
Model CVC
email
keys. The time delay can be set from
:
INfO
@
CTONINdusTrIes
key. To reduce the output,
key without releasing the
and
and
keys. To store
.
keys. To
COm