DM163024 Microchip Technology, DM163024 Datasheet - Page 20
DM163024
Manufacturer Part Number
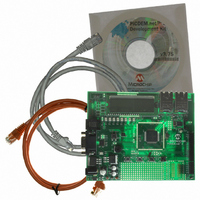
DM163024
Description
BOARD DEMO PICDEM.NET 2
Manufacturer
Microchip Technology
Series
PICDEM.net™ 2r
Type
Controllers & Processorsr
Specifications of DM163024
Main Purpose
Interface, Ethernet Control
Embedded
Yes, MCU, 8-Bit
Utilized Ic / Part
ENC28J60, PIC18F97J60
Primary Attributes
Ethernet Controller and MCU, 2 LCDs, Temp Sensor
Ethernet Connection Type
10 Base-T
Data Rate
10 Mbps
Memory Type
EEPROM
Interface Type
RS-232, RS-485, Ethernet
Operating Voltage
9 V
Operating Temperature Range
- 40 C to + 85 C
Data Bus Width
8 bit
Product
Modules
For Use With/related Products
PIC18F97J60
Lead Free Status / RoHS Status
Lead free / RoHS Compliant
Secondary Attributes
-
Lead Free Status / Rohs Status
Lead free / RoHS Compliant
Other names
Q3022084
Q3397595
Q3397595
Available stocks
Company
Part Number
Manufacturer
Quantity
Price
Company:

Part Number:
DM163024
Manufacturer:
Microchip Technology
Quantity:
135
Company:
Part Number:
DM163024
Manufacturer:
MICROCHIP
Quantity:
12 000


PICDEM.net™ 2 Development Board User’s Guide
2.5
DS51623B-page 16
CONFIGURING THE PICDEM.net 2 DEVELOPMENT BOARD
2.4.3
Once the PICDEM.net 2 Development Board is properly connected and powered up,
you should see all of the following:
• User LED D8 (tied to RJ0) is blinking
• User LEDs D1 through D7 are dark
• The green LINK LED on J1 is lit
• The LCD display shows the message:
If your board does not show all of these things, check all connections with the
power supply and the board. For additional assistance, refer to
Chapter 5. “Troubleshooting”.
If you are using a configuration with a local host system, power the system up now. If
the board and/or local host require IP configuration, proceed to the next section.
Otherwise, skip over to Section 2.6 “Establishing Communications”.
Once the Development Board is properly connected, it needs to be configured to
operate on the network or with the host system that it is connected to. As already men-
tioned, the board is factory-configured for DHCP operation; it should automatically
acquire an IP address on DHCP-enabled networks and be available for immediate use.
If this describes your configuration, you can proceed to Section 2.6 “Establishing
Communications” and begin experimenting.
If your Development Board is connected to a network without DHCP support, you will
need to assign an IP address to the board. Follow the directions in
Section 2.5.2 “Configuring the PICDEM.net 2 Development Board IP Address”.
If your Development Board is directly connected to a host system, you will need to
determine the IP address of the host system (or assign one, if necessary), and then
configure the board’s IP address accordingly. Start with the directions in
Section 2.5.1 “Obtaining the Host IP Address (Host System Configuration
Only)”, then configure the board as described in Section 2.5.2 “Configuring the
PICDEM.net 2 Development Board IP Address”.
2.5.1
This process will vary, depending on the operating system used on the host system and
the absence or presence of DHCP configuration on the host system. The procedure
given here is specific to later versions of the Microsoft Windows operating system
(i.e., Windows NT4/2000/XP). If you are unsure if your network uses DHCP to assign
individual machine IP addresses, contact your network support group.
TCPStack v3.75
If the network uses DHCP, the display should change after a moment to:
TCPStack v3.75
?.?.?.?
where “?.?.?.?” is the board IP address as assigned by your network server.
Note:
Confirming Operation
Obtaining the Host IP Address
(Host System Configuration Only)
The actual version of the firmware will be reflected in the first line of the LCD
display. Version 3.75 is the revision available at the time this manual was
prepared. Your display may differ.
© 2007 Microchip Technology Inc.
Related parts for DM163024
Image
Part Number
Description
Manufacturer
Datasheet
Request
R

Part Number:
Description:
Manufacturer:
Microchip Technology Inc.
Datasheet:
Part Number:
Description:
Manufacturer:
Microchip Technology Inc.
Datasheet:
Part Number:
Description:
Manufacturer:
Microchip Technology Inc.
Datasheet:
Part Number:
Description:
Manufacturer:
Microchip Technology Inc.
Datasheet:
Part Number:
Description:
Manufacturer:
Microchip Technology Inc.
Datasheet:
Part Number:
Description:
Manufacturer:
Microchip Technology Inc.
Datasheet:
Part Number:
Description:
Manufacturer:
Microchip Technology Inc.
Datasheet:
Part Number:
Description:
Manufacturer:
Microchip Technology Inc.
Datasheet: