R0K5211B4S000BE Renesas Electronics America, R0K5211B4S000BE Datasheet - Page 5
R0K5211B4S000BE
Manufacturer Part Number
R0K5211B4S000BE
Description
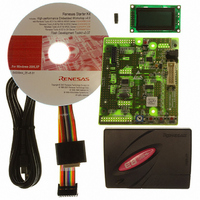
KIT DEV EVALUATION R8C/1B
Manufacturer
Renesas Electronics America
Series
Renesas Starter Kits (RSK)r
Type
MCUr
Datasheet
1.R0K5211B4S000BE.pdf
(6 pages)
Specifications of R0K5211B4S000BE
Contents
CPU Board, LCD Display Module, E8 Emulator, Cable, QuickStart Guide and CD-ROM
For Use With/related Products
R8C/1B
Lead Free Status / RoHS Status
Not applicable / Not applicable


26. Select the Debug build configuration in the left hand drop
27. Click on the “Build” icon to compile, assemble and link the project.
4. Programming and Debug
28. Ensure the “SessionR8C_E8a_SYSTEM” session in the
29. Click the <Connect> button on the debug toolbar.
30. The “Emulator mode” dialog will be shown. Select the
31. Select “Erase Flash and Connect”.
32. If the E8a is to provide power to the CPU board,
33. Click <Next>.
34. Ensure the “Enable advanced setting” checkbox is clea
35.
3
6. Accept any dialog warning that an older version of E8a firmware is necessary to work with the application. Allow
down list on the toolbar.
right hand drop down list on the toolbar is selected.
correct MCU group and device type (e.g. R8C/1B
Group and R5F211B4 for E8A_RSKR8C1B).
select “Power Target from Emulator” and choose the
“5.0V” option.
Click <Next>, then <Finish>.
download of firmware to complete, this may take several seconds.
Please note that the “Emulator mode” dialog
shown here will only appear the FIRST time you
connect to the target within a project. On
subsequent connections the “Emulator setting”
dialog will appear, please choose the same
options to connect.
Otherwise connect a 5V centre positive supply.
The connection to the Renesas Starter Kit will be completed and will activate the debugger buttons on the
High-performance Embedded Workshop toolbar.
red. Set the firmware location to “User Flash Area”.
Related parts for R0K5211B4S000BE
Image
Part Number
Description
Manufacturer
Datasheet
Request
R

Part Number:
Description:
KIT STARTER FOR M16C/29
Manufacturer:
Renesas Electronics America
Datasheet:

Part Number:
Description:
KIT STARTER FOR R8C/2D
Manufacturer:
Renesas Electronics America
Datasheet:

Part Number:
Description:
R0K33062P STARTER KIT
Manufacturer:
Renesas Electronics America
Datasheet:

Part Number:
Description:
KIT STARTER FOR R8C/23 E8A
Manufacturer:
Renesas Electronics America
Datasheet:

Part Number:
Description:
KIT STARTER FOR R8C/25
Manufacturer:
Renesas Electronics America
Datasheet:

Part Number:
Description:
KIT STARTER H8S2456 SHARPE DSPLY
Manufacturer:
Renesas Electronics America
Datasheet:

Part Number:
Description:
KIT STARTER FOR R8C38C
Manufacturer:
Renesas Electronics America
Datasheet:

Part Number:
Description:
KIT STARTER FOR R8C35C
Manufacturer:
Renesas Electronics America
Datasheet:

Part Number:
Description:
KIT STARTER FOR R8CL3AC+LCD APPS
Manufacturer:
Renesas Electronics America
Datasheet:
Part Number:
Description:
KIT STARTER FOR RX610
Manufacturer:
Renesas Electronics America
Datasheet:

Part Number:
Description:
KIT STARTER FOR R32C/118
Manufacturer:
Renesas Electronics America
Datasheet:

Part Number:
Description:
KIT DEV RSK-R8C/26-29
Manufacturer:
Renesas Electronics America
Datasheet:

Part Number:
Description:
KIT STARTER FOR SH7124
Manufacturer:
Renesas Electronics America
Datasheet:

Part Number:
Description:
KIT STARTER FOR H8SX/1622
Manufacturer:
Renesas Electronics America
Datasheet:

Part Number:
Description:
KIT DEV FOR SH7203
Manufacturer:
Renesas Electronics America
Datasheet: