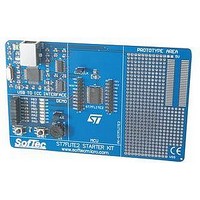
PK-ST7FLITE2 SofTec Microsystems SRL, PK-ST7FLITE2 Datasheet - Page 2

PK-ST7FLITE2
Manufacturer Part Number
PK-ST7FLITE2
Description
KIT STARTER USB FOR ST7FLITE2
Manufacturer
SofTec Microsystems SRL
Type
MCUr
Specifications of PK-ST7FLITE2
Contents
Board, Cable, Software, Datasheets and User Manual
Silicon Manufacturer
ST Micro
Features
Built-in Debug, In-Circuit Communication Serial Interface
Kit Contents
Board, Cable, CD
Silicon Family Name
ST7
Silicon Core Number
ST7FLITE2
Core Architecture
ARM
Core Sub-architecture
ARM7TDMI
Rohs Compliant
No
Lead Free Status / RoHS Status
Contains lead / RoHS non-compliant
For Use With/related Products
STMicro ST72FLITE2 (USB)
Lead Free Status / RoHS Status
Contains lead / RoHS non-compliant, Contains lead / RoHS non-compliant
Other names
520-1030
PK-ST7FLITE2
Quickstart Tutorial
1
4
6
Start Working in Minutes!
This QuickStart Tutorial has been designed to get you started with the PK-
ST7FLITE2 in minutes. You will setup the instrument and run your first
application in less than 10 minutes.
Found New
Hardware Wizard
The first time PK-ST7FLITE2 is connected to the PC, Windows recognizes the
instrument and starts the “Found New Hardware Wizard” procedure, asking
you to specify the drivers to use for the instrument.
The procedure is slightly different on each version of Windows. On Windows
XP, select the “Install the software automatically” option and click on the
“Next” button.
Be sure not to specify any drive or optional location where to look for the
driver, since it has already been installed on your hard disk by the PK-ST7
Series System Software setup.
Start a Debugging
Session
Select Debug > Start Debugging from the main menu. STVD7 will display the
source code with the Program Counter pointing to the first instruction,
alongside of the Disassembly window.
Note: both Windows 2000 and Windows
XP may issue a warning during the
“Found New Hardware Wizard”
procedure. This warning is related to the
fact that the USB driver used by PK-
ST7FLITE2 is not digitally signed by
Microsoft, and Windows considers it to
be potentially malfunctioning or
dangerous for the system. However, you
can safely ignore the warning, since
every kind of compatibility/security test
has been carried out by SofTec
Microsystems.
Copyright © 2004 SofTec Microsystems®. DC00737
1. “USB to ICC Interface” Section
Contains the circuitry needed to
electrically and logically translate
ICC-like commands sent by the host
PC through the USB cable to the ICC
interface of the microcontroller. The
PK-ST7FLITE2 board is powered by
the USB bus.
2
7
Microcontroller Development Tools
1
Install the
Instrument Software
The PK-ST7FLITE2 System Software setup program is located on the SofTec
Microsystems “System Software” CD-ROM provided with the instrument. The
setup program will copy the required files (including the USB driver) to your
hard drive.
2. “Demo” Section
Features a RESET push-button, one
user push-button, a potentiometer
and eight user LEDs.
Run the Example
Select Debug > Run from the main menu. The program will be executed
in real-time. By rotating the potentiometer on the demo board, you affect
the results of the A/D conversion, and the binary value of each conversion
is displayed on the LEDs.
www.softecmicro.com
2
To install the PK-ST7FLITE2 System Software, insert
3. “MCU” Section
Contains a soldered, 20-pin
ST7FLITE2 device (in SOIC package)
with connectors to access the I/O
pins of the microcontroller for
expansion prototyping.
the SofTec Microsystems “System Software”
CD-ROM into your computer’s CD-ROM
3
drive. A startup window will
automatically appear. Choose “Install
Instrument Software” from the
main menu. Click on the “Install PK-
ST7 Series” option. Follow the on-
screen instructions.
4
4. “Prototype” Section
You can wire your own circuit here.
The prototype section features both
a standard, thru-hole area (for
mounting traditional components)
and a SMD area (for soldering SMD
components in SOIC package).
3
5
8
http://www.softecmicro.com/
new products, new supported devices,
For the latest software releases,
discussion forums and FAQs,
Run STVD7 and
Open the Example
Start STMicroelectronics Visual Debug for ST7 (STVD7) by selecting Start >
Programs > SofTec Microsystems > PK-ST7 Series > STVD7.
The first time you launch STVD7 you are prompted to enter some toolchain
paths. Click “Yes” and confirm the default values by clicking “OK”. The STVD7
IDE will then open.
Choose File > Open Workspace from the main menu. Select the “adc.wsp”
workspace file that is located under the “\Program Files\SofTec
Microsystems\PK-ST7 Series\STVD7\Samples\PK-ST7FLITE2\Asm\Adc”
directory. Click “Open”.
Congratulations!
Connect the Board
to the PC
Connect PK-ST7FLITE2 to a free USB port on your PC. The green “POWER”
LED on the instrument will turn on.
You have successfully completed this tutorial! You can now
continue to experiment with the STVD7 user interface
(more examples for the PK-ST7FLITE2 board—for both the
Metrowerks and Cosmic C compilers—are provided) and
discover its potentialities (step commands, simple and
complex breakpoints, watch windows, etc.) on your own.
Please also read carefully all of the PK-ST7FLITE2
documentation.
log on to


