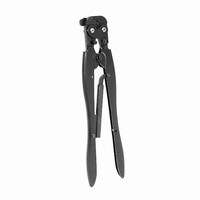
46673 Tyco Electronics, 46673 Datasheet - Page 3
46673
Manufacturer Part Number
46673
Description
TOOL HAND CRIMP STRATO 16-22AWG
Manufacturer
Tyco Electronics
Series
Certi-Crimp™, Strato-Therm™r
Datasheet
1.46673.pdf
(6 pages)
Specifications of 46673
Tool Type
Hand Crimper
Features
Side Entry, Ratchet
Lead Free Status / RoHS Status
Not applicable / Not applicable
For Use With/related Products
Splices and Terminals, 16-22 AWG
Lead Free Status / RoHS Status
na, Not applicable / Not applicable


Rev P
Splice
No Wire Conductor
Strands Protruding
STRATO-THERM Hand Crimping Tools
6. Hold wire in place and close the tool handles
FULLY to crimp the terminal or splice. Allow tool
handles to open FULLY. Remove the crimped
terminal or splice from the crimping jaws.
7. To crimp the other half of the splice, reposition
the uncrimped sleeve in the crimping jaws as
described in Step 3. Follow Steps 4 through 6 to
complete the crimp.
NOTE
8. Inspect the crimp. Refer to Figure 6 for a
properly crimped terminal and splice. Check the
insulation grip on the crimped terminal or splice.
Refer to Section 4, INSULATION CRIMPING
ADJUSTMENT.
i
If the splice cannot be turned around to position
the uncrimped sleeve in the crimping jaws, turn
the tool around.
Terminal
Crimp Centered on
Wire Barrel Sleeve
Wire Barrel
Sleeve
Insulation
Barrel Sleeve
Figure 5
Wire Barrel
Sleeve
Properly Crimped Terminal and Splice
Insulation
Barrel Sleeve
Tyco Electronics Corporation
Figure 6
4. INSULATION CRIMPING ADJUSTMENT
The hand tool has three insulation crimping
adjustment positions to adjust the wire insulation grip:
1—Tight, 2—Medium, and 3—Loose. To obtain the
desired insulation grip, proceed as follows:
Tool 46673 and 46673-1
1 Hashmark
Tool 46988
2 Hashmarks
NOTE
1. Insert insulation crimping adjustment pins into
Position 3 as shown in Figure 1.
2. Position terminal or splice in crimping jaws as
described in Section 3, Step 3.
3. Insert an UNSTRIPPED wire into only the
insulation barrel sleeve of the terminal or splice.
4. Perform a test crimp as described in Section 3,
Step 6. Remove the crimped terminal or splice and
check the insulation support. Bend the wire back
and forth once. The insulation barrel sleeve should
retain grip on the wire insulation. If the wire pulls
out, move the insulation crimping adjustment pins
to the next tighter position (Position 2) and proceed
to Step 5. If the wire does not pull out, the pins are
properly adjusted and the tool is ready for
crimping.
5. Perform another test crimp as described in
Step 4. Adjust pins, as necessary, until the desired
insulation grip is obtained. Do not use a tighter
setting than is required.
NOTE
i
i
The hashmark code on the bottom of the wire
barrel sleeve created by the tool should match
the hashmark code referenced with the
appropriate tool. See Figure 6.
The insulation crimping adjustment pins must be
located in the same adjustment position.
1 Hashmark on
Bottom of Terminal
2 Hashmarks on
Bottom of Splice
408-1535
3 of 6