E-9J 3M, E-9J Datasheet - Page 2
E-9J
Manufacturer Part Number
E-9J
Description
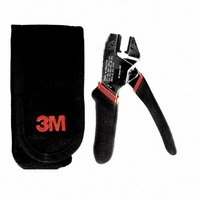
SCOTCHLOK LIGHTWEIGHT CRIMP TOOL
Manufacturer
3M
Series
Scotchlok™r
Specifications of E-9J
Tool Type
Hand Crimper
Features
Side Entry
For Use With/related Products
Splices
For Use With
UY2-25/PACK - SCOTCHLOK BUTT 19-26AWG 25PCSUY2-PK50 - SCOTCHLOK BUTT 19-26AWG 50PCSUY2-JAR500 - SCOTCHLOK BUTT CONN 19-26AWGUY2(BULK) - SCOTCHLOK BUTT CONN 19-26AWGUY(CART) - SCOTCHLOK BUTT 22-26AWG CARTUY(BULK) - SCOTCHLOK BUTT CONN 22-26AWGUR2-25/PACK - SCOTCHLOK BUTT 19-26AWG 25PCSUR2-PK50 - SCOTCHLOK BUTT 19-26AWG 50PCSUR2-JAR500 - SCOTCHLOK BUTT CONN 19-26AWGUR(CART) - SCOTCHLOK BUTT 19-26AWG CARTUR(BULK) - SCOTCHLOK BUTT CONN 19-26AWGUPC(CART) - SCOTCHLOK CLEARING CAP 22-26AWGUP3(CART) - SCOTCHLOK BUTT CONN DRY 19-26AWGUP3-BULK - SCOTCHLOK BUTT CONN DRY 19-26AWGUP2(CART) - SCOTCHLOK BUTT CONN DRY 22-26AWGUCC-JAR500 - SCOTCHLOK CLEARING CAP 22-26AWGUCC(CART) - SCOTCHLOK CLEAR-CAP 22-26 CARTUB2A-25/PACK - SCOTCHLOK BRIDGE 19-26AWG 25PCSUY2100 - SCOTCHLOK BUTT CONN DRY 19-26AWGUY2000 - SCOTCHLOK BUTT CONN 19-26AWGUR2000 - SCOTCHLOK BUTT CONN 19-26AWGUPC1000 - SCOTCHLOK CLEARING CAP 22-26AWGUPB1000 - SCOTCHLOK TAP CONN DRY 22-26AWGUP3000 - SCOTCHLOK BUTT CONN DRY 19-26AWGUP2000 - SCOTCHLOK BUTT CONN DRY 22-26AWGUCC1000 - SCOTCHLOK CLEARING CAP 22-26AWGUB2A1100 - SCOTCHLOK TAP/BRIDGE 19-26AWGUB2A1000 - SCOTCHLOK TAP/BRIDGE 19-26AWGU2A1000 - SCOTCHLOK TRIM-OUT 19-26AWGUR2(BX) - SCOTCHLOK BUTT CONN 19-26AWGUAL27828 - SCOTCHLOK BUTT 19-24AWG CARTUG20082 - SCOTCHLOK TAP/BRIDGE 19-26AWG CUUAL27827 - SCOTCHLOK LOW VOLT GREY (LOOSE)UY14911 - SCOTCHLOK BUTT CONN 22-26AWGUR20074 - SCOTCHLOK BUTT CONN 19-26AWG
Lead Free Status / RoHS Status
Lead free / RoHS Compliant
Other names
0-00-51115-19004-9
00051115190049
5111519004
51115190049
80-6113-1406-5
80611314065
E9J
00051115190049
5111519004
51115190049
80-6113-1406-5
80611314065
E9J


4.0
4.1
4.2
4.3
4.4
5.0
5.1
5.2
3M and Scotchlok are trademarks of 3M Company.
Important Notice
3M Scotchlok connectors and tools are engineered to work together to achieve consistently superior performance in the field. Tools from
other manufacturers may not meet the tight quality tolerances of 3M tools and can damage the crimping and performance of a 3M connector.
Therefore, the published 3M warranty does not extend to any 3M connectors crimped in tools not made by 3M. The warranty on 3M Scotchlok
splicing tools can also be voided if used on non-3M connectors.
All statements, technical information, and recommendations related to 3M’s products are based on information believed to be reliable, but
the accuracy or completeness is not guaranteed. Before using this product, you must evaluate it and determine if it is suitable for your
intended application. You assume all risks and liability associated with such use. Any statements related to the product which are not
contained in 3M’s current publications, or any contrary statements contained on your purchase order shall have no force or effect unless
expressly agreed upon, in writing, by an authorized officer of 3M.
Warranty; Limited Remedy; Limited Liability.
This product will be free from defects in material and manufacture for a period of one (1) year from the time of purchase. 3M MAKES NO
OTHER WARRANTIES INCLUDING, BUT NOT LIMITED TO, ANY IMPLIED WARRANTY OF MERCHANTABILITY OR FITNESS FOR
A PARTICULAR PURPOSE. If this product is defective within the warranty period stated above, your exclusive remedy shall be, at 3M’s
option, to replace or repair the 3M product or refund the purchase price of the 3M product. Except where prohibited by law, 3M will not
be liable for any indirect, special, incidental or consequential loss or damage arising from this 3M product, regardless of the legal
theory asserted.
Communication Markets Division
3M Telecommunications
6801 River Place Blvd.
Austin, TX 78726-9000
800.426.8688
Fax 800.626.0329
www.3MTelecommunications.com
Instructions for use with 3M
Insert the wires into the sides of connector, with the trap door flap toward
the connector to be cut out. Pre-crimp the 211 connector by squeezing
it with your fingers. Position the connector by sliding it up or down the
conductors.
Place the connector between the jaws of the 3M Scotchlok Crimping Tool
E-9J. Ensure the wires remain located within the body of the 211connector.
Rest the connector against the step in the back wall of the crimping jaws
and squeeze the handles of the E-9J tool.
Complete termination of the connector is achieved by full closure of the
tool handles until the connector cap remains flush with the rim of the
connector body when the tool is released and the separated conductors are
easily removed from the end of 211 connector body.
Close trap door flap to retain sealant material within the connector.
Care and Maintenance
Remove grease, dirt and other contaminants with a clean brush or soft lint free cloth. Do not use objects
or materials that may damage the tool or tool handle grips.
Protect internal linkages, pivot points, and bearing surfaces with a thin coat of light weight oil. Wipe
off any excess oil and return tool to the supplied tool pouch. Store the tool and pouch in a clean, dry
location.
Recycled paper
40% Pre-consumer waste paper
10% Post-consumer waste paper
™
Scotchlok
™
Connector 211
© 3M 2005 78-8135-2332-7-B