64001-0400 Molex Inc, 64001-0400 Datasheet - Page 2
64001-0400
Manufacturer Part Number
64001-0400
Description
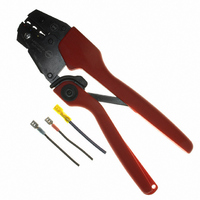
TOOL HAND CRIMP 10-22 AWG
Manufacturer
Molex Inc
Series
Insulkrimp®r
Datasheets
1.64016-0201.pdf
(1 pages)
2.19284-0034.pdf
(27 pages)
3.64001-0400.pdf
(6 pages)
4.64001-0400.pdf
(6 pages)
Specifications of 64001-0400
Features
Side Entry, Ratchet
Tool Type
Hand Crimper
Product
Crimping, Stripping & Cutting Tools & Drills
Fits Cable/wire
22-10 AWG
Crimp Size
22AWG To 10AWG
Lead Free Status / RoHS Status
Not applicable / Not applicable
For Use With/related Products
Quick Connects Terminals, 10-22 AWG
For Use With
WM18722 - CONN FEMALE FO .250 14-16AWG BLUWM18721 - CONN FEMALE FO .250 18-22AWG REDWM18760 - CONN .110" FEMALE INSUL 18-22AWGWM18759 - CONN .187" FEMALE INSUL 18-22AWG19003-0047 - .250 FEMALE INSULATED 14-16 AWG19003-0059 - QUICK DISCONN FEMALE 14-16 AWGWM5929 - CONN .250" FEMALE INSUL 14-16AWGWM5928 - CONN .187" FEMALE INSUL 18-22AWGWM18241 - CONN .250" FEMALE INSUL 10-12AWGWM18240 - CONN .187" FEMALE INSUL 14-16AWGWM18239 - CONN .250" FEMALE INSUL 14-16AWGWM18238 - CONN .187" FEMALE INSUL 18-22AWGWM18237 - CONN .250" FEMALE INSUL 18-22AWG
Lead Free Status / Rohs Status
Lead free / RoHS Compliant
Other names
064001-0400
064001-0400-E
0640010400
0640010400-E
64001-0400-E
64001-0400
640010400
640010400-E
Q1905044
Q2941097
WM1622
064001-0400-E
0640010400
0640010400-E
64001-0400-E
64001-0400
640010400
640010400-E
Q1905044
Q2941097
WM1622


RHT 1994 Hand Crimp Tool
Doc No. 64001-0400
Revision: G
OPERATION
Open the tool by first closing the jaws sufficiently for the ratchet mechanism to
release.
Crimping Terminals
1. There are 2 Tab Locator Blades supplied with the tool. One is for .187 and .250
2. Push the terminal onto the tab locator all the way to the stop in the proper color-
3. Partially close the tool to hold the terminal in place (See Figure 2).
4. Insert the properly stripped wire into the terminal barrel (See Figure 2 and 3). The wires end should butt against the wire stop
5. Remove the crimp and inspect for proper crimp location. Molex offers a Crimp Inspection Handbook for closed barrel industrial
Tabs; the other is for .205 Tabs and .110 Tabs. Make sure the proper blade is
installed on the top of the locator and the other is stored on the bottom of the
locator.
coded nest. The Barrel of the terminal should be up (See Figure 1).
stamped into each terminal. Cycle the tool.
Note: The tamper proof ratchet action will not release the tool until it has been fully closed.
product. See our website or contact your sales engineer.
Note: Whenever crimping without the locator, make sure the seam of the terminal is oriented up or down in the tool if using
unbrazed product, as this will provide higher pull force values.
TERMINAL
Figure 2
Release Date: 09-20-02
Revision Date: 07-21-05
WIRE
LOCATOR
2
UNCONTROLLED COPY
ND
WIRE STOP BUILT
INTO TERMINAL
TAB LOCATOR
TERMINAL
CONDUCTOR
ANVIL
CONDUCTOR
PUNCH
LOCATOR
Figure 3
Figure 1
TAB LOCATOR
TERMINAL
PUNCH
INSERT
BARREL
JAWS OPEN
INSERT
ANVIL
Page 2 of 6
WIRE
TERMINAL