59287-2 Tyco Electronics, 59287-2 Datasheet - Page 7
59287-2
Manufacturer Part Number
59287-2
Description
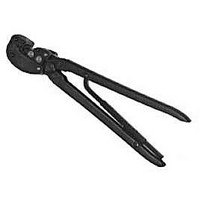
TOOL HAND HEAVY PIDG 10-12AWG
Manufacturer
Tyco Electronics
Series
PIDG™, Plasti-Grip™r
Specifications of 59287-2
Features
Side Entry, Ratchet
Tool Type
Hand Crimper
Wire Size (awg)
16-10
Insulator Material
Non-Insulated
Lead Free Status / RoHS Status
Not applicable / Not applicable
For Use With/related Products
Splices and Terminals, 10-12 AWG and 14-16 AWG HD
For Use With
8-324918-2 - CONN RING 10-12AWG #10 YELLOW323784 - CONN RING 10-12AWG #1/2 YELLOW8-320576-2 - CONN RING 10-12AWG #5/16 YELLOW130203 - CONN RING 10-12AWG #M5 YELLOW8-35787-2 - CONN RING 10-12AWG #8 YELLOW8-35364-2 - CONN RING 10-12AWG #10 YELLOW8-35109-5 - CONN RING 10-12AWG #10 YELLOW8-35107-2 - CONN RING 10-12AWG #6 YELLOW34512 - CONN TERM PIDG RECT 10-12AWG #68-35108-1 - CONN RING 12-10AWG #8 PIDG8-35149-2 - CONN RING 12-10AWG #6 PIDG324543 - CONN TAB TONG 12-10AWG PIDG8-35109-1 - CONN RING 12-10AWG #10 PIDG8-35110-1 - CONN RING 12-10AWG #1/4 PIDG329697 - TERMINAL PIDG RECT 12-10AWG #652077 - TERMINAL RING TONGUE SZ 1/2 YELA99253 - CONN SPLICE KNIFE 12-10AWG PIDG151795 - CONN LIPPED BLADE 12-10AWG TIN130690 - CONN RING TONG 12-10AWG M10 PIDG130679 - CONN RING TONG 12-10AWG 5MM130667 - CONN RING TONG 12-10AWG M6 PIDG130491 - CONN RING TONG 12-10AWG M6 PIDG130466 - CONN RING TONG 12-10AWG M5 PIDG130446 - CONN RING TONG 12-10AWG M4 PIDG130207 - CONN RING TONG 12-10AWG M10 PIDG130205 - CONN RING TONG 12-10AWG M6 PIDG160298 - CONN RING TONGUE 12-10AWG PIDG160138 - CONN RING TONGUE 12-10AWG PIDG130171 - CONN RING TONGUE 12-10AWG PIDG130167 - CONN RING TONGUE 12-10AWG PIDG8-35762-2 - KNIFE DISCONNECT,PIDG 12-108-35273-2 - TERMINAL,PIDG R 12-10 1/48-320577-2 - TERMINAL,PIDG R 12-10 3/82-323762-1 - CONN RING TONG 12-10AWG #10 PIDG8-35346-2 - CONN RING TONGUE 12-10AWG #5/168-35345-2 - CONN RING TONGUE 12-10AWG #1/48-35148-1 - CONN RING TONGUE 12-10AWG #48-324543-1 - CONN TERM TAB 12-10AWG PIDG8-320567-2 - CONN RING TONGUE 12-10AWG #6696020-1 - CONN RING TONGUE 12-10AWG #654773-1 - CONN MULT STUD 12-10AWG #10,8,6327966 - CONN RECT TONGUE 12-10AWG #4165028 - TERM RING TONG 12-10AWG PIDG151471 - TERM BLADE STR 12-10AWG TIN324615 - CONN RING TONG 12-10AWG #5/8165034 - CONN RING TONG 12-10AWG #1/48-320634-2 - TERM RING TONGUE 12-10AWG PIDG331467 - CONN RING TONGUE 12-10AWG #1/2329389 - CONN RING TONGUE 12-10AWG #10327954 - CONN RECT TONGUE 12-10AWG #5327948 - CONN RECT TONGUE 12-10AWG #835604 - CONN RING TONGUE 12-10AWG #6331268 - CONN RECT TONGUE 12-10AWG #88-324915-1 - CONN RING TONGUE 10-12AWG PIDGA28077 - CONN RING 10-12 AWG #3/8 PIDGA27282 - CONN RING 10-12 AWG #10 YEL PIDGA27278 - CONN RING 10-12 AWG #8 YEL PIDGA27290 - CONN RING 10-12 AWG #5/16 PIDGA27288 - CONN RING 10-12 AWG #1/4 PIDGA27280 - CONN RING 10-12 AWG #8 YEL PIDGA27276 - CONN RING 10-12 AWG #6 YEL PIDGA27291 - CONN RING 10-12 AWG #3/8 PIDGA27273 - CONN RING 10-12 AWG #6 YEL PIDG2-327960-1 - TERMINAL,PIDG RECT 12-10 68-36161-2 - CONN RING 10-12 AWG #10 PIDG8-35111-1 - CONN RING 10-12 AWG #5/16 PIDG8-35112-1 - CONN RING 10-12 AWG #3/8 PIDG8-35151-2 - CONN RING 10-12 AWG #1/2A27281 - CONN RING 10-12 AWG 10 YEL PIDGA27274 - CONN RING 10-12 AWG #6 YEL PIDGA27275 - CONN RING 10-12 AWG #6 PIDGA27285 - CONN RING 10-12 AWG #1/4 PIDGA27277 - CONN RING 10-12 AWG #8 PIDG8-320569-2 - CONN RING 10-12 AWG #1/4 PIDG66025-6 - CONN TAB 10-12AWG TERMI-BK PIDG66025-2 - CONN TAB 10-12AWG TERMI-BK PIDGA27279 - CONN RING 10-12 AWG #8 PIDGA27283 - CONN RING 10-12 AWG #10 PIDGA27289 - CONN RING 10-12 AWG #5/16 PIDGA27287 - CONN RING 10-12 AWG #1/4 PIDGA27510 - CONN RING 10-12 AWG #3/8 PIDGA27272 - CONN RING 10-12 AWG #4 PIDGA27286 - CONN RING 10-12 AWG #1/4 PIDGA27284 - CONN RING 10-12 AWG #10 PIDGA09046 - CONN SPLICE KNIFE 10-12AWG PIDGA0894 - CONN RING 10-12 AWG #1/2 PIDGA0893 - CONN RING 10-12 AWG #6 PIDGA1095 - CONN RING 10-12 AWG #5/16 PIDGA1084 - CONN RING 10-12 AWG #3/8 PIDGA1083 - CONN RING 10-12 AWG #1/4 PIDGA1082 - CONN RING 10-12 AWG #10 PIDGA1081 - CONN RING 10-12 AWG #8 PIDG
Lead Free Status / RoHS Status
na, Not applicable / Not applicable
Other names
A27983


Lubricate all pins, pivot points, and bearing surfaces
with any good SAE 20 motor oil as follows:
Wipe excess oil from the tool, particularly from the
crimping area. Oil transferred from the crimping area
onto certain terminations may affect the electrical
characteristics of an application.
This inspection requires the use of plug gages
conforming to the dimensions provided in Figure 9.
To gage the crimping chamber, proceed as follows:
Rev
Tool used in daily production — daily
Tool used daily (occasional) — weekly
Tool used weekly — monthly
1. Close the tool handles until the ratchet releases
and then allow them to open freely. If they do not
open quickly and fully, the spring is defective and
must be replaced. See Section 6, REPLACEMENT
AND REPAIR.
2. Inspect the head for worn, cracked, or broken
crimping dies. If damage is evident, return the tool
for evaluation and repair. See Section 6,
REPLACEMENT AND REPAIR.
1. Remove traces of oil or dirt from the crimping
chamber and plug gage.
2. Insert each insulation crimp adjustment pin into
Position 1. See Figure 10.
3. Close the tool handles until the crimping dies
bottom, and hold in this position. DO NOT force
beyond initial contact.
4. Press and hold the locator down.
5. Carefully insert the GO element into the
crimping chamber as shown in Figure 10; DO NOT
force it. For the wire barrel section of the crimping
chamber, the GO element must pass completely
through the crimping chamber. For the insulation
barrel section, the GO element must pass through
the length of the section but will stop against the
wire barrel section.
i
If gaging the crimping chamber is not required,
inspect the die closure using an alternate
procedure, i.e., the Insulation Crimp Adjustment"
(see Section 4) and Visual Inspection" (see
Paragraph 5.2.B).
Tyco Electronics Corporation
If the crimping chamber conforms to the gage
inspection, the tool is considered dimensionally
correct, and should be lubricated with a THIN coat of
any good SAE 20 motor oil. If not, return the tool for
evaluation and repair. See Section 6,
REPLACEMENT AND REPAIR.
Check the ratchet to ensure that the ratchet does not
release prematurely, allowing the dies to open before
they have fully bottomed. Proceed as follows:
Customer–replaceable parts are listed in Figure 11.
A complete inventory should be stocked and
controlled to prevent lost time when replacement of
parts is necessary. Parts other than those listed
should be replaced by Tyco Electronics to ensure
quality and reliability. Order replacement parts
through your representative, or call 1–800–526–5142,
or send a facsimile of your purchase order to
717–986–7605, or write to:
For customer repair service, call 1–800–526–5136.
6. In the same manner, try to insert the NO–GO
element into the crimping chamber as shown in
Figure 10. The NO–GO element may begin entry,
but may not pass through the crimping chamber.
1. Remove traces of oil or dirt from the bottoming
surfaces of the dies.
2. Obtain a 0.025 mm [.001 in.] shim that is
suitable for checking the clearance between the
bottoming surfaces of the dies.
3. Select a terminal or splice and maximum size
wire for the terminal or splice.
4. Position the terminal or splice in the crimping
chamber according to Section 3, CRIMPING
PROCEDURE. Holding the wire in place, squeeze
the tool handles together until the ratchet releases.
Hold the tool handles in this position, maintaining
just enough pressure to keep the dies closed.
5. Check the clearance between the bottoming
surfaces of the dies. If the clearance is 0.025 mm
[.001 in.] or less, the ratchet is satisfactory. If
clearance exceeds 0.025 mm [.001 in.], the ratchet
is out of adjustment and must be repaired. See
Section 6, REPLACEMENT AND REPAIR.
CUSTOMER SERVICE (038–035)
TYCO ELECTRONICS CORPORATION
PO BOX 3608
HARRISBURG PA 17105–3608
of 9