LS7-38-2 Panduit Corp, LS7-38-2 Datasheet
LS7-38-2
Specifications of LS7-38-2


Related parts for LS7-38-2


LS7-38-2 Summary of contents
Page 1
...
Page 2
CONTENTS Getting Started INTRODUCTION AND SAFE OPERATION .......................................... 2 GENERAL PRECAUTIONS ...................................................................... 4 WARRANTY INFORMATION ................................................................. 5 GENERAL DESCRIPTION ....................................................................... 6 KEYBOARD & LCD DISPLAY ................................................................ 7 BATTERIES ............................................................................................... 8 OPTIONAL AC ADAPTER ........................................................................ 9 TAPE CASSETTE .................................................................................... 10 LABEL ...
Page 3
ii ...
Page 4
Getting started 1 ...
Page 5
... This manual will guide you step by step through the set-up, operation, and troubleshooting of the LS7 Printer. If you have problems not covered herein, contact your local Panduit Sales Representative or call Panduit Technical Support at 866-871-4571 (outside the US, refer to page 70 for contact information). ...
Page 6
Information to USA Users NOTE: This printer has been tested and found to comply with the limits for a Class A digital device, pursuant to Part 15 of FCC rules. These limits are designed to provide reasonable protection against harmful ...
Page 7
... Do not touch the print head mechanism. If the head is touched, clean it immediately with a cotton s wab to avoid permanent damage. Do not pull on the tape being fed from the LS7. This may damage the tape cassette. CAUTI ON: Observe the following cautions in order to prevent malfunction of the LS7 ...
Page 8
WARRANTY INFORMATION Our products are warranted to be free from defects in material and workmanship at the time of sale but our obligation under this warranty is limited to the replacement of any product proved to be defective within 6 ...
Page 9
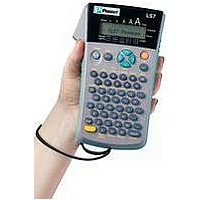
GENERAL DESCRIPTION TOP VIEW Tape cutte r lever BOTTOM VIEW Battery compartment Tape compartment 6 AC adapter connector Ba ck cover Tape release lever Print head Tape exit slot ...
Page 10
... Align Length key Page key Caps Z C Code X Repeat Serialize Barcode Legend Repeat legend key Serialize key LS7 Auto Underline Frame Length Cursor keys Home Power key File Return / File memory key End Underline Frame Clear Backspace key ¢ Mirror Accent ...
Page 11
BATTERIES This lightweight and portable machine can be used anywhere by installing six (6) AA (AM3, LR6) alkaline batteries. When changing the batteries, always replace all six at the same time. To change the batteries: 1 Remove the back cover ...
Page 12
... OPTIONAL AC ADAPTER The AC adapter (LS7-ACS) allows you to use this machine wherever there is an electrical outlet. To connect the optional AC adapter: 1 Insert the plug on the adapter cord into the connector marked DC IN 9.5V on the bot- tom end of the machine. 2 Insert the plug on the adapter into the nearest standard electrical outlet. ...
Page 13
... TAPE CASSETTE A single LS7 tape cas sette is supplied with this unit. This machine has been designed to allow the tape cassette to be changed quickly and easily. To change the LS7 tape cassette: 1 Remove the back cover by pressing in on the rough area at the top end of the machine and pulling off the cover ...
Page 14
... The Label Code is printed on the cassette and can be viewed with the cassette either unloaded or loaded in the printer. The majority of tape cass ettes do not require manual entry of a Label Code. EXAMPLE To enter a Labe l Code using LS7-50-1: File Size Press . Printer is now re ady 1 for operation ...
Page 15
LAMINATED INDUSTRIAL TAPE SEPARATOR TOOL LAMINATED INDUSTRIAL TAPE The enclosed tape separator enables you to easily remove the backing from labels printed on laminated tapes. 1 Hold the tape in one hand, with the printed surface facing up, and hold ...
Page 16
... Rollers dry cotton swab to wipe each roller with an up-and-down motion while rotating them with your finger. 4 Install a tape cassette, attach the back cover, and then try printing again dus t still remains, use Panduit Cleaning Cassette (LS7-CLN). If none of the above works, contact Technical Support at 866-871-4571. 13 ...
Page 17
Print head 14 Print head Rollers Cotton swab Gently wipe off this black line. ...
Page 18
TAPE CUTTER With use, the tape cutter may become covered with adhesive, making it difficult to cut the tape. If the tape cannot be cut correctly, clean the tape cutter blades as explained below. To avoid injuries, be extremely careful ...
Page 19
... CARRYING CASE The enclos ed hard case is designed to protect your LS7 and its acces sories while you store or carry them. Therefore, keep them in this carrying case whenever they are not being used. Before opening the carrying case, be sure that the side with the Panduit logo faces upward. ...
Page 20
For your information 17 ...
Page 21
POWER KEY The power key ( ) is located in the top right-hand corner of the keyboard. If batteries have been installed or the machine has been plugged in using the optional AC adapter, the previous session’s information is displayed ...
Page 22
CODE & CAPS KEYS Most characters can be entered simply by pressing their keys. However, to use special func- tions or to enter capital letters, accented characters and s ome symbols, the following special keys are necessary. CODE KEY To ...
Page 23
CAPS KEY To type capital letters continuous ly: 1 Press until the Caps indicator ( Caps 2 Press the keys of the desired letters. To exit Caps mode, press Caps EXAMPLE To type in “JOHN”: 1 Press once. Caps " ...
Page 24
CURSOR KEYS The machine’s LCD dis play shows two rows of 11 characters; however, the text that you cre- ate can characters long. You can review and edit your text by using the cursor Home keys ...
Page 25
UP CURSOR KEY To move the cursor up to the previous line: Home Pres s once. To move the cursor up several lines: Home Hold down until the cursor moves to the desired pos ition. To move the cursor to ...
Page 26
SPACE KEY The Space key lets you add blank spaces between characters in your text different from the right cursor key ( ), which just moves the curs or without adding blank spaces. To add a space: Press ...
Page 27
RETURN KEY Like on a typewriter or word process or, this machine’s return key ( line of text and start another one. When you have finished entering one line of text, press the return key to add a return mark ...
Page 28
To add a new line of text: Home 1 Press , , or to position the cursor to the right of the character that End will end the line. File 2 Press . The return mark ( ) appears at ...
Page 29
To apply a selected item: File Pres s once. EXAMPLE To add “ ” to your text: Feed Press once Sym. T hen selec t , File T hen Rotate A Auto + = Underline ...
Page 30
BACKSPACE KEY Clear The backspace key ( ) allows you to remove characters to the left of the cursor’s current BS position. It differs from the left curs or key ( deleting any characters. The backspace key can also be ...
Page 31
Clear 1 Press once . BS To delete “-678”: Clear 2 Hold down until “-678” are BS deleted. To quit a function without changing your text: Clear Pres s to return to your text. BS EXAMPLE To quit the symbol ...
Page 32
CLEAR FUNCTION The clear function is used to remove all characters from the display so that you can begin entering new text. Although all of the text is erased, the Caps mode does not change. To delete all of the ...
Page 33
ACCENT FUNCTION The accent function can be used to add accented characters to your text. The accented characters are grouped according to the capital or lowercas e letter that they are combined with. The following accented characters are available: Letter ...
Page 34
EXAMPLE To add the ac cented character “Ë”: Accent 1 Hold down and press . O Code 2 Press . Caps Page 3 Press . E 4 Press until “ Ë” flashes. File 5 Press . ...
Page 35
SYMBOL FUNCTION In addition to the letters, symbols and numerals on the key tops, there are 9 additional marks available with the symbol function. These symbols are shown below. Symbols Fiber Data Fax Phone Optic To type in a symbol: ...
Page 36
EXAMPLE To add the symbol “ ”: Feed 1 Press . Sym. 2 Press or until “ flashes. File 3 Press . ” Rotate A Auto + = Underline 1 Frame Caps ...
Page 37
LENGTH FUNCTION Although the length of the printed label automatically adjusts to fit the length of the entered text, there may be times when you will want to make a label with a specific length. The length function allows you ...
Page 38
EXAMPLE To select a labe l length of 10.5": Length 1 Hold down and press Code Q once. 2 Keep held down and continue Code Length pre ssing until ON is displayed Relea se . Code 4 Press ...
Page 39
SIZE FUNCTION The character size of the entire text can be adjus ted using the size function. Since the character s ize that can be used depends on the width of the tape, the following table shows the character sizes ...
Page 40
Tape width 1/4” 3/8” 1/2” ...
Page 41
the 24 point size setting: 2 While still holding down , con- Code Size tinue pressing until 24 is displayed Release . Code Rotate A Auto ...
Page 42
UNDERLINE FUNCTION You can add emphasis to your text by underlining it. The default underline setting is OFF. When the underline function ON, the Under- line indicator on the right s ide of the display lights ...
Page 43
FRAME FUNCTION With the frame function, you can choose from various frames and highlights to make more decorative or emphasized text. The following frame settings are available: OFF DIAMOND ROUND SLANT DOT The default frame setting is OFF. When any ...
Page 44
EXAMPLE To select the DOT frame setting: 1 While holding down , press Code Frame once , and keep held 9 Code down. 2 While still holding down , con- Code Frame tinue pressing until DOT is dis- 9 played. ...
Page 45
HORIZONTAL ALIGNMENT FUNCTION You can choose to align lines in the text in one of three ways. In addition, if the length func- tion was used to set the length of the label, the text will align within the label ...
Page 46
MIRROR PRINTING FUNCTION With this function, you can print your text so that the characters can be read from the adhe- sive side of the tape. If mirror-printed labels are attached to glass or some other clear mate- rial, they ...
Page 47
PRINT KEY, COPIES & FEED FUNCTIONS After you have entered your text and chos en the desired format s ettings, you are ready to print the label. To print a label: Copies Press Print Print once. The message “COPIES 01/01” ...
Page 48
SERIALIZATION FUNCTION This function can be used to print many copies of the s ame text while increasing a certain value in the text after each label is printed. This type of automatic incrementation is very us e- ful when ...
Page 49
Hold down Code Serialize 3 Relea se . Code File Size 4 Press . File 5 Press 0 4 File Size 6 Press Serialization is displayed ...
Page 50
ROTATE LEGEND FUNCTION The rotate legend function is used when a label mus t be oriented vertically yet read horizon- tally. A common need for this function is terminal block labeling. To enable the rotate legend function: 1 Hold down ...
Page 51
V and press 3 Hold down Code Serialize until NUMERIC is displayed . 4 Release Code File Size 5 Press . 0 1 File Size 6 Press . 0 1 File Size 7 Press . Serialization is ...
Page 52
... Hold down and press Code Rotate When Repeat Legend is enabled, Length able is 6 pt. Uses: Wire and cable marking EXAMPLE To print a wire marker with length of 1.0” that reads “D101” using LS7-75-1 cassette: X and 1 Hold down press Code Repeat Legend until ON is displa yed. Release ...
Page 53
Length 3 Hold down and press Code Q until ON is displayed. Release Code Size 4 Press File . Size Size 5 Press . Copies 6 Press . Print Print ...
Page 54
LINE DRAWING FUNCTION The line function is used to separate legends for easier recognition. The line function has two vertical line positions (left and right edge) and three horizontal positions (label top, every line and label bottom). To enable/dis able ...
Page 55
Size 4 Press . 1 V and press 5 Hold down Code Serialize Release . Code File 6 Press . 0 0 File Line 7 Press . 0 3 File Size . 8 Press 0 1 Copies . 9 Press ...
Page 56
PAGE FUNCTION The page function is used to group multiple labels in a file. A file is a document consisting pages (labels). The page function is useful when labeling a group of items that have non-s ...
Page 57
Line 3 Press A (page 1 Page 4 Hold down and press Code E until LABEL PAGE 2 is displayed. Release . Code @ Underline 5 Press Page 6 Hold down ...
Page 58
MEMORY FILE FUNCTIONS You can use the memory to store your most frequently us ed text files. The text remains in the memory, even after all characters are removed from the display using the clear function (see page 29). When ...
Page 59
To overwrite the stored file with the new one: File Pres s to delete the previously s tored file and store the new one under the selected number back and choos e another file number without overwriting the ...
Page 60
To quit the file delete function without deleting the text file, hold down File and press (or pres s just Size Frame 4 Press the key ( the file number containing the text that you wish to ...
Page 61
To recall the te xt from file number 4: File 1 Hold down and press . Code 2 Press until RECALL flashes on the display. File 3 Press . $ 4 Press . 4 File 5 Pre ...
Page 62
To delete the te xt stored under file number 8: File 1 Hold down and press . Code Rotate Repeat Legend 2 Press until CLEAR flashes on the Rotate display. Repeat Legend File 3 Press . Rotate Repeat Legend 4 ...
Page 63
BARCODE FUNCTION The barcode function enables barcodes to be printed as part of labels. Four different param- eters enable you to create custom barcodes . Parameter PROTOCOL CODE 39 WIDTH (barcode width) LARGE, SMALL HUMAN READABLE (numbers printed below bar- ...
Page 64
N and press . Barcode 2 Type in the new barcode data or edit the old data. To change the barcode parameter settings: Home 1 Press . To return to the barcode data display without changing any parameter settings, Clear ...
Page 65
To delete the barcode from your text: Home 1 Press , , or End half of the barcode mark or immediately to the right of the entire barcode mark. Clear 2 Press . The message “OK TO CLEAR? BS File ...
Page 66
EXAMPLE To add a barcode to the label Hold down and press . Code Barcode Home 2 Press . 3 Press until the CHECK DIG. parameter is displayed. Home 4 Press or until ON is dis- End playe ...
Page 67
Size @ $ Line 6 Press , , , , then Line . 5 File 7 Press . Rotate A Auto Underline ...
Page 68
... If you are using alkaline batteries, they may be not formed properly. low. Try using the AC adapter or replace the batteries with new ones . • Check that the correct AC adapter (LS7-ACS) is being used and that it is connected correctly blank horizontal white • Clean the print head as explained on page 13 and line appears through the 14 ...
Page 69
ERROR MESSAGE LIST Error Cause Message 1 BAR CODE • This message appears LABEL barcode has already been added to the label when you hold down Code N . Barcode 1 SERIALIZE • This message appears if ...
Page 70
... Remove the high-voltage adapter and connect the AC adapter (LS7-ACS). • Install a tape cass ette. • Install a Panduit (green colored) tape cas sette. • Remove the back cover of the printer and re-install cas sette in printer ...
Page 71
Error Cause Message FUNCTION • This message appears if NOT ALLOWED! Size, Frame or Barcode is set when Rotate function is being selected. • This mess age appears if Size is set when Repeat Legend function is being s elected. ...
Page 72
Error Cause Message SET • This message appears if LENGTH! length has not been set when Rotate and Repeat Legend are selected. SYSTEM • This message appears if ERROR! there is a problem with the machine’s software. TEXT • This ...
Page 73
... Power supply: Six AA (AM3, LR6) alkaline batteries or optional AC adapter (LS7-ACS) Auto power-off if no key is pressed for 5 minutes Print head: 128 dot/180 dpi Dimensions: 4 3/4” (121 mm) (W) Weight: 1.1 lbs. (520 g) (without a tape cass ette and batteries installed) ...
Page 74
...