A3GT-99D0-R Omron, A3GT-99D0-R Datasheet - Page 17
A3GT-99D0-R
Manufacturer Part Number
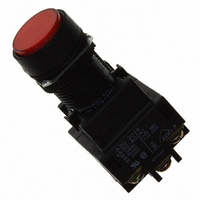
A3GT-99D0-R
Description
SWITCH ALT ACTION PB ROUND RED
Manufacturer
Omron
Series
A3Gr
Type
Standardr
Datasheet
1.A3GT-99C0-B.pdf
(18 pages)
Specifications of A3GT-99D0-R
Circuit
DPDT
Switch Function
On-On
Contact Rating @ Voltage
5A @ 125VAC
Actuator Type
Round Button
Mounting Type
Panel Mount
Termination Style
Screw Terminal
Lead Free Status / RoHS Status
Lead free / RoHS Compliant
Illumination Type, Color
-
Illumination Voltage (nominal)
-
Other names
A3GT99D0R
SW173
SW173


A3G
Mounting
After installing the main unit, mount the socket unit on the panel surface.
Insert the switch unit from the front of the panel. Place the lock
fitting and mounting nut on the terminal side and tighten the
mounting nut. For the IP65 type, use the rubber seal. Align the
anti-turn piece with the grooves and insert it so that the edge
section faces the panel. Tighten the mounting to a torque of
10 kg-cm or less.
Fit the spring mounting clip for snap-in mounting
to the switch unit. Insert the tab of the spring
mounting clip into the two grooves on the
threaded part of the switch unit.
Note: Be sure to use two spring mounting clips
Mount the socket to the switch unit. As the socket mounts to the
switch unit in only one direction, the white mark on the switch unit
and that on the socket must be aligned for mounting.
Press the Lock button on the socket and pull to remove.
Pull straight off when removing the socket.
NUT MOUNTING
SNAP-IN MOUNTING
SOCKET MOUNTING
REMOVING SOCKET
and see that each is firmly inserted into the
grooves. Do not use for IP65-type
switches.
Insert the switch unit from the front of the
panel and secure it.
Spring mounting clip
Panel
Edge
Lock fitting
Groove
White mark
Spring mounting clip
Push the tabs of the spring mounting
clips firmly into the grooves
Mountibg nut
White mark
A3G
17
Related parts for A3GT-99D0-R
Image
Part Number
Description
Manufacturer
Datasheet
Request
R

Part Number:
Description:
SWITCH PB ROUND BLACK
Manufacturer:
Omron
Datasheet:

Part Number:
Description:
SWITCH ALT ACTION PB ROUND BLK
Manufacturer:
Omron
Datasheet:

Part Number:
Description:
SWITCH DPDT PB ILLUM WHITE
Manufacturer:
Omron
Datasheet:
Part Number:
Description:
SWITCH DPDT PB ILLUM GREEN
Manufacturer:
Omron
Datasheet:
Part Number:
Description:
SWITCH DPDT PB ILLUM RED
Manufacturer:
Omron
Datasheet:
Part Number:
Description:
SWITCH ALT ACTION PB ILLUM RED
Manufacturer:
Omron
Datasheet:
Part Number:
Description:
SWITCH ALT ACTION PB ILLUM GRN
Manufacturer:
Omron
Datasheet:
Part Number:
Description:
SWITCH ALT ACTION PB ILLUM WHT
Manufacturer:
Omron
Datasheet:
Part Number:
Description:
SWITCH PB ROUND RED
Manufacturer:
Omron
Datasheet:
Part Number:
Description:
SWITCH PB ROUND GREEN
Manufacturer:
Omron
Datasheet:
Part Number:
Description:
SWITCH PB ROUND YELLOW
Manufacturer:
Omron
Datasheet:
Part Number:
Description:
SWITCH ALT ACTION PB ROUND GRN
Manufacturer:
Omron
Datasheet:
Part Number:
Description:
SWITCH ALT ACTION PB ROUND YLW
Manufacturer:
Omron
Datasheet:
Part Number:
Description:
SWITCH PB MUSHROOM RED
Manufacturer:
Omron
Datasheet:
Part Number:
Description:
SWITCH ALT ACT PB MUSHROOM RED
Manufacturer:
Omron
Datasheet: