KS01 TME, KS01 Datasheet - Page 2
KS01
Manufacturer Part Number
KS01
Description
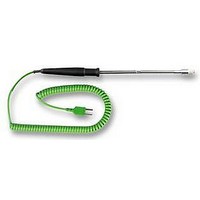
PROBE, SURFACE, RIBBON
Manufacturer
TME
Datasheet
1.KS01.pdf
(3 pages)
Specifications of KS01
No. Of Strands X Strand Size
12 X 0.2mm
Lead Length
2m
Body Material
316 Stainless Steel
Thermocouple Type
K
Temperature Sensing Range
-200°C To +1000°C
Svhc
No SVHC (18-Jun-2010)
Material Composition
Stainless Steel
Available stocks
Company
Part Number
Manufacturer
Quantity
Price
Company:

Part Number:
KS0103
Manufacturer:
SITI
Quantity:
7 760
Part Number:
KS0107B
Manufacturer:
SEC
Quantity:
20 000
Part Number:
KS0107BPCC
Manufacturer:
SAM
Quantity:
20 000
Part Number:
KS0122
Manufacturer:
SEC
Quantity:
20 000
Part Number:
KS0122-S
Manufacturer:
SEC
Quantity:
20 000
Company:
Part Number:
KS0125
Manufacturer:
INTER
Quantity:
3 190
Company:
Part Number:
KS0127B
Manufacturer:
SAMSUNG
Quantity:
319


CALIBRATION PROCEDURE
EQUIPMENT REQUIRED
1. 30mV GENERATOR ACCURATE TO WITHIN ±4uV
2. THERMOCOUPLE SIMULATOR ACCURATE TO WITHIN ±.0.1°C
3. TYPE 'K' MINIATURE THERMOCOUPLE PLUG TO MINIATURE THERMOCOUPLE PLUG LEAD
4. COPPER MINIATURE THERMOCOUPLE PLUG TO COPPER MINIATURE THERMOCOUPLE PLUG LEAD
CALIBRATION PROCEDURE
The 2000 instrument has its own built in calibration sequence that is activated by shorting acrossa
two calibration pads within the battery compartment.
1. Remove the instrument from its holster.
2. Remove the battery compartment from the case.
3. Ensure that the unit is set for °C type 'K'
4. Switch the unit on
5. With screwdriver short across the calibration pads within the battery compartment (see fig
6. The word 'CAL' will appear in the top right hand corner of the display.
7. Connect the 30mV source and allow to settle.
8. Press the ‘SCL’ button.
9. A solid bar will appear on the left hand of the display.
10. Connect the thermocouple simulator and set for 0 °C type 'K', Allow to settle (approx 10
11. Press the ‘SCL’ button.
12. A solid bar will appear on the left hand of the display.
13. The unit should now be displaying 0°C.
14. Check that the calibration is in accordance with the figures shown in Table 1. If not then
15. Remove the battery from the unit.
16. The unit is now fully calibrated.
NOTES
1. AUTO SWITCH OFF
Whilst the unit is in ‘CAL’ mode, if the calibration pads are shorted again the Auto-Switch off
feature will be toggled. The state of the Auto-Switch off feature is shown in the top right hand side
of the display next to the ‘CAL’ message. If the Auto-Switch off is active the letter ‘A’ will be
displayed if not then no character will be shown.
Table 1. Calibration limit
below)
calibrating. When the calibration is complete, the bar will be deactivated.
minutes)
calibrating. When the calibration is complete, the bar will be deactivated.
repeat procedure.
TEMPERATURE (°C)
1300
-150
100
500
-50
30
0
LOW(°C)
-150.4
1301
499.6
-50.2
29.8
99.7
-.1
This indicates that the unit is
This indicates that the unit is
HIGH(°C)
-149.6
1299
100.3
500.4
-49.8
30.2
.1
Related parts for KS01
Image
Part Number
Description
Manufacturer
Datasheet
Request
R

Part Number:
Description:
DC/DC CONVERTER, 1W, 5V/0.2A
Manufacturer:
TRACOPOWER
Datasheet:
Part Number:
Description:
DC/DC CONVERTER, 1W, 9V/0.1A
Manufacturer:
TRACOPOWER
Datasheet:
Part Number:
Description:
DC/DC CONVERTER, 1W, 12V/0.08A
Manufacturer:
TRACOPOWER
Datasheet:
Part Number:
Description:
DC/DC CONVERTER, 1W, 15V/0.07A
Manufacturer:
TRACOPOWER
Datasheet:
Part Number:
Description:
DC/DC CONVERTER, 1W, 5V/0.2A
Manufacturer:
TRACOPOWER
Datasheet:
Part Number:
Description:
DC/DC CONVERTER, 1W, 9V/0.1A
Manufacturer:
TRACOPOWER
Datasheet:
