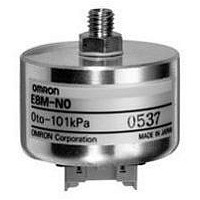
E8MS-N0 Omron, E8MS-N0 Datasheet - Page 12

E8MS-N0
Manufacturer Part Number
E8MS-N0
Description
SENSOR PRESSURE NEGATIV 0-101KPA
Manufacturer
Omron
Series
E8MSr
Specifications of E8MS-N0
Pressure Type
Gauge
Operating Pressure
-14.65 ~ +0 PSI, -101 ~ 0 kPa
Port Size
Male, 1/8" (3.175mm) 27 NPT
Output
Digital
Voltage - Supply
12 V ~ 24 V
Termination Style
Cable
Operating Temperature
0°C ~ 50°C
Package / Case
Module
Sensor Output
Voltage
Supply Current
25mA
Voltage Rating
12V
Port Style
NPT, M5
Pressure Measurement Type
Gage
Operating Pressure Min
0psi
Terminal Type
Connector
Operating Pressure Max
14.6psi
Mounting Style
Desktop
Maximum Operating Temperature
+ 50 C
Minimum Operating Temperature
0 C
Operating Supply Voltage
12 V
Output Voltage
1 V to 5 V
Pressure Port
Y
Sensor Type
Sensors
Lead Free Status / RoHS Status
Lead free / RoHS Compliant
Lead Free Status / RoHS Status
Lead free / RoHS Compliant, Lead free / RoHS Compliant
Other names
E8MSN0
Safety Precautions
Refer to Warranty and Limitations of Liability.
This product is not designed or rated for ensuring
safety of persons either directly or indirectly.
Do not use it for such purposes.
Do not use this product in atmospheres or environments that exceed
product ratings.
● Installation
Connecting and Locking the E8MS Sensor I/O Connector
(E89-M4)
(1)Hold both ends of the female connector connected to the Sensor
(2)A lock cover is slid through the Sensor I/O Connector to prevent it
(3)To unlock the connector, rotate the lock cover counterclockwise
Note: Forcibly pulling the cable to disconnect the connector may damage the
I/O Connector so that the protrusion on the female connector faces
upward, orientate the hole in the male connector on the Sensor
upwards, and insert the female connector into the hole until the
protrusion clicks in.
from coming free due to vibration or shock. Insert the lock cover
facing in the correct direction (a) as shown in the following figure,
and rotate it clockwise (b) until it clicks in.
until it clicks, then pull it towards you. To disconnect the connector,
hold both ends of the connector, then pull it towards you.
pressure-welded portion. Be sure to hold both ends of the connector
when disconnecting it.
Precautions for Correct Use
Lock cover
Lock
Lock cover
(a)
WARNING
(b)
Unlock
Other Installations
E8MS-@@/E8M-10
(1)The pressure-introducing section (aluminum for E8MS, SUS304
(2)When using tapered screws, use tapered Rc(PT)1/8 female
(3)Tighten M5 female screws to a torque no more than 1 to 1.5 N·m.
(4)When tightening a screw, hold by its hexagonal head, not by its
E8M-N0
(1)The pressure port (SUS304) is fixed with M5 male screws.
(2)Tighten male screws to a torque no more than 1 to 1.5 N·m.
(3)When tightening a male screw, hold by its hexagonal head, not by
E8M-A1-S
(1)The pressure port (SUS303) is fixed with M5 female screws (7 mm
(2)Tighten screws for the pressure port to a torque no more than 1 to
(3)M4 female screws are used for the product mounting sections.
(4)When mounting the product, tighten the screws while holding a
(5)Tighten the product mounting screws to a torque no more than
(6)If the positive pressure section is released and positive pressure is
E8M-MP8
(1)Install the Sensor horizontally.
(2)The recommended panel thickness is 0.5 to 8 mm.
(3)Do not install the Sensor in an environment subject to strong
(4)Do not install the Sensor under dusty conditions.
(5)Do not install the Sensor in an environment subject to corrosive
(6)Do not install the Sensor near equipment that generates strong
for E8M) is fixed with tapered R(PT)1/8 male screws and M5
female screws.
screws. Wrap the tapered R(PT)1/8 male screws with sealing tape
to prevent any leakage. Tighten the male screws to a torque no
more than 3.9 N·m.
body.
its body.
deep).
1.5 N·m.
metal part of the product, not a resin part.
1.2 N·m.
applied to the negative pressure section, a positive pressure may
be displayed.
vibration or shock.
gases, particularly sulfide and ammonia gases.
high-frequency noise such as high-frequency welders or sewing
machines.
E8MS/E8M
12


