SUPERPRO IS01-ISP Xeltek, SUPERPRO IS01-ISP Datasheet
SUPERPRO IS01-ISP
Specifications of SUPERPRO IS01-ISP


Related parts for SUPERPRO IS01-ISP


SUPERPRO IS01-ISP Summary of contents
Page 1
Contents Contents ............................................................................................................................................ 1 Outline .............................................................................................................................................. 3 What is IS01? ............................................................................................................................... 3 General functions ..................................................................................................................... 3 Hardware functions .................................................................................................................. 3 Software functions .................................................................................................................... 3 System requirements .................................................................................................................... 4 Standard package of the programmer ........................................................................................... 4 Hardware installation ....................................................................................................................... 5 Connection ...
Page 2
Project library management ................................................................................................... 31 SD card operation ................................................................................................................... 32 Select chip .............................................................................................................................. 32 XPlayer ................................................................................................................................... 34 Buffer ..................................................................................................................................... 34 Checksum ............................................................................................................................... 38 Device information ................................................................................................................. 39 Device Configuration Word ................................................................................................... 39 Edit automatic processing command ...................................................................................... 39 Operation options ...
Page 3
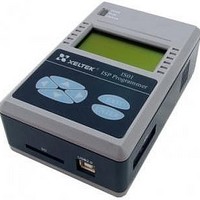
Outline What is IS01? IS01 is a professional multifunction serial programmer with small volume, fast programming speed, good stability and high cost performance; it supports almost all serial programmable devices and is very suitable for In-System or In-Application applications. It ...
Page 4
Very fast programming rate, which is selectable (three gears as high, medium and low) to adapt to different cable length and load feature of user board. • Support dynamic buffer function (each chip burns different contents, the application example ...
Page 5
Hardware installation Connection of ISP cable with the target system Description of connection port ISP connection port contains the signal ends required for programming of target system. The connection port is divided into group A and group B: Port A ...
Page 6
TPOUT supplies high level, and TPIN is level detection input line. Short-circuit them on the target board, once ISP signal is applied to the test point, TPIN immediately detects high level, and AUTO ...
Page 7
Note: SDA and SCL are reserved for test, and generally are not provided for user. Examples for connection of target system Before programming the target device, you must be familiar with the target device, learn the function of each pin ...
Page 8
Take AT Mega48 as an example, according to the operation hint, we should make line connection according to the table below: ISP requirements for target system The first step to adopt ISP programming is to take into account the particularity ...
Page 9
Such design in above figure makes the programmer difficult to connect with the programming pins, and also makes difficult to test the pin signals. All the programming pins in above diagram have test point, therefore easy to measure ...
Page 10
... Precautions for power: Though XELTEK ISP programmer can provide programming power (1.8-18V, 5W), in most cases the power provided by ISP programmer is not sufficient to make the target board work normally, therefore, we preferably recommend to use the self-contained power of the target board ...
Page 11
The reset generator in such connection in above diagram conflicts with the Reset pin for programming. Be careful when the In-System programmer drives Reset pin. Such connection in above diagram eliminates pin conflicts by adding a jumper, but such operation ...
Page 12
Such connection in above diagram is relatively reasonable, it settles the conflict problem through a pull-up resistance, and makes the equipment work well important to note that some Resetters will automatically delay for a length of time after ...
Page 13
This is the circuit diagram after improvement, it can be seen from the diagram, addition of a buffer before LED can alleviate limitation of IS01 on output current; the series resistances before MISO can eliminate signal conflict; changing connecting position ...
Page 14
M25P64 is a large-capacity serial ROM made by STM company, and programmed through SPI protocol, in this example, the chip packaging mode adopted is SO16, the schematic connection diagram is shown as below: DIO5 VPROG1 DIO7 DIO3 24C04 ST 24C04 ...
Page 15
... XELTEK. Installation of software If you use Xeltek online programmer based on USB port for the first time, the content of this chapter will help you to correctly install the application software for the programmer and connect programmer hardware. USB equipment is a kind of plug & play equipment, in the first time installation, Windows will invoke “ ...
Page 16
Setup Process The setup procedure goes step by step and you can change the default settings according to your needs in the setup process. Step 1: Select the language that you want to use in the setup process, as shown ...
Page 17
Step 2: Click the "Next" button. The License Agreement appears. 17 ...
Page 18
Step 3: Please read the license agreement carefully and click “I Agree” to continue the installation. Otherwise, click Cancel to exit the installation. 18 ...
Page 19
Step 4: You can select the installation path in this step. Click the “Browse” button to change the default destination folder. Click the “Next >” button to continue the installation. 19 ...
Page 20
Step 5: You are asked whether to create a start menu icon and a desktop icon in this step. If you select the default setting, click the “Next” button to continue. 20 ...
Page 21
Step 6: Check the above settings that you set in the setup process. Click the “Install” button to proceed to the next step. Step 7: In this step, the files are being copied, the drivers are installed, the software is ...
Page 22
Step 8: Click the “Finish” button to finish the setup. The hardware and driver installation Connect the programmer module to your computer through the USB port. Turn on the programmer power switch. After the application software is installed, the driver ...
Page 23
The actual interfaces may be somewhat different from the above ones. Anyway the user should wait until the installation finishes. Please don't run any other programs during the installation. Running the application software for the programmer The application software for ...
Page 24
Please click the “Cancel” button lest the OS should install the driver with a compatible ID and cause some problems. 24 ...
Page 25
Quick start This chapter will help you to understand the whole process of chip burn-recording operation from beginning to the end, the content includes: User interface of application software Steps of burn-recording device Before you are ready to ...
Page 26
... IS01 start”, otherwise, the program will enter demo mode). Select device Click “select device” on the device menu bar or box for selecting device pops up ...
Page 27
Load data into buffer Programming device is a process to burn the data in the buffer into the storage unit of the chip according to the manufacturer’s requirements. There are two ways for loading of data into the buffer. 1) ...
Page 28
AUTO command without manual key push to start operation in order to facilitate the user to batch burn the chips (IS01 production mode can only be used in offline mode). Programming The user can buy ...
Page 29
Data buffer: the data buffer of the device is divided into one or more areas. If there are several data buffers displayed after selecting the device required to explain the meaning of the data buffers according to ...
Page 30
Buffer address: the start address where data is loaded into in the buffer. 6. Offset address of file: some types of file have non-zero start address (data offset address), thus it may be required to input the file start ...
Page 31
After selecting the project and inputting correct password, the project is loaded. If the “all modules adopt the same mode” is chosen, then this project will be loaded into all the modules. Save project Select “save project” on the “Project” ...
Page 32
The project information in SD card of the programmer is displayed in the project list (project name, manufacturer name, device name and size) Send project: Send the local project file down into SD card (note: before sending the project, you ...
Page 33
The dialogue box for “Device” includes such controls as manufacturer browse box, device name browse box, type select button and OK and Cancel buttons as well as Search Edit box etc. How to select a device? Select device type ...
Page 34
Note: Some chips can not be used only after authorization is given, after selecting this chip, the log window will remind “this chip needs authorization!” XPlayer XPlayer is a kind of special programming tool mainly for CPLD series chips produced ...
Page 35
35 ...
Page 36
Range: displays the address and end address of this buffer (with character width as the unit) Address: displays the position of current cursor Note: this address is the address with word width of chip as the unit Checksum: see “calculation ...
Page 37
Copy the designated area of buffer to another position (with word width as the unit) Fill: Fill the designated area of buffer with the filling value (with word width as the unit) Search: Search the data in the buffer through ...
Page 38
Assume the data at address 0-10(hex system) of data buffer is – The character width that can be selected is: 16 bits(2 bytes), the ...
Page 39
Device information Select “device information” on the “Device” menu bar or the current device information will be displayed. If there is no special information, the device information only displays manufacturer name, device name, package, adapter and algorithm, this information can ...
Page 40
Add: Add operation function items from function list to auto list (it can also be added by double clicking this item). Delete: Remove selected function item from auto list (it also can be deleted by double-clicking the item). Clear All: ...
Page 41
First, verify the data with VCC(±5%) or (±10%), for example, for VCC=5.00V, then we can select VCC=5.00V to verify the data once, or use VCC=4.75V and VCC=5.25V to verify the data twice (±5%) or use VCC=4.50V and VCC=5.50V to verify ...
Page 42
Some applications require writing different content to local areas of the chip, for example serial number of the product, MAC address etc., which are collectively called serial number. This software has provided two solutions. One is the standard increment method ...
Page 43
Note 2: the format of initial value must be correct, when the type is non-ASCII, the format of initial value is “XX XX XX”; when the type is ASCII, the format of initial value is “XXXXX”. If the format is ...
Page 44
Select “module management” on “options” menu bar, then the following dialogue box pops up: Note: The module setting only becomes valid after the software is started. Factory mode It is designed for factory mass burning of chips. After entering the ...
Page 45
If the number of modules >1, there will appear the general operation bar , click "AutoAll" to execute the respective Auto operations of each module; click "Cancel All" to cancel operations of all modules. Print Report Choose “Print Report” menu ...
Page 46
Open file 2. Save file 4. Save project 5. Edit buffer 7. Device information 8. Device Configuration Word 10. Operation Option 11. Help Operation toolbar The items on operation toolbar vary with devices. Generally the operation bar of the ...
Page 47
It shows the current loaded file name and file checksum (whether to calculate checksum or not is decided by user himself). Statistical Information Bar Reset: Clear success and failure etc. to zero, and cancel countdown setting (countdown number is -1) ...
Page 48
... Offline operation Offline introduction Turn on the system, the initialization isn’t completed until the screen prompts "XELTEK IS01", then the system will wait for command. If the keyboard is triggered firstly, the system will enter offline mode (standalone work mode). Note that when the system enters offline mode, the system will first detect SD card fails to detect the SD card, the system will prompt " ...
Page 49
Menu description Keyboard rules: ENTER—select and enter next-level menu EXIT—exit to the upper level menu ↑, ↓ scroll up and down select. BUFFER—change the address ...
Page 50
... Modify, copy, or transfer the User’s Guide, other documentation or any copy. Reverse engineering, de-compiling, or disassemble any program module or security device. Limited Warranty XELTEK warrants that its products will be free from defects in workmanship and materials, and shall conform to specifications current at the time of shipment, for a period of one year from the date of shipment ...
Page 51
Please have your invoice number ready when calling cannot answer your questions without it. Software updates are available free from the web site. Pre-call Check List: If ...