HFBR-4533Z Avago Technologies US Inc., HFBR-4533Z Datasheet - Page 2
HFBR-4533Z
Manufacturer Part Number
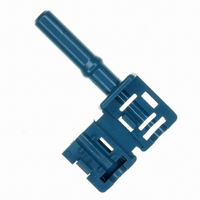
HFBR-4533Z
Description
FIBER OPTIC CRIMPLESS CONN BLUE
Manufacturer
Avago Technologies US Inc.
Series
HFBRr
Specifications of HFBR-4533Z
Simplex/duplex
Simplex
Mode
Singlemode
Mounting Type
Free Hanging (In-Line)
Fastening Type
Snap-In
Ferrule Material
Plastic
Color
Blue
Fiber Type
Plastic
Fiber Diameter
1mm
Connector Body Material
Plastic
Peak Reflow Compatible (260 C)
Yes
Leaded Process Compatible
Yes
Lead Free Status / RoHS Status
Lead free / RoHS Compliant
Features
-
Connector Type
-
Connector Style
-
Lead Free Status / Rohs Status
Lead free / RoHS Compliant
Other names
516-2080
Available stocks
Company
Part Number
Manufacturer
Quantity
Price
Company:

Part Number:
HFBR-4533Z
Manufacturer:
Broadcom Limited
Quantity:
15 091


Termination Guide
Step-by-Step Plastic Cable Connectoring Instructions
The following step-by-step guide describes how to
terminate plastic fiber optic cable. It is ideal for both
field and factory installations. Connectors can be easily
installed on cable ends with standard tools such as wire
strippers and cutters.
Finishing the cable is accomplished with the Avago
Technologies HFBR-4593Z Polishing Kit, consisting of a
polishing fixture, 600 grit abrasive paper and 3 mm pink
lapping film (3M Company, OC3-14). The connector can
be used immediately after polishing.
The following materials are needed for plastic fiber ter-
mination:
1. Plastic optical fiber cable (Example: HFBR-RUD500Z)
2. Wire cutters or scissors
3. 16 gauge wire stripper (Example: Ideal Stripmaster
4. HFBR-4593Z polishing kit (optional)
5. Crimpless connectors
Step 1: Stripping the Fiber
The zip cord structure of the duplex cable permits easy
separation of the channels. The channels should be
separated a minimum of 100 mm (4 in) to a maximum
of 150 mm (6 in) back from the ends to permit connec-
toring, polishing and cable end flexibility.
After cutting the cable to the desired length, strip off
approximately 7 mm (0.3 in) of the outer jacket with the
16 gauge wire strippers.
When using the duplex connector arrangement, the
separated duplex cable should be stripped to roughly
equal lengths on each cable end.
For the non-latching version (HFBR-4531Z), the same
connector is used for simplex and duplex arrangement.
No crimping is necessary. The top half of the connector
will snap into the ferrule half to secure the fiber.
2
type 45-092)
Step 2: Putting on the Connector
Place the connector on each end of the fiber, and slide
the connector down until the fiber jacket stops it. The
fiber should protrude no less than 1.5 mm (0.06 in) from
the end of the connector.
To install simplex connectors flip the top half of the con-
nector over and snap it into the ferrule half (with your
fingers). When the top half latches inside the body of
the ferrule half, proper connector-to-cable attachment
is achieved.
For duplex connector installation place one connector
on top of the other, so that the top half of each connec-
tor is over the ferrule half of the opposite connector.
Manually press connectors together in the center of
the arrangement. Then latch by pressing on the sides
of each connector. As with the simplex version, connec-
tors are secured when top halves latch into the ferrule
halves.
Related parts for HFBR-4533Z
Image
Part Number
Description
Manufacturer
Datasheet
Request
R

Part Number:
Description:
CABLE POF BLK PLAST DUPLEX 4.5M
Manufacturer:
Avago Technologies US Inc.
Datasheet:

Part Number:
Description:
CABLE POF BLK PLAST DUPLEX 4.5M
Manufacturer:
Avago Technologies US Inc.
Datasheet:

Part Number:
Description:
RECEIVER FIBER OPTIC ST 1300NM
Manufacturer:
Avago Technologies US Inc.
Datasheet:

Part Number:
Description:
RECEIVER FIBER OPTIC 600NM 5MBD
Manufacturer:
Avago Technologies US Inc.
Datasheet:

Part Number:
Description:
XMITTER FIBER OPTIC 600NM 5MBD
Manufacturer:
Avago Technologies US Inc.
Datasheet:

Part Number:
Description:
OPTOCOUPLER GATE DRV 2A 16-SOIC
Manufacturer:
Avago Technologies US Inc.
Datasheet:
Part Number:
Description:
OPTOCOUPLER 2CH 2.5A 16-SOIC
Manufacturer:
Avago Technologies US Inc.
Datasheet:

Part Number:
Description:
OPTOCOUPLER GATE DRV 0.4A 16SOIC
Manufacturer:
Avago Technologies US Inc.
Datasheet:

Part Number:
Description:
OPTOCOUPLER 2.0A 250KHZ 8-DIP
Manufacturer:
Avago Technologies US Inc.
Datasheet:

Part Number:
Description:
OPTOCOUPLER 2.0A 250KHZ GW 8-SMD
Manufacturer:
Avago Technologies US Inc.
Datasheet:

Part Number:
Description:
OPTOCOUPLER 2CH 15MBD 3.3V 8SOIC
Manufacturer:
Avago Technologies US Inc.
Datasheet:
Part Number:
Description:
OPTOCOUPLER DARL-OUT 8-DIP
Manufacturer:
Avago Technologies US Inc.
Datasheet:
Part Number:
Description:
OPTOCOUPLER IGBT DRIVE 0.4A 8DIP
Manufacturer:
Avago Technologies US Inc.
Datasheet:
Part Number:
Description:
OPTOCOUPLER DARL-OUT 8-DIP
Manufacturer:
Avago Technologies US Inc.
Datasheet:

Part Number:
Description:
OPTOCOUPLER 1CH 1MBS 8-SMD GW
Manufacturer:
Avago Technologies US Inc.
Datasheet: