19447 Desco, 19447 Datasheet - Page 2
19447
Manufacturer Part Number
19447
Description
TEST KIT, IONIZATION, 0 TO ±19.99KV/IN
Manufacturer
Desco
Datasheet
1.19447.pdf
(3 pages)
Specifications of 19447
Measuring Range
0 To ±19.99kV/in
Accuracy %
5%
External Height
23.9mm
External Width
69.9mm
External Depth
125.5mm
No. Of Batteries
1
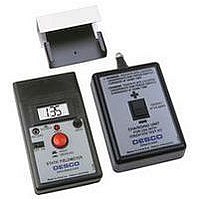
Kit Contents
19445 Meter, Plate, 9V Battery, Charger & Case
Rohs Compliant
NA
Lead Free Status / RoHS Status
na


TB-2071 Page 2 of 3
2. ZERO THE INSTRUMENT - Make connection between the
Adapter Plate and the meter case either through your finger or a
test lead. Face the Fieldmeter away from charged objects and
press the ON/ZERO button. Hold until the display reads zero. The
instrument may also be zeroed by pointing it toward a known
grounded surface (such as the palm of the opposite hand) and
depressing the ON/ZERO button. Although you must be careful
not to contact the recessed sensor plate, the amount of spacing
between the instrument and the target is not critical when zeroing
the instrument. NOTE: The 19445 has a conductive case that
provides a ground reference for the measuring circuit. For
accurate measurements it is necessary that the person holding the
meter be properly grounded.
AUTO SHUTDOWN TIMER During normal operation (not during
ZERO) a blinking decimal point indicates the AUTO SHUTDOWN
TIMER is enabled. If the AUTO SHUTDOWN TIMER is disabled
the decimal point will be on continuously.
Holding down the ZERO button, while unit is ON, for less than 3
seconds resets the AUTO SHUTDOWN TIMER (if enabled). The
AUTO SHUTDOWN TIMER is enabled or disabled by turning on
the unit and keeping the ON/ZERO button pressed then toggling
the HOLD/OFF button. Enable/disable of the AUTO SHUTDOWN
TIMER is indicated by the decimal point: DP on = timer on, DP
off = timer off.
AUTO SHUTDOWN TIMER state is maintained during power off.
AUTO SHUTDOWN TIMER can be continually toggled as long as
the ON/ZERO button remains pressed, up to 20 seconds, after
which the unit will turn off. A blinking decimal point indicates the
AUTO SHUTDOWN TIMER is active. During the last minute
before power off ALL annunicators will blink at a fast rate.
Pressing any button will reset the timer. Timeout is nominally 15
minutes.
Figure 4. Taking a balance measurement.
3. TAKE A MEASUREMENT - Locate the meter in an ionized
environment at the appropriate distance from the device under
test. The static field displayed is the actual balance of the ionizer
or voltage offset. NOTE: When testing pulsed ionizer systems, the
voltage displayed is constantly changing. This pulse rate may be
faster than the display update rate of the fieldmeter, therefore the
displayed voltage is an average of the actual voltage. The output
of the fieldmeter is useful in this situation for more accurate
measurements.
BENCHTOP IONIZER
DESCO EAST - 90 Hudson Road, Canton, MA 02021-1407 • (781) 821-8370 • Fax (781) 575-0172 • Web Site: http://www.desco.com
DESCO WEST - 3651 Walnut Avenue, Chino, CA 91710 • (909) 627-8178 • Fax (909) 627-7449
Taking Discharge Measurements
In order to verify that an ionizer is operating properly it is also
important that its ability to neutralize or discharge static electricity
is measured. The following procedure will measure an ionizer's
discharge time.
1. OPERATING THE CHARGING UNIT - The Model 19447 has a
momentary push-button that turns on the power to the unit.
Holding the button down supplies power to the output terminals.
2. OUTPUT CONTACTS - Two output contacts are provided. They
are connected to an internal power source. When one contact is
connected to ground the other contact will provide a charge of the
indicated polarity. The charger is designed so that an operator can
press the power button and touch an output contact,
simultaneously with the fingers of the same hand.
Figure 5. Charging unit controls.
3. POLARITY SELECTION - The terminals are labeled (+) and (-).
To provide a POSITIVE voltage output, connect the negative (-)
terminal to ground. Press and hold the power switch. To provide a
NEGATIVE voltage output, connect the positive (+) terminal to
ground. Press and hold the power switch.
4. GROUNDING - IMPORTANT! For the charging unit to work
correctly, the operator or the fieldmeter must be properly
grounded. A ground path between an output contact must exist.
5. IONIZER DISCHARGE TIME MEASUREMENTS - Locate the
19445 and the Adapter Plate in the appropriate location for
measurements.
6. POSITIVE DISCHARGE MEASUREMENT - For positive
discharge measurement, touch the negative
(-) terminal of the charger while pressing the charging button on
the charger. Momentarily touch the positive terminal to the adapter
plate. The 19445 reads approximately +1.10kV. By using a stop
watch or other timing device, determine the time needed for the
voltages to decrease from +1.10kV to +.01kV. This is the positive
discharge time.
7. NEGATIVE DISCHARGE MEASUREMENTS - For negative
discharge measurements, touch the (+) output terminal while
pressing the charging button on the charger. Momentarily touch
the negative terminal to the adapter plate. Follow the instructions
for the positive discharge measurement above.
© 2005 DESCO INDUSTRIES INC.
Employee Owned