AD40A Fluke, AD40A Datasheet - Page 21
AD40A
Manufacturer Part Number
AD40A
Description
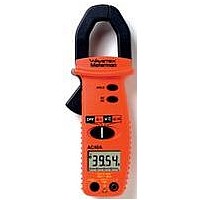
MULTIMETER, DIGITAL, CLAMP, 3-3/4 DIGIT
Manufacturer
Fluke
Datasheet
1.AD40A.pdf
(24 pages)
Specifications of AD40A
Dmm Type
Clamp
Current Measuring Range Ac
40A To 400A
No. Of Digits / Alpha
3-3/4
Dmm Response Type
Average
Dmm Functions
AC Current
Calibrated
No
Ranging
Auto
Display Count
3999
Lead Free Status / RoHS Status
na


F • Remplacement de la Pile
L’instrument est alimenté par deux piles de 1.5V AAA. Remplacez les piles dès
que U est affiché.
le boîtier.
Read the warranty located at the front of this manual before requesting war-
ranty or non-warranty repairs. For warranty repairs, any multimeter
claimed to be defective can be returned to any Wavetek Meterman autho-
rized distributor or to a Wavetek Meterman Service Center for an over-the-
counter exchange for the same or like product. Non-warranty repairs
should be sent to a Wavetek Meterman Service Center. Please call Wavetek
Meterman or enquire at your point of purchase for the nearest location and
current repair rates. All multimeters returned for warranty or non-warranty
repair or for calibration should be accompanied by the following informa-
tion or items: company name, customer's name, address, telephone num-
ber, proof of purchase (warranty repairs), a brief description of the problem
or the service requested, and the appropriate service charge (for non-war-
ranty repairs). Please include the test leads with the meter. Service charges
should be remitted in the form of a check, a money order, credit card with
expiration date, or a purchase order made payable to Wavetek Meterman
or to the specific service center. For minimum turn-around time on out-of-
warranty repairs please phone in advance for service charge rates. The
multimeter should be shipped with transportation charges prepaid to one
of the following addresses or to a service center:
Dévissez et enlevez le boîtier arrière.
Œ
Coupez l’alimentaton de l’appareil et enlevez les cordons.
– 19 –
REPAIR
Ž
Remplacez les piles et réassemblez
nen.
Rückseite
Geräterückseite
Batterien ersetzen und Gerät wieder
zusammensetzen.
E • Sustitución de las Pilas
El medidor está alimentado por dos
baterías del tipo botón de 1,5
voltios AAA unitarios. Cambie las
baterías, tan pronto como aparezca
el símbolo U en pantalla.
Apague el medidor. Desconecte y
retire las puntas de prueba.
Ponga el medidor mirando hacia
abajo. Extraiga los dos tornillos y
levante la tapa posterior.
Cambie las pilas. Vuelva a cerrar
la tapa.
Zwei Schrauben von
entfernen
abheben.
und
Ž
Œ
Ž