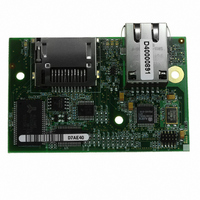
20-101-1138 Rabbit Semiconductor, 20-101-1138 Datasheet - Page 14

20-101-1138
Manufacturer Part Number
20-101-1138
Description
RCM4300 RABBITCORE
Manufacturer
Rabbit Semiconductor
Datasheet
1.20-101-1139.pdf
(124 pages)
Specifications of 20-101-1138
Module/board Type
MPU Core Module
Product
Microcontroller Modules
Data Bus Width
8 bit
Core Processor
Rabbit 4000
Clock Speed
58.98 MHz
Interface Type
Ethernet
Flash
2 MBytes
Timers
10 x 8 bit
Operating Supply Voltage
3.3 V
Board Size
72 mm x 47 mm x 21 mm
For Use With/related Products
RCM4300
Lead Free Status / RoHS Status
Lead free / RoHS Compliant
Other names
316-1141
- Current page: 14 of 124
- Download datasheet (2Mb)
2.2.3 Step 3 — Connect Programming Cable
The programming cable connects the module to the PC running Dynamic C to download
programs and to monitor the module during debugging.
Connect the 10-pin connector of the programming cable labeled
the RCM4300 as shown in Figure 4. Be sure to orient the marked (usually red) edge of the
cable towards pin 1 of the connector. (Do not use the
not supported by the RCM4300.)
Connect the other end of the programming cable to an available USB port on your PC or
workstation.
Your PC should recognize the new USB hardware, and the LEDs in the shrink-wrapped
area of the USB programming cable will flash — if you get an error message, you will
have to install USB drivers. Drivers for Windows XP are available in the Dynamic C
Drivers\Rabbit USB Programming Cable\WinXP_2K
DPInst.exe
online at www.ftdichip.com/Drivers/VCP.htm.
RabbitCore RCM4300 User’s Manual
NOTE: Never disconnect the programming cable by pulling on the ribbon cable.
Carefully pull on the connector to remove it from the header.
to install the USB drivers. Drivers for other operating systems are available
Figure 4. Connect Programming Cable and Power Supply
Programming
1
2
power connector
Cable
snap plug into place
Press down on clip,
Insert tab into slot
3-pin
AC Adapter
Assemble
Colored
edge
SPEED
LINK
DS4
DS2
R42
R36
R41
C21
R33
RX43
RX97
R31
R32
C5
RX49
UX3
U3
C15
R30
Q1
R22
R23
C18
L1
R29
RX55
C6
C15 C16 R28 R27 R26
PWR
C16
C10
R20
R10
JP12
JP13
JP14
C11
JP16
JP18
JP10
JP12
JP14
JP6
JP5
JP4
JP3
JP8
JP7
JP9
R25
R17
AC Adapter
DS1
RX57
C91
C93
C92
C90
R16
GND
C2
RX59
JP8
JP9
/RST_OUT
GND
JP1
JP4
JP5
JP6
JP7
C1
R4
J1
R70
RCM1
/IOWR
VREF
VBAT
EXT
PA1
PA3
PA5
PA7
PB1
PB3
PB5
PB7
PC1
PC3
PC5
PC7
PE1
PE3
PE5
PE7
PD1
LN1
PD3
LN3
PD5
LN5
PD7
LN7
J1
R3
U1
R19
R71
JP10
JP11
R19
R9
R1
R2
J3
DIAG
J2
GND
/IORD
/RST_IN
PA0
PA2
PA4
PA6
PB0
PB2
PB4
PB6
PC0
PC2
PC4
PC6
PE0
PE2
PE4
PE6
PD0
LN0
PD2
LN2
PD4
LN4
PD6
LN6
CVT
AGND
+3.3 V
+5 V
GND
UX47
connector, which is presently
RX75
JP25
CX25
DS2
folder — double-click
UX49
RX73
BT1
S2
R23
PROG
CX23 RX77
1
R21
CX27
1
RESET
DS3
UX4
R22
S3
R24
RX83
RX67
S1
RESET
GND
RX81
RX11
RX79
1
GND
to header J1 on
UX10
UX12
UX14
UX16
GND
UX30
14
Related parts for 20-101-1138
Image
Part Number
Description
Manufacturer
Datasheet
Request
R

Part Number:
Description:
COMPUTER SGL-BRD BL2500 29.4MHZ
Manufacturer:
Rabbit Semiconductor
Datasheet:

Part Number:
Description:
COMPUTER SGL-BRD BL2500 29.4MHZ
Manufacturer:
Rabbit Semiconductor
Datasheet:

Part Number:
Description:
DISPLAY GRAPHIC 12KEY PROG OP670
Manufacturer:
Rabbit Semiconductor
Datasheet:

Part Number:
Description:
DISPLAY GRAPHIC 12KEY ETH OP6700
Manufacturer:
Rabbit Semiconductor
Datasheet:

Part Number:
Description:
COMPUTER SINGLE-BOARD BL2030
Manufacturer:
Rabbit Semiconductor

Part Number:
Description:
COMPUTER SGL-BOARD ETH BL2010
Manufacturer:
Rabbit Semiconductor

Part Number:
Description:
MODULE OP6810 W/O ETH/MEM EXPANS
Manufacturer:
Rabbit Semiconductor
Datasheet:

Part Number:
Description:
COMPUTER SINGLE-BOARD BL2020
Manufacturer:
Rabbit Semiconductor

Part Number:
Description:
COMPUTER BL2010 W/FRICTION LOCK
Manufacturer:
Rabbit Semiconductor

Part Number:
Description:
COMPUTER BL2020 W/FRICTION LOCK
Manufacturer:
Rabbit Semiconductor

Part Number:
Description:
COMPUTER SGL-BRD BL2500 44.2MHZ
Manufacturer:
Rabbit Semiconductor
Datasheet:

Part Number:
Description:
COMPUTER SGL-BOARD FULL BL2000
Manufacturer:
Rabbit Semiconductor

Part Number:
Description:
COMPUTER SINGLE-BOARD BL2110
Manufacturer:
Rabbit Semiconductor

Part Number:
Description:
COMPUTER SGL-BRD 29.4MHZ BL2610
Manufacturer:
Rabbit Semiconductor
Datasheet:

Part Number:
Description:
INTERFACE OP6800 512K FLASH&SRAM
Manufacturer:
Rabbit Semiconductor
Datasheet:


