DEMOACEX Freescale Semiconductor, DEMOACEX Datasheet - Page 5
DEMOACEX
Manufacturer Part Number
DEMOACEX
Description
BOARD EXPANSION FOR DEMO KIT
Manufacturer
Freescale Semiconductor
Datasheet
1.DEMOACEX.pdf
(8 pages)
Specifications of DEMOACEX
Accessory Type
Expansion Module
Processor To Be Evaluated
MCF51AC
Data Bus Width
32 bit
Interface Type
USB
Silicon Manufacturer
Freescale
Core Architecture
Coldfire, HCS08
Core Sub-architecture
Coldfire V1, HCS08
Silicon Core Number
MCF51, MC9S08
Silicon Family Name
Flexis - MCF51AC, Flexis - S08AC
Rohs Compliant
Yes
Cpu Core
HCS08
For Use With/related Products
ACEX™ MCUs
Lead Free Status / RoHS Status
Lead free / RoHS Compliant
Available stocks
Company
Part Number
Manufacturer
Quantity
Price
Company:

Part Number:
DEMOACEX
Manufacturer:
Freescale Semiconductor
Quantity:
135


5. Ensure the correct AC family microcontroller
6. Ensure the DEMOACEX is securely connected to
7. Turn board power switch to ON.
8.
9. From Connection Manager menu, select
10. From Loader Warning menu, click on “OK”
11.
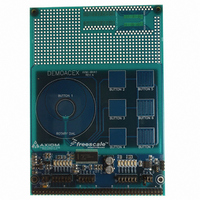
12. On the DEMOACEX, touch each of the e-field
For more information on the DEMOACEX
Board read the board user manual
(DEMOACEX_UM.pdf) on www.freescale.
com/flexis or on the DVD under
Documentation > Development System
Documentation > DEMOACEX User Manual
of the DVD menu.
Flexis™ Series—Quick Start Guide
daughter card is installed on the DEMOAC board.
the DEMOAC board and is configured for default
operation. Refer to Figure 1.
“DEMOAC on USB1 (Name=PEnnnnnnn)” port (or
“USB1:DEMOAC(PEnnnnnnn)” port if using the
MCF51AC256) and click on “Connect (Reset).”
to allow the debugger to mass erase the
microcontroller’s on-chip flash memory and
program it with the new application.
touch pad buttons 2-7 and notice 1 or more of
LEDs 1-3 light. Touching and moving your finger
around the rotary dial cycles through LEDs 5-10.
Pressing button 1 toggles the state of LEDs 5-10.
Use the potentiometer on the DEMOAC board to
adjust the sensitivity of the e-field pads.
Compile and program the logic analyzer
application by clicking on “Debug” button.
Click on “Start/Continue (F5)” button in
debugger to run application.
Troubleshooting
If the demonstration application fails
to function as indicated above, please
follow the steps below before contact-ing
Freescale Semiconductors. Please refer to
the TIC card included in the DEMOACEX kit
for contact information.
• Ensure the correct version of
• Ensure the DEMOACEX is properly
• Ensure the DEMOAC is properly
• Ensure the DEMOAC board PWRSW is
• Ensure the LAMP LED is ON.
• Verify the +5V voltage indicator on the
CodeWarrior and all that available
Service Packs are installed
configured; refer to Figure 1 above.
configured; refer to the DEMOAC Quick
Start Guide for details.
set to the ON position.
DEMOAC is ON.
Related parts for DEMOACEX
Image
Part Number
Description
Manufacturer
Datasheet
Request
R

Part Number:
Description:
Manufacturer:
Freescale Semiconductor, Inc
Datasheet:
Part Number:
Description:
Manufacturer:
Freescale Semiconductor, Inc
Datasheet:
Part Number:
Description:
Manufacturer:
Freescale Semiconductor, Inc
Datasheet:
Part Number:
Description:
Manufacturer:
Freescale Semiconductor, Inc
Datasheet:
Part Number:
Description:
Manufacturer:
Freescale Semiconductor, Inc
Datasheet:
Part Number:
Description:
Manufacturer:
Freescale Semiconductor, Inc
Datasheet:
Part Number:
Description:
Manufacturer:
Freescale Semiconductor, Inc
Datasheet:
Part Number:
Description:
Manufacturer:
Freescale Semiconductor, Inc
Datasheet:
Part Number:
Description:
Manufacturer:
Freescale Semiconductor, Inc
Datasheet:
Part Number:
Description:
Manufacturer:
Freescale Semiconductor, Inc
Datasheet:
Part Number:
Description:
Manufacturer:
Freescale Semiconductor, Inc
Datasheet:
Part Number:
Description:
Manufacturer:
Freescale Semiconductor, Inc
Datasheet:
Part Number:
Description:
Manufacturer:
Freescale Semiconductor, Inc
Datasheet:
Part Number:
Description:
Manufacturer:
Freescale Semiconductor, Inc
Datasheet:
Part Number:
Description:
Manufacturer:
Freescale Semiconductor, Inc
Datasheet: