63811-6400 Molex Inc, 63811-6400 Datasheet - Page 3
63811-6400
Manufacturer Part Number
63811-6400
Description
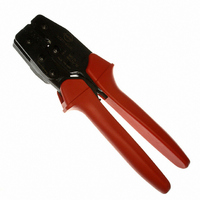
TOOL HAND CRIMP 1.5MM
Manufacturer
Molex Inc
Series
Pico-SPOX™r
Type
Hand Crimp Toolr
Specifications of 63811-6400
Tool Type
Hand Crimper
Features
Side Entry, Ratchet
Product
Crimping, Stripping & Cutting Tools & Drills
Description/function
Crimp
Wire Gauge Range
30 AWG to 24 AWG
Lead Free Status / RoHS Status
Not applicable / Not applicable
For Use With/related Products
Rectangular Contacts, 24-30 AWG
For Use With
WM1112 - CONN TERM FEMALE 24-30AWG TIN
Lead Free Status / Rohs Status
Lead free / RoHS Compliant
Other names
063811-6400
063811-6400-P
0638116400
0638116400-P
63811-6400-P
638116400
638116400-P
WM9013
063811-6400-P
0638116400
0638116400-P
63811-6400-P
638116400
638116400-P
WM9013


Hand Crimp Tool for
Doc No: ATS- 638116400
Revision: B
3. When using the locator, swing the locator away from the crimp
4. Return the locator to its original position.
5. Insert the proper wire over the terminal. Some large O.D. wires
6. Compress the terminal by squeezing the tool handles until the
7. Remove the crimped terminal from the terminal locator by
8. Visually inspect the crimped terminal for proper crimp location.
Note:
A crimp height chart is provided with this manual as Reference Only. Due to the wide range of wires, strands,
insulation diameters, and durometers, actual crimp height
measurements may very slightly. An occasional,
destructive, pull force test should be preformed to check
hand tool crimp. Pull Force value Must exceed the
Minimum pull force specifications listed on page 2.
Locator Replacement
See the parts list on the last page of this document for the
proper locator order number. Follow the steps below to
replace the locator.
1. Open the crimp hand tool.
2. Swing the existing locator open and away from the
3. Firmly press down on the brass pivot shaft with your thumb, while pulling the locator up. Slip the locator off the
4. Replace it with the proper locator by putting over the brass pivot shaft and snapping it into place.
tool, and gently press the locator against the tool frame as
shown in Figure 2. The wire stop will automatically open.
Insert the proper terminal into the proper nest opening. Make
sure when choosing the nest opening, it will correspond with
the A or B profile on the hand tool.
may need to be placed into the terminal before closing the tool.
Gently touch the wire stop with the end of the wire. See Figure
3.
ratchet mechanism cycle has been completed. Release
handles to open the jaws.
pressing down on the wire stop and gently pulling on the wire.
The terminal locator can be in either position.
hand tool.
top of the brass pivot shaft. See Figure 4.
Note: The tamper proof ratchet action will not release the tool until it has been fully closed.
SPOX™
Release Date: 06-19-06
Revision Date: 03-29-08
Terminals
UNCONTROLLED COPY
BRASS PIVOT SHAFT
PRESS DOWN ON
LOCATOR
SWING
OPEN
LOCATOR
AGAINST STOP
IN PLACE
WIRE STOP
WIRE
WIRE STOP
LOCATOR
LIFT UP
Figure 3
Figure 4
TERMINAL
Page 3 of 6
JAWS
OPEN
WIRE