101-0721 Rabbit Semiconductor, 101-0721 Datasheet - Page 2
101-0721
Manufacturer Part Number
101-0721
Description
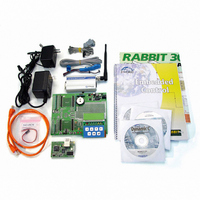
KIT MACHINE TO MACHINE
Manufacturer
Rabbit Semiconductor
Series
RabbitCore 3000r
Type
M2M (Machine to Machine)r
Datasheet
1.101-0722.pdf
(4 pages)
Specifications of 101-0721
Rohs Status
RoHS non-compliant
Wireless Frequency
900 MHz to 1.8 GHz
Interface Type
RS-232, Ethernet
Operating Voltage
9 VDC
Antenna
Knuckle Antenna
For Use With/related Products
RCM3200
Lead Free Status / Rohs Status
Lead free / RoHS Compliant
Other names
316-1040


Hardware Connections
1. Set Up LCD/Keypad Module
If header J5 is installed, remove the jumper on header J5 on
the back of the LCD/keypad module to configure the LCD/
keypad module to operate at 5 V. If the LCD/keypad module
has a potentiometer, the contrast may be adjusted once the
LCD/keypad module is installed in Step 2.
2. Install Modules on Prototyping Board
Turn the RCM3200 module so that the Ethernet connector
end of the module extends off the left side of the Prototyping
Board as shown in Figure 2 below. Line up the pins on headers
J1 and J2 on the bottom of the module with header sockets
RCM2JA and RCM2JB on the Prototyping Board. Install the
LCD/keypad module on header sockets J7, J8, and J10 of the
Prototyping Board as shown in Figure 2. Press both module’s
pins firmly into the Prototyping Board header sockets.
Connect the wall transformer to jack J11 on the Prototyping Board as shown in Figure 2 above. The power
LED to the left of the power-supply connection on the Prototyping Board should light up.
NOTE: It is important that you line up the pins on the modules exactly with the corresponding
NOTE: The RESET button is provided on the Prototyping Board to allow a hardware reset of the
TIP: If you need to reset the GSM/GPRS modem, disconnect, then reconnect its power supply.
pins of the sockets on the Prototyping Board. The header pins may become bent or damaged if
the pin alignment is offset, and the modules will not work. Permanent electrical damage to the
modules may also result if a misaligned module is powered up.
RCM3200 module without disconnecting power.
The GSM/GPRS modem has its own power supply.
Figure 2. Install the Modules on the Prototyping Board
Figure 1. Remove Jumper
LCD/Keypad Module
from Header J5 on
Related parts for 101-0721
Image
Part Number
Description
Manufacturer
Datasheet
Request
R

Part Number:
Description:
COMPUTER SNGLBD BL2101 A/D 0-10V
Manufacturer:
Rabbit Semiconductor
Part Number:
Description:
CARD D/A 0-10V SR9400 SMARTSTAR
Manufacturer:
Rabbit Semiconductor
Datasheet:
Part Number:
Description:
CARD A/D 0-10V SR9300 SMARTSTAR
Manufacturer:
Rabbit Semiconductor
Datasheet:

Part Number:
Description:
WiFi / 802.11 Modules & Development Tools WIRELESS CONTROL APP KIT
Manufacturer:
Rabbit Semiconductor

Part Number:
Description:
KIT DEV RCM5400W US/INTERNATIONL
Manufacturer:
Rabbit Semiconductor
Datasheet:

Part Number:
Description:
DEV KIT DELUXE MINICORE RCM5600W
Manufacturer:
Rabbit Semiconductor
Datasheet:


Part Number:
Description:
KIT FOR BL4S100 STARTER PACKAGE
Manufacturer:
Rabbit Semiconductor
Datasheet:

Part Number:
Description:
DEV KIT STANDARD MINI RCM5600W
Manufacturer:
Rabbit Semiconductor
Datasheet:
Part Number:
Description:
MODULE RABBITCORE RCM3720
Manufacturer:
Rabbit Semiconductor
Datasheet:
Part Number:
Description:
MODULE RABBITCORE RCM3220
Manufacturer:
Rabbit Semiconductor
Datasheet:
Part Number:
Description:
MODULE RABBITCORE RCM3210
Manufacturer:
Rabbit Semiconductor
Datasheet:
Part Number:
Description:
COMPUTER SGL-BOARD OP6600 W/SRAM
Manufacturer:
Rabbit Semiconductor
Datasheet:
Part Number:
Description:
COMPUTER SGL-BD BL2000 SRAM/FLSH
Manufacturer:
Rabbit Semiconductor