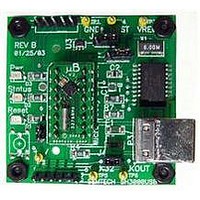
EVK-SH3000USB Semtech, EVK-SH3000USB Datasheet - Page 3

EVK-SH3000USB
Manufacturer Part Number
EVK-SH3000USB
Description
Tools, Development Kit
Manufacturer
Semtech
Datasheet
1.EVK-SH3000USB.pdf
(19 pages)
Specifications of EVK-SH3000USB
Kit Contents
Evaluation Kit
Tool / Board Applications
MicroBuddy Devices
Development Tool Type
Hardware / Software - Eval/Demo Board
Mcu Supported Families
SH3000
For Use With
SH3000 MicroBuddy
Lead Free Status / RoHS Status
na
Using the Evaluation Board
The evaluation board is designed to demonstrate the functions and features of the MicroBuddy product. This can be
broken down into several stages, namely Watchdog, Low-Frequency Oscillator (LFO), High-Frequency Oscillator (HFO)
and Wakeup Timer (WUT). These terms and functions are explained in more detail in the SH3000 Reference Manual,
and only a brief introduction is given here on how to demonstrate and observe these functions.
Connecting the board
First, install the software from the CD-ROM in the evaluation kit by double-clicking on the file SETUP.EXE. Follow the
directions and reboot the PC if instructed.
Next connect the MicroBuddy board to the system. Wait for the computer to find and identify the new hardware. When
asked for the driver, press BROWSE and select the “\DRIVER” directory on the CD-ROM enclosed with the kit.
Now find the MicroBuddy shortcut (which should be located in the Semtech folder of the start menu) and double click on it
The software Project Settings screen should now appear on the computer (see the Product Settings section).
Watchdog demonstration
The program pauses while communication takes place between the computer and the evaluation board. The Log window
shows the results of the communication that took place and the title bar of the window should go green. If it remains red,
there was a problem. Watchdog codes are now sent to the MicroBuddy to prevent the Watchdog from timeout, simulating
what a production MCU would do. These codes can be observed in the output log window.
To demonstrate a watchdog timeout, press the Force Timeout button on the CPU supervisor functions screen. The
causes the Cypress chip to stop updating the watchdog. MicroBuddy then enters reset because of a watchdog timeout.
The Reset Status LED flashes, the Status window shows Reset caused by Watchdog timeout . The watchdog is
now disabled, and can be re-enabled by setting a value on the slider and pressing Change Now again.
LFO demonstration
The LFO has several settings that can be demonstrated. First press the LF Clock tab to select the Low-Frequency
Oscillator settings screen, and set the evaluation board jumper J1 to the XTAL position (towards the MicroBuddy dip-
adapter). The MicroBuddy is now using the 32.768 kHz crystal as a reference. Press the switch button next to pin 13 on
the user interface to enable the 32.768 kHz out pin and press Change Now . Attaching a scope probe to the CLK32 pin
on the evaluation board should show a clean 32.768 kHz signal.
Now change jumper J1 on the evaluation board to the RC position (towards the Cypress chip). The MicroBuddy is now
using the internal 32.768 kHz oscillator as a reference. The scope should again show a 32.768 kHz signal. Note there
may be some noise on the signal now due to the long thin wires used on the evaluation board. In practice a good solid
ground plane would be present and this noise would disappear.
Note: For normal operation, jumper J4 should be connected, and jumper J3 should be in position towards the Cypress
chip U2.
SH3000 Evaluation Kit User Guide v0.96
SYSTEM MANAGEMENT
·
·
·
Press the CPU Supervisor functions tab to select the watchdog settings screen.
Select a value for the watchdog time using the slider control.
Press Change Now.
2003-03
3
EVK-SH3000USB MicroBuddy™
Copyright ©2002-2003 Semtech Corporation
Evaluation Kit User Guide
www.semtech.co
Preliminary
m


