ATAVRONEKIT Atmel, ATAVRONEKIT Datasheet - Page 7
ATAVRONEKIT
Manufacturer Part Number
ATAVRONEKIT
Description
KIT AVR/AVR32 DEBUGGER/PROGRMMR
Manufacturer
Atmel
Series
AVR®r
Type
Debuggerr
Specifications of ATAVRONEKIT
Contents
Programmer/Debugger
Processor To Be Evaluated
AVR32
Data Bus Width
32 bit
Interface Type
ISP, JTAG
Core Architecture
AVR
Kit Contents
ATAVRONEKIT
Tool / Board Applications
General Purpose MCU, MPU, DSP, DSC
Development Tool Type
Hardware / Software - Dev Kit (Dev Tool)
Rohs Compliant
Yes
Mcu Supported Families
AVR32 32-bit MCU
For Use With/related Products
AVR® Devices
Lead Free Status / RoHS Status
Lead free / RoHS Compliant
Available stocks
Company
Part Number
Manufacturer
Quantity
Price
Company:

Part Number:
ATAVRONEKIT
Manufacturer:
Atmel
Quantity:
135


Section 3
Hardware preparation
In case you have an evaluation kit without the MICTOR38 connector, you need to install one. In case the
connector is already mounted, you can skip this chapter.
To be able to connect to the evaluation board AUX port, you need to solder a connector to the board.
The AVR ONE! Kit contains one MICTOR38 connector for this purpose. If you need more connectors for
other kits, or your own designs, you can buy more connectors from Atmel, or Tyco Electronics/AMP.
The Tyco Electronics/AMP Part number is 2-5767004-2.
To install the MICTOR38 connector, you only need a fine-tipped soldering iron, a small piece of fine sol-
der (0,3mm is OK), and some extra flux. Also remember to provide proper ventilation to prevent inhaling
the fumes from the flux.
The soldering guide shows the EVK1100, but is applicable for all other kits that needs a MICTOR38 con-
nector (like the EVK1101).
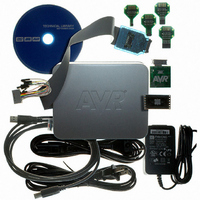
Figure 3-1.
Required hardware and tools for installation of Mictor38
AVR ONE! Quick-start Guide
3-1
32103C–AVR ONE!–02/10
Related parts for ATAVRONEKIT
Image
Part Number
Description
Manufacturer
Datasheet
Request
R

Part Number:
Description:
DEV KIT FOR AVR/AVR32
Manufacturer:
Atmel
Datasheet:

Part Number:
Description:
INTERVAL AND WIPE/WASH WIPER CONTROL IC WITH DELAY
Manufacturer:
ATMEL Corporation
Datasheet:
Part Number:
Description:
Low-Voltage Voice-Switched IC for Hands-Free Operation
Manufacturer:
ATMEL Corporation
Datasheet:
Part Number:
Description:
MONOLITHIC INTEGRATED FEATUREPHONE CIRCUIT
Manufacturer:
ATMEL Corporation
Datasheet:
Part Number:
Description:
AM-FM Receiver IC U4255BM-M
Manufacturer:
ATMEL Corporation
Datasheet:
Part Number:
Description:
Monolithic Integrated Feature Phone Circuit
Manufacturer:
ATMEL Corporation
Datasheet:
Part Number:
Description:
Multistandard Video-IF and Quasi Parallel Sound Processing
Manufacturer:
ATMEL Corporation
Datasheet:
Part Number:
Description:
High-performance EE PLD
Manufacturer:
ATMEL Corporation
Datasheet:
Part Number:
Description:
8-bit Flash Microcontroller
Manufacturer:
ATMEL Corporation
Datasheet:
Part Number:
Description:
2-Wire Serial EEPROM
Manufacturer:
ATMEL Corporation
Datasheet: