DR2000-DK RFM, DR2000-DK Datasheet
DR2000-DK
Specifications of DR2000-DK


Related parts for DR2000-DK


DR2000-DK Summary of contents
Page 1
... DR2000 Development Board RFM ...
Page 2
... Limited Hardware Warranty. RF Monolithics, Inc. (“RFM”) warrants solely to the purchaser that the hardware components of the DR2000 Virtual Wire® Development Kit (the “Kit”) will be free from defects in materials and workmanship under normal use for a period of 90 days from the date of shipment by RFM. This limited warranty does not extend to any components which have been subjected to misuse, neglect, accident, or improper installation or application. RFM’ ...
Page 3
... The Kit is an experimental device, and RFM makes no representation with respect to the adequacy of the Kit in developing low-power wireless data communications applications or systems, nor for the adequacy of such design or result. RFM does not and cannot warrant that the functioning of the Kit will be uninterrupted or error-free. ...
Page 4
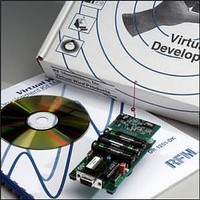
... RS232C serial ports. The kit includes two communications nodes, with each node consisting of a data radio protocol board, plus accessories. The DR2000-DK kit operates at 916.5 MHz. Development Kit Development Kit is a tool for evaluating the feasibility ...
Page 5
... Key Features The DR2000 Virtual Wire “Out of the box” operation between two PC's 3 Vdc low-current UHF data radio transceivers (916.5 MHz) Excellent receiver off-channel interference rejection Wide dynamic range receiver log detection and AGC for resistance to on- channel interference ...
Page 6
Regulatory Certification Regulatory Authority - Worldwide, man-made electromagnetic emissions are controlled by international treaty and the ITU (International Telecommunications Union) committee recommendations. These treaties require countries within a geographical region to use comparable tables for channel allocations and emission ...
Page 7
... Unless otherwise marked, RFM DR2000 Virtual Wire have not been certified to any particular set of regulations. Each module has suggested countries for use, depending on current allocations and technical limits ...
Page 8
The EU directives introduce the concepts of a “cognizant body”, a “notification body”, and a “construction file”. Cognizant bodies are simply technical experts recognized by the EU committees to review technical regulations and compliance. Any acceptable test lab will have ...
Page 9
EU measurement rules are based on a similar arrangement, but a “standard dipole” antenna is substituted for the DUT to calibrate the range attenuation. Since the EU measurements are comparison or substitution rules, they are often easier to follow for ...
Page 10
Canada DOC Industrie Canada Attn: Certification, Engineering and Operations Section, 1241 Clyde Avenue, Ottawa K1A 0C8 CANADA UNITED KINGDOM LPRA (manufacturing association information) Low Power Radio Association The Old Vicarage, Haley Hill, Halifax HX3 6DR UK or Radiocommunications Agency (official) ...
Page 11
... DR2000 PCB: RS232 I/O Led 1 Led 2 ANT Led 3 RF ground Power Switch 2-4.5 VDC or 3 VDC Battery (2 AA) Ground 11 ...
Page 12
Led Indicators: Led1 Bi-color red and green Led. Normal operation Range test ON Command Error Led2 Yellow Led RS232 I/O activity Led3 Bi-color red and green Led. Normal Operation ANT Antenna Connection point RF ...
Page 13
... Data shifted out lsb first DC balanced Symbols Used in the DR2000: 0x0015, { NIBBLE = 0 0x0031, { NIBBLE = 1 0x0032, { NIBBLE = 2 0x0023, { NIBBLE = 3 0x0034, { NIBBLE = 4 0x0025, { NIBBLE = 5 0x0026, { NIBBLE = 6 0x0016, { NIBBLE = 7 0x001A, { NIBBLE = 8 0x0029, { NIBBLE = 9 ...
Page 14
... Example of the Start Symbol, Preamble1,2 & 3 and the To & From Address, 31 & 32hex. This is taken directly from the DR2000 while sending Range Test Data at the Txmod input to the TR1000. 14 ...
Page 15
... DR2000 Commands: All commands ARE case sensitive. $$PCSPn Change RS232 baud rate (default @ power up is 19.2kb 19200 2400 4800 9600 38400 57600 115200 Response PC baud rate = nnnnn $$RDSPn Change RF baud rate (this value is stored in flash memory 57600 2400 4800 9600 19200 ...
Page 16
... DR2000 Commands (continued): $$TOADhh Change ‘To’ address (in hex) Valid digits: 0-f (00 – ff) To Address of ‘00’ is used for Broadcast (this value is stored in flash memory) Response To Address = nn $$FRADhh Change ‘FROM’ address (in hex) Valid digits: 0-9, a-f (00 – ff) (this value is stored in flash memory) ...
Page 17
... DR2000 Commands (continued): $$s Display current DR2000 configuration Example: RF mode OOK To Address = 31 From Address = 32 Packet Size = 40 Range on Rxout on To address is 31 hex (49) From Address is 32 hex (50) Packet size is 40 hex (64) Range test is ON RS232 output is on $$^s Control s = Xon/Xoff flow control disabled Response ...
Page 18
... DR2000 Commands (continued): $$? Display valid commands Response: $$s = $$s Received, display status $$^s = Xon-Xoff Disabled $$^q = Xon-Xoff Enabled $$PCSP = PC Baud Rate $$RDSP = RF Baud Rate $$RFMD = RF mode $$TOAD = Set To Address $$FRAD = Set From Address $$SIZE = Set Packet Address $$STMD = Set Mode $$SCTS = Set CTS $$REST ...
Page 19
... DR2000 Remote Commands: These commands will change to configuration of the remote DR2000 when their Address is equal to “TO address”. $&PCSPn Change remote RS232 baud rate (default @ power up is 19.2kb 19200 2400 4800 9600 38400 57600 115200 Response Message sent to remote $&RDSPn Change remote RF baud rate (this value is stored in flash memory) ...
Page 20
... DR2000 Remote Commands (continued): $&FRADhh Change remote ‘FROM’ address (in hex) Valid digits: 0-9, a-f (00 – ff) (this value is stored in flash memory) Response Message sent to remote $&SIZEhh Change remote Packet size (in hex) Valid digits: 0-9, a-f (01 – ff) Recommended packet size is 64 (40h) ...
Page 21
... DR2000 Setup: DR2000 DB9 to RJ11 Supplied 6 Conductor RJ11 Cable Supplied DR2000 DB9 Plugs Directly into PC Serial Port No PC Connection Needed 21 ...
Page 22
22 ...
Page 23
23 ...
Page 24
24 ...
Page 25
25 ...
Page 26
... Bill Of Materials for DR2000 Reference ----------------------------------------------------------------------- U10 Q2 U13 U11,12 C17,19 C21,22 C30,36,3,31,34,33,10,13 C32,37 C38 C39 C1,2,25,26 C7,18,20 C6,8,9,11,12,14,15,16,23,24 0.1uf C27,28, R1,3,4 R2 R5,6 R19,23,25,27,14,34 R32 R9 R10 R11 R18 R20,21,22,17 R35 R36 R37,31,33 R15 R16,26,38 R24 R29,30 R41 R42 R43 R44,45 S1 VALUE Qty ...
Page 27
... Bill Of Materials for DR2000 Reference A1 TR1000 Y1 16.87MHZ Y2 1.8432MHZ D2 CMD67-21VYC/TR8 1 B1 BH2AA-PC SK1 32PLCC SOCKET VALUE Qty PN 1 TR1000 1 500-0792-001 1 500-0837-001 500-0799-001 1 500-0836-001 1 500-0797-001 SIZE 916.5MHZ HC49U HC49U YEL LED 2 PIN PLCC32 27 ...
Page 28
RS232 Connector wiring: DB9 Female _____ Pin1 & Pin 6 Pin2 Pin3 Pin4 Pin5 Pin6 Pin7 Pin8 Pin9 White RG11-6 (Straight) Blue Black Red N/C White Yellow N/C Green N/C Green Yellow Blue Black Red Signal DCD RX TX Ground ...
Page 29
... Send the following from the REMOTE DR2000: 323101051d4142434445464748494a4b4c4d4e4f505152535455565758595a31 This will send the following data from the REMOTE DR2000 Address 31 TO the LOCAL DR2000 address 32. The LOCAL display will print “ABCDEFGHIJKLMNOPQRSTUVWXYZ1”. Note1: Length is calculated as data byte count + 2 (FCS1 & FCS2) In the above example data byte count (1b hex) ...
Page 30
... Enter the following commands on the REMOTE DR2000: $$TOAD32 $$FRAD31 $$RFMD0 $$RFSP4 $$RCST1 3. Enter the following commands on the LOCAL DR2000 to start the test: $$RANG1 4. The following data is now being sent to the REMOTE DR2000: “ Range Test Data “ 5. Enter the following to stop the range test: $$RANG0 ...
Page 31
... DR2000 Instructions for sending 32 byte packets using Telix for Dos. 1. Connect DR2000 to Com 1 2. Start Telix 3. Turn the DR2000 power on 4. Display should look like this: If this is correct go to step # 5 Else To change to address enter in Caps $$TOAD31 To change from address enter in Caps $$FRAD32 To change Size enter in Caps $$SIZE20 Label this DR2000 as master ...
Page 32
... To change Size enter in Caps $$SIZE20 Label this DR2000 as slave. Turn power off and back on and ensure display is the same as above 8. Unplug DR2000 labeled “Salve” leaving it turned on. 9. Plug DR2000 labeled ”Master” and turn the power on 10. Ensure display look like this: ...
Page 33
If the display is NOT correct the # 1 and start again 12. Press ”Alt g “ on the PC and enter DR32-1 for Com port 1 or DR32-2 for Com port 2 13. Display should ...
Page 34
... Press “Y” for yes 19. The script is now stopped. Note: The DR2000 looks at the From address to ensure you are talking to it. If you have the master and slave swapped, the DR2000 will not transmit the packet. So ensure the master address is as stated above. ...