RN-111B-EVAL Roving Networks Inc, RN-111B-EVAL Datasheet - Page 2
RN-111B-EVAL
Manufacturer Part Number
RN-111B-EVAL
Description
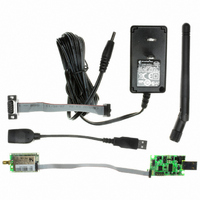
EVALUATION KIT FOR WIFLY MODULE
Manufacturer
Roving Networks Inc
Type
WiFly 802.11br
Specifications of RN-111B-EVAL
Frequency
2.4GHz
Wireless Frequency
50 Hz to 60 Hz
Interface Type
USB, Serial, SMA
Operating Voltage
5 VDC
Lead Free Status / RoHS Status
Lead free / RoHS Compliant
Lead Free Status / RoHS Status
Lead free / RoHS Compliant, Lead free / RoHS Compliant
Other names
740-1027


All software and documentation for the WiFly Module and evaluation kit can be found on the Roving Networks
website on the support page.
You will need your computer, an internet connection, the SSID for your WiFi access point, the passkey(s) for
your WiFi access point if your network is security enabled.
With your computer connected to the internet go to the Roving Networks website support page and download
and WiFly setup wizard or FTDI drivers. The WiFly setup wizard will install the Wifly Utility and the drivers.
Follow the directions in the WiFly setup wizard and be sure the wizard finishes successfully before proceeding.
NOTE: The WiFly utility is only for convenience, the WiFly module can be completely configured from a
terminal emulator. If you do not use WiFly utility you will need to install the FTDI device drivers. These can be
found on the Roving Networks website on the support page.
You will need a simple terminal emulator program. We suggest TeraTerm. This is also available for download
from the Roving Networks website. WARNING: Don not use HyperTerm, it has several bugs that make it
unusable for this application.
Setup and Configuration
This is a two step process:
1. Connecting the hardware through the USB or serial connection
2. Configuring the WiFly module to access the WiFi network
Once complete the WiFly module is associated with the network and has acquired an IP address. The WiFly
module can then be programmed and network connections established.
NOTE: Before proceeding the drivers must be installed on your computer.
Step 1: Setting up the hardware
The evaluation board can be connected to the host computer using either the USB or the serial interface
port on your computer.
USB Connection:
1. Connect the USB extension cable to the
2. Connect the 10pin ribbon cable to the
3. Connect the other end of the 10pin ribbon
4. Verify that the jumper is set for USB mode,
5. Plug the USB cable into the computer.
development board.
WiFly module and evaluation board. When
looking from above, red side of the ribbon
should be towards the edge of the module.
cable to the WiFly Module, again the red
side of the ribbon cable should be on the
outside edge of the module.
perpendicular to the length of the
evaluation board (See figure 1)
809 University Avenue
•
Los Gatos, CA 95032
•
Tel (408) 395-6539
Fig. 1 USB cable setup and jumper setting
RN-111B-EVAL
IGRN111B-EVAL 3/10/2009
• info@RovingNetworks.com
Related parts for RN-111B-EVAL
Image
Part Number
Description
Manufacturer
Datasheet
Request
R

Part Number:
Description:
MODULE WIFLY 802.11B SMA
Manufacturer:
Roving Networks Inc
Datasheet:

Part Number:
Description:
MODULE WIFLY 802.11B RP-SMA
Manufacturer:
Roving Networks Inc
Datasheet:

Part Number:
Description:
MODULE WIFLY 802.11B CHIP ANT
Manufacturer:
Roving Networks Inc
Datasheet:

Part Number:
Description:
MODULE WIFLY 802.11B 1/4 WV-WIRE
Manufacturer:
Roving Networks Inc
Datasheet:

Part Number:
Description:
ADAPTER BLUETOOTH FRFLY SRL MALE
Manufacturer:
Roving Networks Inc
Datasheet:

Part Number:
Description:
ADAPTER BLUETOOTH FIREFLY RS422
Manufacturer:
Roving Networks Inc
Datasheet:

Part Number:
Description:
ADAPTER BLUETOOTH FRFLY SRL MALE
Manufacturer:
Roving Networks Inc
Datasheet:

Part Number:
Description:
ADAPTER BLUETOOTH FRFLY SRL MALE
Manufacturer:
Roving Networks Inc
Datasheet:

Part Number:
Description:
RES 11 OHM 1/4W 1% AXIAL
Manufacturer:
Stackpole Electronics Inc
Datasheet:
Part Number:
Description:
RES 11 OHM 1/4W 5% AXIAL
Manufacturer:
Stackpole Electronics Inc
Datasheet:
Part Number:
Description:
RES 11 OHM 1/2W 1% AXIAL
Manufacturer:
Stackpole Electronics Inc
Datasheet:
Part Number:
Description:
RES 11 OHM 1/4W 1% AXIAL
Manufacturer:
Stackpole Electronics Inc
Datasheet:
Part Number:
Description:
RES 11 OHM 1/2W 1% AXIAL
Manufacturer:
Stackpole Electronics Inc
Datasheet:

Part Number:
Description:
MODULE SOCKET BLUETOOTH CLASS1
Manufacturer:
Roving Networks Inc
Datasheet:

Part Number:
Description:
MODULE BLUETOOTH V2.1+EDR
Manufacturer:
Roving Networks Inc
Datasheet: