RN-111B-EVAL Roving Networks Inc, RN-111B-EVAL Datasheet - Page 4
RN-111B-EVAL
Manufacturer Part Number
RN-111B-EVAL
Description
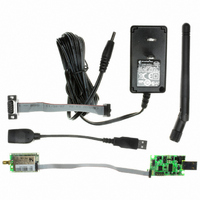
EVALUATION KIT FOR WIFLY MODULE
Manufacturer
Roving Networks Inc
Type
WiFly 802.11br
Specifications of RN-111B-EVAL
Frequency
2.4GHz
Wireless Frequency
50 Hz to 60 Hz
Interface Type
USB, Serial, SMA
Operating Voltage
5 VDC
Lead Free Status / RoHS Status
Lead free / RoHS Compliant
Lead Free Status / RoHS Status
Lead free / RoHS Compliant, Lead free / RoHS Compliant
Other names
740-1027


2. Configuring the WiFly module
Using a terminal emulator to configure the WiFly module
Instead of using the WiFly Utility, a terminal emulator can be used to configure the WiFly module. This
has the advantage that once the module is configured the complete set of WiFly commands is available to
the user.
NOTE: If you have not installed the WiFly
utility or the FDTI device drivers Windows
will not recognize the new hardware when it
is plugged into your computer. To resolve
this either running the WiFly setup wizard or
install the FDTI drivers directly.
1. Determine the COM port the USB Serial
809 University Avenue
hardware as “USB serial port” or “USB WiFly programmer.” NOTE: If you have not installed the WiFly
Utility, the Windows operating system will not recognize the new hardware. If this is the case, cancel
the “Found New Hardware” dialog and disconnect the USB cable, then run the WiFly setup wizard.
•
•
•
•
•
•
The WiFly module is successfully configured if the red LED is off and the green light is flashing slowly.
To verify the connection, switch to the Status tab in the WiFly Utility. There you should see the actual
IP address assigned to the WiFly module, the signal strength and other information. At this point you
can go to the Tools tab in the WiFly utility and ping the Wifly module by providing its IP address.
Now that the WiFly is configured it will retain these setting and every time it is powered up will attempt
to associate with the same network.
port is connected on. This can be found
by opening the “Device Manager” which
is part of the system tools in Windows.
In the Device Manager browse and
expand the selection for Ports (COM &
LPT) In the example to the right the
USB serial port is COM9
Enter the name (SSID) and Channel of your network
The utility requires you enter a remote IP address and port number. This does not have to be a
valid IP address on your network. Set the port to 2000
If your network has security you must provide the security codes by selecting the Authentication
Type and enter the Key Number or Phase
Optionally if you are not using DHCP or just want to assign a static IP address
Enter a name for this configuration at the top of the window in the Save Settings field.
Click on Update
o
o
o
o
Deselect IP Address Dynamically Assigned
Enter the Static IP address
Enter the Subnet Mask
Enter the IP address of the Gateway
•
Los Gatos, CA 95032
•
Tel (408) 395-6539
RN-111B-EVAL
IGRN111B-EVAL 3/10/2009
• info@RovingNetworks.com
Related parts for RN-111B-EVAL
Image
Part Number
Description
Manufacturer
Datasheet
Request
R

Part Number:
Description:
MODULE WIFLY 802.11B SMA
Manufacturer:
Roving Networks Inc
Datasheet:

Part Number:
Description:
MODULE WIFLY 802.11B RP-SMA
Manufacturer:
Roving Networks Inc
Datasheet:

Part Number:
Description:
MODULE WIFLY 802.11B CHIP ANT
Manufacturer:
Roving Networks Inc
Datasheet:

Part Number:
Description:
MODULE WIFLY 802.11B 1/4 WV-WIRE
Manufacturer:
Roving Networks Inc
Datasheet:

Part Number:
Description:
ADAPTER BLUETOOTH FRFLY SRL MALE
Manufacturer:
Roving Networks Inc
Datasheet:

Part Number:
Description:
ADAPTER BLUETOOTH FIREFLY RS422
Manufacturer:
Roving Networks Inc
Datasheet:

Part Number:
Description:
ADAPTER BLUETOOTH FRFLY SRL MALE
Manufacturer:
Roving Networks Inc
Datasheet:

Part Number:
Description:
ADAPTER BLUETOOTH FRFLY SRL MALE
Manufacturer:
Roving Networks Inc
Datasheet:

Part Number:
Description:
RES 11 OHM 1/4W 1% AXIAL
Manufacturer:
Stackpole Electronics Inc
Datasheet:
Part Number:
Description:
RES 11 OHM 1/4W 5% AXIAL
Manufacturer:
Stackpole Electronics Inc
Datasheet:
Part Number:
Description:
RES 11 OHM 1/2W 1% AXIAL
Manufacturer:
Stackpole Electronics Inc
Datasheet:
Part Number:
Description:
RES 11 OHM 1/4W 1% AXIAL
Manufacturer:
Stackpole Electronics Inc
Datasheet:
Part Number:
Description:
RES 11 OHM 1/2W 1% AXIAL
Manufacturer:
Stackpole Electronics Inc
Datasheet:

Part Number:
Description:
MODULE SOCKET BLUETOOTH CLASS1
Manufacturer:
Roving Networks Inc
Datasheet:

Part Number:
Description:
MODULE BLUETOOTH V2.1+EDR
Manufacturer:
Roving Networks Inc
Datasheet: