Z8FMC160100KITG Zilog, Z8FMC160100KITG Datasheet - Page 5
Z8FMC160100KITG
Manufacturer Part Number
Z8FMC160100KITG
Description
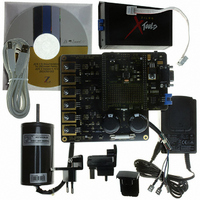
KIT DEV FOR Z8 ENCORE Z8FMC16100
Manufacturer
Zilog
Series
Z8 Encore! MC™r
Datasheets
1.Z8FMC160100KIT.pdf
(7 pages)
2.Z8FMC160100KIT.pdf
(383 pages)
3.Z8FMC160100KITG.pdf
(2 pages)
4.Z8FMC160100KITG.pdf
(15 pages)
Specifications of Z8FMC160100KITG
Main Purpose
Power Management, Motor Control
Embedded
Yes, MCU, 8-Bit
Utilized Ic / Part
Z8FMC16100
Primary Attributes
3-Ph DC Motors
Secondary Attributes
Graphical User Interface
For Use With
269-4664 - KIT ACC OPTO-ISO USB SMART CABLE269-4661 - KIT ACC ETHERNET SMART CABLE269-4539 - KIT ACCESSORY USB SMART CABLE
Lead Free Status / RoHS Status
Lead free / RoHS Compliant
Other names
269-4660


Step 3. Configure the 5 V DC Universal Power Supply
The universal power supply kit features different plug adapters in one box and the power
supply in another. The power supply ships with a slide-out plate that must be removed to
insert the location-specific plug adapter.
Observe the following steps to configure the 5 V DC universal power supply:
For convenience, you can leave the adapter slot cover in place and plug in a standard
computer equipment AC power cord (purchased separately) between the AC cord recepta-
cle on the end of the power supply and an electrical outlet.
Step 4. Connect the 5 V DC Universal Power Supply to the
MC MDS Board
Connect the 5 V DC power supply to the MC MDS board at connector P1, then plug the
supply into an electrical outlet. The green 3.3 V DC LED D4 illuminates when power is
applied and LED D3 blinks.
Step 5. Set the Adjustable Power Supply to 0 V DC and
Connect It to the 3-Phase Motor Control Application Board
Observe the following steps to adjust and connect the power supply to the application
board.
QS005406-0111
a. Remove the slide-out plate.
b. Select the AC plug adapter appropriate for your locale and insert it into the slot that
c. Slide the new plug adapter into the slot until it snaps into place.
a. Set your adjustable power supply to 0 V DC.
b. Connect the negative (–) lead of your adjustable power supply to spade lug
c. Connect the positive (+) lead of your adjustable power supply to spade lug
Caution:
remains after removing the slide-out plate.
connector P5 on the 3-Phase Motor Control Application Board.
connector P4 on the 3-Phase Motor Control Application Board.
To avoid damage to the development kit, check the power supply con-
nection polarities as you follow the instructions below.
Z8FMC16100 Series Motor Control Development Kit
Quick Start Guide
Page 5 of 15
Related parts for Z8FMC160100KITG
Image
Part Number
Description
Manufacturer
Datasheet
Request
R

Part Number:
Description:
Communication Controllers, ZILOG INTELLIGENT PERIPHERAL CONTROLLER (ZIP)
Manufacturer:
Zilog, Inc.
Datasheet:

Part Number:
Description:
KIT DEV FOR Z8 ENCORE 16K TO 64K
Manufacturer:
Zilog
Datasheet:

Part Number:
Description:
KIT DEV Z8 ENCORE XP 28-PIN
Manufacturer:
Zilog
Datasheet:

Part Number:
Description:
DEV KIT FOR Z8 ENCORE 8K/4K
Manufacturer:
Zilog
Datasheet:

Part Number:
Description:
KIT DEV Z8 ENCORE XP 28-PIN
Manufacturer:
Zilog
Datasheet:

Part Number:
Description:
DEV KIT FOR Z8 ENCORE 4K TO 8K
Manufacturer:
Zilog
Datasheet:
Part Number:
Description:
CMOS Z8 microcontroller. ROM 16 Kbytes, RAM 256 bytes, speed 16 MHz, 32 lines I/O, 3.0V to 5.5V
Manufacturer:
Zilog, Inc.
Datasheet:
Part Number:
Description:
Low-cost microcontroller. 512 bytes ROM, 61 bytes RAM, 8 MHz
Manufacturer:
Zilog, Inc.
Datasheet:
Part Number:
Description:
Z8 4K OTP Microcontroller
Manufacturer:
Zilog, Inc.
Datasheet:
Part Number:
Description:
CMOS SUPER8 ROMLESS MCU
Manufacturer:
Zilog, Inc.
Datasheet:
Part Number:
Description:
SL1866 CMOSZ8 OTP Microcontroller
Manufacturer:
Zilog, Inc.
Datasheet:
Part Number:
Description:
SL1866 CMOSZ8 OTP Microcontroller
Manufacturer:
Zilog, Inc.
Datasheet:
Part Number:
Description:
OTP (KB) = 1, RAM = 125, Speed = 12, I/O = 14, 8-bit Timers = 2, Comm Interfaces Other Features = Por, LV Protect, Voltage = 4.5-5.5V
Manufacturer:
Zilog, Inc.
Datasheet:
Part Number:
Description:
Manufacturer:
Zilog, Inc.
Datasheet: