DEMO9S08JS16 Freescale Semiconductor, DEMO9S08JS16 Datasheet - Page 5
DEMO9S08JS16
Manufacturer Part Number
DEMO9S08JS16
Description
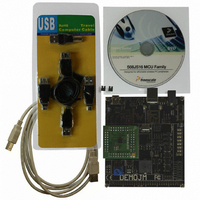
BOARD DEMO FOR JS16 FAMILY
Manufacturer
Freescale Semiconductor
Type
MCUr
Datasheets
1.DC9S08JS16.pdf
(49 pages)
2.DEMO9S08JS16.pdf
(32 pages)
3.DEMO9S08JS16.pdf
(8 pages)
4.DEMO9S08JS16.pdf
(8 pages)
5.DEMO9S08JS16.pdf
(4 pages)
Specifications of DEMO9S08JS16
Contents
2 Boards, Cable, Documentation, DVD
Processor To Be Evaluated
MC9S08JS16
Data Bus Width
8 bit
Interface Type
USB
Operating Supply Voltage
5 V
Silicon Manufacturer
Freescale
Core Architecture
HCS08
Core Sub-architecture
HCS08
Silicon Core Number
MC9S08
Silicon Family Name
S08JS
Rohs Compliant
Yes
For Use With/related Products
MC9S08JS16
Lead Free Status / RoHS Status
Lead free / RoHS Compliant


1. Insert the provided DVD into the computer.
2. Select the appropriate board and click “Install
3. Follow the on-screen instructions until
4. Select the appropriate board and click “Install
5. Follow the on-screen instructions util installation
After the CodeWarrior 6.2.1 patch and JS16
service pack are installed, the MC9S08JS16
silicon can be selected when creating the
application, and the JS16 project can be
compiled correctly.
Install Bootloader GUI
MC9S08JS16 supports a USB bootloader.
The user’s application code can be downloaded
(updated) using the USB bootloader or BDM
debug port. If the USB bootloader is adopted,
a friendly PC GUI must be installed. This GUI
works with the USB bootloader located in boot
ROM to transfer and program the firmware
(s19 code) to MC9S08JS16’s flash memory.
The installation of a PC GUI is a one-time step
before the USB bootloader is used.
1. Insert the provided DVD into the computer. A menu
2. Select the appropriate board and click on “Install
3. Follow the on-screen instructions until installation
The CodeWarrior compiles and links the
MC9S08JS16 project to generate the s19
code. The s19 code can be selected by the
bootloader GUI and programmed to the
MC9S08JS16 flash. For more information
about USB bootloader, please refer to
“MC9S08JS16 USB bootloader GUI user
guide” in the DEMO9S08JS16 DVD.
DEMO9S08JS16—Quick Start Guide
DEMO9S08JS16—Quick Start Guide
A menu will appear.
CodeWarrior Development Studio
for Microcontroller 6.2.1 patch.”
installation is complete.
MS9S08JS16 Service Pack”
is complete.
will appear.
Bootloader GUI.”
is complete.
STEP
3
Install DEMO Code
(based on USB-MINI stack)
for MC9S08JS16
Freescale USB-MINI stack for MC9S08JS16
is a complimentary stack with the appropriate
JS16 USB Device mode low-level drivers
and top-level HID class and CDC class
examples. To exercise the various USB
examples packaged with the stack, follow
the step-by-step DEMO9S08JS16 Labs
document (DEMO9S08JS16LAB) included
in the “Training” section of the DVD. Stack
installation is a one-time required step before
developing applications with this software.
1. Insert the provided DVD into the computer. A menu
2. Click “Install JS16 USB Demo.” This will launch
3. Follow on-screen instructions until installation
Install PEmicro
Demo Board Toolkit
PEmicro Embedded Multilink Toolkit
includes graphical utilities that run on your
computer and help speed up your application
development. These utilities take development
beyond the hardware and interact with the
target microcontroller over the same USB
multilink reference design on the board that
allows you to debug using CodeWarrior. Best
of all, you can debug your microcontroller
in CodeWarrior while simultaneously using
one of the following utilities: Logic Analyzer,
Serial Grapher and Terminal Window. PEmicro
Embedded Multilink Toolkit installation is a
one-time required step.
will appear.
the stack installer.
is complete.
STEP
STEP
4
5
Related parts for DEMO9S08JS16
Image
Part Number
Description
Manufacturer
Datasheet
Request
R

Part Number:
Description:
Manufacturer:
Freescale Semiconductor, Inc
Datasheet:
Part Number:
Description:
Manufacturer:
Freescale Semiconductor, Inc
Datasheet:
Part Number:
Description:
Manufacturer:
Freescale Semiconductor, Inc
Datasheet:
Part Number:
Description:
Manufacturer:
Freescale Semiconductor, Inc
Datasheet:
Part Number:
Description:
Manufacturer:
Freescale Semiconductor, Inc
Datasheet:
Part Number:
Description:
Manufacturer:
Freescale Semiconductor, Inc
Datasheet:
Part Number:
Description:
Manufacturer:
Freescale Semiconductor, Inc
Datasheet:
Part Number:
Description:
Manufacturer:
Freescale Semiconductor, Inc
Datasheet:
Part Number:
Description:
Manufacturer:
Freescale Semiconductor, Inc
Datasheet:
Part Number:
Description:
Manufacturer:
Freescale Semiconductor, Inc
Datasheet:
Part Number:
Description:
Manufacturer:
Freescale Semiconductor, Inc
Datasheet:
Part Number:
Description:
Manufacturer:
Freescale Semiconductor, Inc
Datasheet:
Part Number:
Description:
Manufacturer:
Freescale Semiconductor, Inc
Datasheet:
Part Number:
Description:
Manufacturer:
Freescale Semiconductor, Inc
Datasheet:
Part Number:
Description:
Manufacturer:
Freescale Semiconductor, Inc
Datasheet: