Chameleon-PIC Nurve Networks, Chameleon-PIC Datasheet - Page 11
Chameleon-PIC
Manufacturer Part Number
Chameleon-PIC
Description
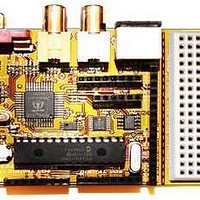
MCU, MPU & DSP Development Tools PIC24 & PROPELLER DEV SYSTEM (SBC)
Manufacturer
Nurve Networks
Datasheet
1.CHAMELEON-PIC.pdf
(263 pages)
Specifications of Chameleon-PIC
Processor To Be Evaluated
PIC24
Data Bus Width
16 bit
Interface Type
USB, VGA, PS/2, I2C, ISP, SPI
Operating Supply Voltage
3.3 V, 5 V
Lead Free Status / RoHS Status
Lead free / RoHS Compliant


0.0 Introduction and Origins
Welcome to the Hardware/Programming Manual for the Chameleon PIC 16-Bit Development Kit. This is a light-
hearted, non-censored, no-holds-barred manual. If you find technical errors or have comments, simply write them down in
a file and please send them to us at support@nurve.net or post on our forums and we will continue to merge them into
this working document.
The document contains two main sections –
The Chameleon’s were designed to be application boards to solve real world problems that you might have day to day in
your designs, engineering classes, or work. The Chameleons philosophy is to be very powerful, but very simple. I have
always been very interested in graphics and media processing, however, it is very hard to get a simple embedded system
or development board to output NTSC, PAL, VGA, etc. Thus, I set out to design something that wasn’t a development or
educational kit like our other products, but was something you just “use” to solve problems that is also good at displaying
information and interfacing to user input devices. Nonetheless, I wanted the Chameleons to be able to do graphics,
produce sound, interface to keyboards and mice and be as small as a credit card. There are a number of approaches to
this design, but with multiprocessing and multicore so popular, I thought it would be interesting to use both concepts in a
product. The Chameleon is the culmination of these ideas. To create a product that with very little coding you could output
NTSC/PAL graphics, VGA graphics, read keyboards, and mice as well as communicate with serial ports and perform
digital and analog I/O.
The selection of the processors was difficult as it always is. We have to balance price, performance, user base, flexibility
and a number of other factors. Additionally, since the Chameleon is a dual processor design, I had to think of a clean way
to interface the processors such as shared memory, SPI, I
use the Microchip PIC24HJ128GP502 processor for the Master and the Parallax Propeller chip for the Slave. The AVR
version uses a Atmel AVR AT328P 8-bit processor, but the idea is the same.
Thus, the idea is that the PIC (or AVR) with its huge fan/user base will be the ring leader, you code in C/ASM on the PIC
processor and then over a SPI interface you send commands to the Propeller chip (which is running a SPI driver) and
then issues the commands from the PIC to various processors (more on this in the Architecture Overview). This is the
perfect fusion and balance of the two processors. From the PIC’s perspective the Propeller chip is simply a media
processor, the programmer need not know a single thing about the Propeller if he doesn’t want to. On the other hand, this
setup is incredibly flexible. The Propeller can run any set of drivers on it that we wish and thru an agreed on
communications protocol the PIC can control these drivers remotely and get work done.
Finally, when I started designing the AVR version of the Chameleon a couple years ago, I kept hearing about this product
called the Arduino, finally I went to the site and checked it out, but was surprised that there was no “Arduino” per se. The
Arduino isn’t a product so much as it’s an ideal or methodology of software and tools. There is nothing but a single AVR
ATMega 168/328 on each Arduino board there is no extra hardware to do anything. So I looked deeper and found out the
Arduino guys came to the same conclusion I did about embedded system programming – it’s too hard!
The tool chains area nightmare, installation has too many steps, and it’s just too complicated for newbies that just want to
play with something. So what they did was not concentrate on hardware, but concentrate on software. They took the AVR
tool GNU GCC tool chain and covered it up with a Java application. Therefore, from your perspective as a programmer
you don’t need to know anything about AVRStudio, GNU GCC, WinAVR, etc. All you need to know is how to type in the
Ardunio text editor and press a couple buttons. Now, programming AVRs (and PICs) is a challenge as well. You normally
The Hardware Manual - This is a fast and furious circuit description of the Chameleon PIC 16-Bit Board’s dual
processor implementation around the Microchip PIC24HJ128GP502 and Parallax Propeller processors. The
PIC24HJ chip is 16-bit, single cycle instruction (in most cases) supporting 16-bit math, multiplication, and division.
It has 128K of FLASH and 8K of SRAM. We are running it at 40 MHz on the Chameleon. The Parallax Propeller
chip is used for media processing and runs at 80Mhz per core with 8 cores. Each instruction takes 4 clocks thus
the Propeller runs at 20 MIPS per core nominally. It has 32K of SRAM and 32K ROM.
The Programming Manual – This is the nitty gritty of the manual and has examples of programming graphics,
sound, keyboard, mice, I/O, etc., and explains how the processors work together along with their various
toolchains.
NOTE
The Chameleon PIC 16-Bit is very similar to the Chameleon AVR 8-Bit. In fact, the
processor was removed from my originally design and replaced by the PIC 16 and the
I/O interfaced re-connected, so if you learn one system you learn them both more or
less.
2
C, etc. Taking all those factors into consideration, I decided to
© 2009 NURVE NETWORKS LLC “Exploring the Chameleon PIC 16-Bit”
11
Related parts for Chameleon-PIC
Image
Part Number
Description
Manufacturer
Datasheet
Request
R

Part Number:
Description:
MCU, MPU & DSP Development Tools AVR8 VIDEO GAME DEV SYSTEM (SBC)
Manufacturer:
Nurve Networks

Part Number:
Description:
MCU, MPU & DSP Development Tools PIC24 VIDEO GAME DEV SYSTEM (SBC)
Manufacturer:
Nurve Networks

Part Number:
Description:
MCU, MPU & DSP Development Tools AVR8 & PROPELLER DEV SYSTEM (SBC)
Manufacturer:
Nurve Networks
Datasheet: