MCP2150DM Microchip Technology, MCP2150DM Datasheet - Page 34
MCP2150DM
Manufacturer Part Number
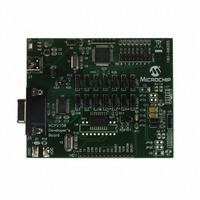
MCP2150DM
Description
BOARD DEMO FOR MCP2150
Manufacturer
Microchip Technology
Specifications of MCP2150DM
Main Purpose
Interface, IrDA
Embedded
Yes, MCU, 8-Bit
Utilized Ic / Part
MCP2150
Primary Attributes
IrDA Controller with PIC18F MCU
Secondary Attributes
USB Interface
Processor To Be Evaluated
MCP2150, MCP2155
Processor Series
MCP215x
Interface Type
USB
Lead Free Status / RoHS Status
Lead free / RoHS Compliant
Lead Free Status / RoHS Status
Lead free / RoHS Compliant, Lead free / RoHS Compliant


MCP2150 Developer’s Board User’s Guide
TABLE 2-5:
DS51869A-page 34
Step Action
10
11
12
1
2
3
4
5
6
7
8
9
Place the Primary Device’s IR port and the MCP2150
Developer’s Board on a flat surface about 25 cm (10
inches) apart, and with the IR ports facing each other.
On the MCP2150 Developer’s Board:
Ensure that the jumpers are configured as in
Figure 2-10
On the MCP2150 Developer’s Board:
Apply power to the unit via the USB connector. The PIC
reset switch (S1) may be depressed and released to
ensure that the PIC had a good reset.
Connect PC’s Serial Port to the DB-9 connector of the
MCP2150 Developer’s Board.
On the PC:
Wait for the PC to make a sound and the system tray to
show an IR Icon. Placing the mouse over the Icon will
show the MCP2150 Device ID (currently “Generic
IrDA”).
On the PC:
Open the HyperTerminal program window for the
Primary Device (such as COM 7).
Ensure that the window indicates that the HyperTerminal
program is connected.
On the PC:
Open a second instance of HyperTerminal program
window attached to the PC’s Serial Port (such as
COM 2) to connect to the MCP2150 Developer’s Board.
Ensure that the window indicates that the HyperTerminal
program is connected.
On the PC:
In one of the HyperTerminal program windows (such as
the Primary Device’s window), type some characters.
On the PC:
In the other HyperTerminal program windows (Serial
Port window), type some characters.
On the PC:
In either HyperTerminal program windows, select the
Transfer pull-down menu and then the Send Text File ...
option. Navigate to the folder that contains the
Transmit File.Txt file and select it. Then click
Open.
On the PC:
Make this file transfer transmitting from the other
HyperTerminal program window.
Continue steps 8, 9 10, or 11 for as long as desired.
Note:
Note:
DEMO #4 STEPS - PASS THROUGH PIC MODE
See D.1.2 “Configuring HyperTerminal to
connect to the IrDA Port (Virtual Port)”
See
for the Secondary Device”
.
D.1.3 “HyperTerminal Configuration
Result
—
—
On the MCP2150 Developer’s Board:
The green power LED (D1) will turn on.
—
—
On the MCP2150 Developer’s Board:
—
On the PC:
The system tray Icon will change from a single IR
Icon to two IR Icons facing each other. An IR Link is
now established.
—
On the PC:
In the other HyperTerminal program windows (the
Serial Port window), those characters appear.
On the PC:
In the other HyperTerminal program windows (the
Primary Device’s window), those characters
appear.
On the PC:
In the selected HyperTerminal program window the
displayed data is transmitted and is received and
displayed by the other HyperTerminal program
window.
On the PC:
In the selected HyperTerminal program window, the
displayed data is transmitted, being received and
displayed by the other HyperTerminal program
window.
—
© 2009 Microchip Technology Inc.
Related parts for MCP2150DM
Image
Part Number
Description
Manufacturer
Datasheet
Request
R

Part Number:
Description:
Manufacturer:
Microchip Technology Inc.
Datasheet:
Part Number:
Description:
Manufacturer:
Microchip Technology Inc.
Datasheet:
Part Number:
Description:
Manufacturer:
Microchip Technology Inc.
Datasheet:
Part Number:
Description:
Manufacturer:
Microchip Technology Inc.
Datasheet:
Part Number:
Description:
Manufacturer:
Microchip Technology Inc.
Datasheet:
Part Number:
Description:
Manufacturer:
Microchip Technology Inc.
Datasheet:
Part Number:
Description:
Manufacturer:
Microchip Technology Inc.
Datasheet:
Part Number:
Description:
Manufacturer:
Microchip Technology Inc.
Datasheet: