ACE1501EN Fairchild Semiconductor, ACE1501EN Datasheet - Page 15

ACE1501EN
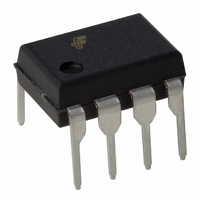
Manufacturer Part Number
ACE1501EN
Description
IC MCU 1KBIT EEPROM 8DIP
Manufacturer
Fairchild Semiconductor
Series
ACEX® 15xxr
Datasheet
1.ACE1501EN.pdf
(33 pages)
Specifications of ACE1501EN
Core Processor
ACE1502
Core Size
8-Bit
Speed
25MHz
Peripherals
Brown-out Detect/Reset, LVD, POR, PWM, WDT
Number Of I /o
6
Program Memory Size
1KB (1K x 8)
Program Memory Type
EEPROM
Eeprom Size
64 x 8
Ram Size
64 x 8
Voltage - Supply (vcc/vdd)
1.8 V ~ 3.6 V
Oscillator Type
Internal
Operating Temperature
-40°C ~ 85°C
Package / Case
8-DIP (0.300", 7.62mm)
Lead Free Status / RoHS Status
Lead free / RoHS Compliant
Data Converters
-
Connectivity
-
ACE1501 Product Family Rev. 1.1
The following steps show how to properly configure Timer 1 to
operate in the PWM mode. For this example, the T1 output sig-
nal is toggled with every timer underflow and the “high” and
“low” times for the T1 output can be set to different values. The
T1 output signal can start out either high or low depending on
the configuration of G2; the instructions below are for starting
with the T1 output high. Follow the instructions in parentheses
to start the T1 output low.
1. Configure T1 as an output by setting bit 2 of PORTGC.
2. Initialize T1 to 1 (or 0) by setting (or clearing) bit 2 of
3. Load the initial PWM high (low) time into the timer register.
4. Load the PWM low (high) time into the T1RA register.
5. Write the appropriate control value to the T1CNTRL register
6. After every underflow, load T1RA with alternate values. If the
Figure 15. Pulse Width Modulation Mode
Underflow
T1RBEN
Interrupt
- SBIT 2, PORTGC
PORTGD.
- SBIT 2, PORTGD
- LD
- LD
- LD
- LD
to select PWM mode with T1 toggle, to clear the enable bit
and pending flag, and to start the timer. (See Table 11 and
Table 12.)
- LD
user wishes to generate an interrupt on a T1 output transi-
tion, reset the pending flags and then enable the interrupt
using T1EN. The G bit must also be set. The interrupt
service routine must reset the pending flag and perform
whatever processing is desired.
- RBIT T1PND, T1CNTRL ; T1PND equals 3
- LD
- LD
T1
TMR1LO, #6FH
(1MHz clock)
T1RALO, #2FH
(1MHz clock)
T1RAHI, #01H
T1CNTRL, #0B0H ; Setting the T1C0 bit starts the
timer
T1RALO, #6FH
(1MHz clock)
T1RAHI, #05H
TMR1HI, #05H
Latch
Data
S
0
1
; Configure G2 as an output
; High (Low) for 1.391ms
; Low (High) for .303ms
; High (Low) for 1.391ms
Instruction
; Set G2 high
Clock
16-bit Timer (TMR1)
Reload select logic
16-bit Auto-Reload
16-bit Auto-Reload
Register (T1RA)
Register (T1RB)
Data
Bus
15
4.3 Mode 2: External Event Counter Mode
The External Event Counter mode operates similarly to the
PWM mode; however, the timer is not clocked by the instruction
clock but by transitions of the T1 input signal. The edge is
selectable through the T1C1 bit of the T1CNTRL register. A
block diagram of the timer’s External Event Counter mode of
operation is shown in Figure 16.
The T1 input should be connected to an external device that
generates a positive/negative-going pulse for each event. By
clocking the timer through T1, the number of positive/negative
transitions can be counted therefore allowing software to cap-
ture the number of events that occur. The input signal on T1
must have a pulse width equal to or greater than one instruction
clock cycle.
The counter can be configured to sense either positive-going or
negative-going transitions on the T1 pin. The maximum fre-
quency at which transitions can be sensed is one-half the fre-
quency of the instruction clock.
As with the PWM mode, when the counter underflows the
counter is reloaded from the T1RA register and the count down
proceeds from the loaded value. At every underflow, a pending
flag (T1PND) located in the T1CNTRL register is set. Software
must then clear the T1PND flag and can then load the T1RA
register with an alternate value.
The counter has one interrupt (TMRI1) that is maskable through
the T1EN bit of the T1CNTRL register. However, the core is only
interrupted if the T1EN bit and the G (Global Interrupt enable)
bit of the SR is set. If interrupts are enabled, the counter will
generate an interrupt each time the T1PND flag is set (when-
ever timer underflows provided that the pending flag was
cleared.) The interrupt service routine is responsible for proper
handling of the T1PND flag and the T1EN bit.
The following steps show how to properly configure Timer 1 to
operate in the External Event Counter mode. For this example,
the counter is clocked every falling edge of the T1 input signal.
Follow the instructions in parentheses to clock the counter every
rising edge.
1. Configure T1 as an input by clearing bit 2 of PORTGC.
2. Initialize T1 to input with pull-up by setting bit 2 of PORTGD.
3. Enable the global interrupt enable bit.
4. Load the initial count into the TMR1 and T1RA registers.
- RBIT
- SBIT
- SBIT
When the number of external events is detected, the counter
will reach zero; however, it will not underflow until the next
event is detected. To count N pulses, load the value N-1 into
the registers. If it is only necessary to count the number of
occurrences and no action needs to be taken at a particular
count, load the value 0xFFFF into the registers.
- LD
- LD
- LD
- LD
2, PORTGC
2, PORTGD
4, STATUS
TMR1LO, #0FFH
TMR1HI, #0FFH
T1RALO, #0FFH
T1RAHI, #0FFH
; Configure G2 as an input
; Set G2 high
www.fairchildsemi.com


