CY8CKIT-001 Cypress Semiconductor Corp, CY8CKIT-001 Datasheet - Page 19
CY8CKIT-001
Manufacturer Part Number
CY8CKIT-001
Description
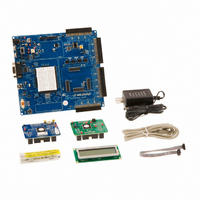
KIT DEV FOR PSOC3/5
Manufacturer
Cypress Semiconductor Corp
Series
PSoC® CapSenser
Type
MCUr
Datasheets
1.CY8CKIT-001.pdf
(2 pages)
2.CY8CKIT-001.pdf
(5 pages)
3.CY8CKIT-001.pdf
(116 pages)
4.CY8CKIT-001.pdf
(12 pages)
Specifications of CY8CKIT-001
Contents
Board, CD, CY8C29 & CY8C38 Modules, MiniProg3 Programmer/Debugger, Power Supply
Processor To Be Evaluated
CY8C29, CY8C38
Interface Type
RS-232, USB, JTAG
Operating Supply Voltage
3.3 V, 5 V
Lead Free Status / RoHS Status
Lead free / RoHS Compliant
For Use With/related Products
PSoC 1, PSoC 3 and PSoC 5
Lead Free Status / Rohs Status
Lead free / RoHS Compliant
Other names
428-2961
Available stocks
Company
Part Number
Manufacturer
Quantity
Price
Company:

Part Number:
CY8CKIT-001A
Manufacturer:
Cypress Semiconductor
Quantity:
135


2.2.3
2.2.4
CY8CKIT-001 PSoC Development Kit Guide, Doc. # 001-48651 Rev. **
Programming a Device
1. If this is your first time running PSoC Creator, follow these steps to configure the MiniProg3
2. In PSoC Creator, from the Debug menu, click Program.
3. The PSoC Creator Status Bar indicates that the device is programming.
4. Wait until programming is complete before continuing.
Running My First PSoC3 Project
1. Reset the PSoC Development Board by pressing and releasing the reset switch (SW4).
2. Verify that LED1 and LED2 are blinking based on the project's use of the PWMs. LED1 blinks
3. For more details regarding this project, review the detailed step-by-step project instructions in
device for these PSoC Development Kit projects. If these configurations are set skip to the next
step below and begin programming.
Note VTARG of the MiniProg3 is wired exclusively to VDDIO1 of the chip on the PSoC CY8C38
Family Processor Module. Because of this the user cannot perform powercycle mode program-
ming.
❐
❐
❐
❐
❐
❐
approximately once every second and LED2 blinks about three times a second.
First PSoC Project on page
From the Tools menu in PSoC Creator, click Options. The Options window opens.
In the Options window, select Debugging
•
•
•
•
•
•
From the Debug menu, select Select Debug Target. The Select Debug Target dialog box
opens.
Expand the tree under MiniProg3 and click Port Acquire.
Select the appropriate device and click Connect.
Click Close.
Set Applied Voltage to 3.3V
Set Transfer Mode to SWD
Set Active Port to 10 Pin
Set Acquire Mode to Reset
Set Clock Speed to 3.2 MHz
Click OK.
48.
→
MiniProg3 from the tree list.
Loading My First PSoC Project
My
15
[+] Feedback
Related parts for CY8CKIT-001
Image
Part Number
Description
Manufacturer
Datasheet
Request
R

Part Number:
Description:
KIT DEV FOR PSOC3/5
Manufacturer:
Cypress Semiconductor Corp
Datasheet:

Part Number:
Description:
PSoC1/3/5 Development Kit
Manufacturer:
Cypress Semiconductor Corp
Datasheet:

Part Number:
Description:
KIT DEV PSOC PROC MODULE CY8C38
Manufacturer:
Cypress Semiconductor Corp

Part Number:
Description:
KIT DEV PSOC PROC MODULE CY8C29
Manufacturer:
Cypress Semiconductor Corp

Part Number:
Description:
KIT DEV PSOC ANALOG VOLTMETER
Manufacturer:
Cypress Semiconductor Corp
Datasheet:

Part Number:
Description:
KIT DEV PSOC5 FIRST TOUCH
Manufacturer:
Cypress Semiconductor Corp
Datasheet:

Part Number:
Description:
KIT DEV PSOC3 FIRSTTOUCH STARTER
Manufacturer:
Cypress Semiconductor Corp
Datasheet:
Part Number:
Description:
KIT DEV PROC MODULE PSOC5
Manufacturer:
Cypress Semiconductor Corp
Datasheet:

Part Number:
Description:
KIT PSOC CY8C28 FAMILY PROCESSOR
Manufacturer:
Cypress Semiconductor Corp
Datasheet:

Part Number:
Description:
KIT PSOC MINIPROG3 PROGRAM DEBUG
Manufacturer:
Cypress Semiconductor Corp
Datasheet:

Part Number:
Description:
KIT EVAL POWERLINE HIGH VOLT
Manufacturer:
Cypress Semiconductor Corp
Datasheet:

Part Number:
Description:
KIT PSOC FIRST TOUCH
Manufacturer:
Cypress Semiconductor Corp
Datasheet:

Part Number:
Description:
EVAL KIT WORLDTOUR2
Manufacturer:
Cypress Semiconductor Corp
Datasheet:

Part Number:
Description:
KIT UNIVERSAL CAPSENSE CTRLR
Manufacturer:
Cypress Semiconductor Corp
Datasheet:
