Chameleon-AVR Nurve Networks, Chameleon-AVR Datasheet - Page 109
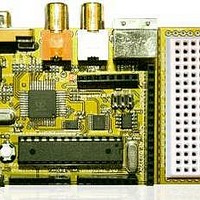
Chameleon-AVR
Manufacturer Part Number
Chameleon-AVR
Description
MCU, MPU & DSP Development Tools AVR8 & PROPELLER DEV SYSTEM (SBC)
Manufacturer
Nurve Networks
Datasheet
1.CHAMELEON-AVR.pdf
(268 pages)
Specifications of Chameleon-AVR
Processor To Be Evaluated
AVR 328P
Data Bus Width
8 bit
Interface Type
USB, VGA, PS/2, I2C, ISP, SPI
Operating Supply Voltage
3.3 V, 5 V
Lead Free Status / RoHS Status
Lead free / RoHS Compliant


© 2009 NURVE NETWORKS LLC “Exploring the Chameleon AVR 8-Bit”
Figure 15.45 – The Arduino “Hardware” directory.
This is probably one of the most important directories, if not the most important directories of the Arduino installation. It
contains a lot of goodies including two TXT files that describe the boards and programmers being used. So this is where
you would add new boards and programmers. Also, there is a directory called \BOOTLOADERS – this is very important,
its where all the .HEX files for the bootloaders are kept for all the flavors of Arduino. If you do happen to erase the Arduino
bootloader accidentally or purposely and want to restore it, you will go into \BOOTLOADERS and pull the 328p
bootloader .HEX file out and use that to program the AVR chip to restore it.
However, right now, we are interested in the \LIBRARIES directory. This is where all the Arduino “libraries” are kept.
Technically, both the source C/C++ file and the object files are in this directory. This is how the MAKE file for Arduino finds
things, it scans the \LIBRARIES directory and each directory name within is related 1:1 to a source library file name. Go
ahead and dive into \LIBRARIES as shown in Figure 15.46.
Figure 15.46 – The Arduino \LIBRARIES directory.
These are all the libraries provided by the Arduino development system. Go ahead and take a look in a few to see what’s
in them, then come back to the root directory as shown above. Now, what we need to do is copy our new Chameleon
libraries into this directory. So go back to the DVD in the Arduino folder and copy the contents of the \LIBRARIES sub-
folder into your install folder. When you’re done, it should look like the image shown in Figure 15.47.
109
Related parts for Chameleon-AVR
Image
Part Number
Description
Manufacturer
Datasheet
Request
R

Part Number:
Description:
MCU, MPU & DSP Development Tools PIC24 & PROPELLER DEV SYSTEM (SBC)
Manufacturer:
Nurve Networks
Datasheet:

Part Number:
Description:
MCU, MPU & DSP Development Tools AVR8 VIDEO GAME DEV SYSTEM (SBC)
Manufacturer:
Nurve Networks

Part Number:
Description:
MCU, MPU & DSP Development Tools PIC24 VIDEO GAME DEV SYSTEM (SBC)
Manufacturer:
Nurve Networks