Chameleon-AVR Nurve Networks, Chameleon-AVR Datasheet - Page 254
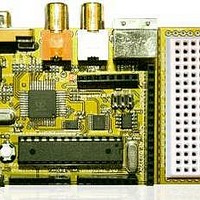
Chameleon-AVR
Manufacturer Part Number
Chameleon-AVR
Description
MCU, MPU & DSP Development Tools AVR8 & PROPELLER DEV SYSTEM (SBC)
Manufacturer
Nurve Networks
Datasheet
1.CHAMELEON-AVR.pdf
(268 pages)
Specifications of Chameleon-AVR
Processor To Be Evaluated
AVR 328P
Data Bus Width
8 bit
Interface Type
USB, VGA, PS/2, I2C, ISP, SPI
Operating Supply Voltage
3.3 V, 5 V
Lead Free Status / RoHS Status
Lead free / RoHS Compliant


There is also the Arduino version “sketch” which is located on the DVD here:
Which you should have copied all these files to your hard drive already. Compiling and building these programs should be
old hat to you now, so I won’t waste time with that. Let’s just look at the code. Referring back to the source listing above,
there are 2 things that make this program really
First, the addition of the message ids, show here:
And secondly, the actual messages to the Propeller to turn the LED on and off (the on message for example):
And that’s it! It just works – If you compile and run this program you will see the status LED blink on and off as well as the
NTSC monitor display messages.
As you can see, its very simple to add new functionality to the driver and if you are careful and make sure not to re-use
message ids then you can deploy your new driver for other Chameleon users (both AVR and PIC) and they can use the
driver without change in their Chameleons and all their old programs will still work, but you new functionality will be at
their finger tips.
34.1 Advanced Concepts and Ideas
There is so much you can do with the Chameleon, I don’t even know where to begin. But, some of the things you might
want to try are:
DVD-ROM:\ CHAM_AVR \ SOURCE \ CHAM_AVR_STATUS_LED_DEMO_01.c
DVD-ROM:\ CHAM_AVR \ TOOLS \ ARDUINO \ SKETCHES \ CHAM_AVR_STATUS_LED_DEMO
Using the Propeller as the Master and writing a driver on the AVR chip, so the Propeller can use its resources,
peripherals, etc.
The Propeller has a local 8-bit port, you can use this for anything. One idea that is really easy to implement is
adding a micro SD card adapter to it. Sparkfun sells a little adapter that is mounted on a right angle header, that
will plug right into the 8-bit Propeller port. You can then get a SD card object, add some messages to the master
control program driver, and presto you have a FLASH hard drive you can access from the AVR chip.
Networking the Chameleons together. The Chameleons are so small and powerful, a cool idea would be to
network 4-8 of them together each generating video, VGA, but being controlled by a “super-master” unit to do
something in unison.
Creating a Arduino Shield adapter board. The Chameleon (both AVR and PIC) have similar I/O headers to the
Arduino, but due to physical constraints they are different. A cool piece of add on hardware would be a daughter
board that mounts on top of the Chameleon to make it 100% I/O compatible with Arduino shields.
© 2009 NURVE NETWORKS LLC “Exploring the Chameleon AVR 8-Bit”
254
Related parts for Chameleon-AVR
Image
Part Number
Description
Manufacturer
Datasheet
Request
R

Part Number:
Description:
MCU, MPU & DSP Development Tools PIC24 & PROPELLER DEV SYSTEM (SBC)
Manufacturer:
Nurve Networks
Datasheet:

Part Number:
Description:
MCU, MPU & DSP Development Tools AVR8 VIDEO GAME DEV SYSTEM (SBC)
Manufacturer:
Nurve Networks

Part Number:
Description:
MCU, MPU & DSP Development Tools PIC24 VIDEO GAME DEV SYSTEM (SBC)
Manufacturer:
Nurve Networks