Chameleon-AVR Nurve Networks, Chameleon-AVR Datasheet - Page 86
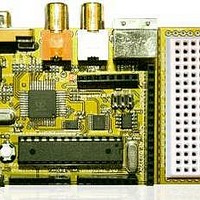
Chameleon-AVR
Manufacturer Part Number
Chameleon-AVR
Description
MCU, MPU & DSP Development Tools AVR8 & PROPELLER DEV SYSTEM (SBC)
Manufacturer
Nurve Networks
Datasheet
1.CHAMELEON-AVR.pdf
(268 pages)
Specifications of Chameleon-AVR
Processor To Be Evaluated
AVR 328P
Data Bus Width
8 bit
Interface Type
USB, VGA, PS/2, I2C, ISP, SPI
Operating Supply Voltage
3.3 V, 5 V
Lead Free Status / RoHS Status
Lead free / RoHS Compliant


15.1.4 Building a Project and Testing the Tool Chain
Congratulations, you have installed the tool chain and if you are still with me then everything must have went correctly! At
this point, we have to set up the tools themselves which includes a lot of detail. I highly recommended you first skim over
this section then return back to this point. This way you have an idea of what’s coming. If you make mistakes during the
setup process they are easy to fix if you know you made them, but very hard if you don’t. Thus, take a few moments to
skim the screen shots then return here and we set things up for real…
Alright, we are going to approach all development with the Chameleon AVR is as simple as possible. To that end, we
need to create a single project to work with then for each demo we will simply include the source files in the source tree
that the demo needs and remove ones it doesn’t This way we don’t have dozens of projects, hundreds of directories and a
big mess. The primary steps that we must follow are:
Let’s begin by launching AVR Studio 4. You should have an icon on your Desktop or link in the Start Menu, locate AVR
Studio 4 and launch it. You should see something like the image depicted in Figure 15.18.
Hopefully, you see something similar to this. However, it’s possible that some of the tools in different locations or not at all
(eg. the I/O view and Processor state). Any of these differences can be remedied at a later time from the Main Menu
under <View→Toolbars>. Now, let’s get to work.
The first step to setting up the tool is to create an initial project. The New Project dialog is shown in Figure 15.19 below.
Create an initial project and directory within the AVR installation directory.
Set up the GCC tool chain properly; the compiler, linker, etc.
Set up the AVR ISP MKII programmer itself (if you have one).
Copy all the source files from the DVD with all the demos and drivers into the Source\ directory locally on your
hard drive.
Figure 15.18 – AVR Studio starting up for the first time.
© 2009 NURVE NETWORKS LLC “Exploring the Chameleon AVR 8-Bit”
86
Related parts for Chameleon-AVR
Image
Part Number
Description
Manufacturer
Datasheet
Request
R

Part Number:
Description:
MCU, MPU & DSP Development Tools PIC24 & PROPELLER DEV SYSTEM (SBC)
Manufacturer:
Nurve Networks
Datasheet:

Part Number:
Description:
MCU, MPU & DSP Development Tools AVR8 VIDEO GAME DEV SYSTEM (SBC)
Manufacturer:
Nurve Networks

Part Number:
Description:
MCU, MPU & DSP Development Tools PIC24 VIDEO GAME DEV SYSTEM (SBC)
Manufacturer:
Nurve Networks