Chameleon-AVR Nurve Networks, Chameleon-AVR Datasheet - Page 110
Chameleon-AVR
Manufacturer Part Number
Chameleon-AVR
Description
MCU, MPU & DSP Development Tools AVR8 & PROPELLER DEV SYSTEM (SBC)
Manufacturer
Nurve Networks
Datasheet
1.CHAMELEON-AVR.pdf
(268 pages)
Specifications of Chameleon-AVR
Processor To Be Evaluated
AVR 328P
Data Bus Width
8 bit
Interface Type
USB, VGA, PS/2, I2C, ISP, SPI
Operating Supply Voltage
3.3 V, 5 V
Lead Free Status / RoHS Status
Lead free / RoHS Compliant


© 2009 NURVE NETWORKS LLC “Exploring the Chameleon AVR 8-Bit”
Figure 15.47 – The Arduino Libraries folder after copying the Chameleon libraries into it.
As you can see, there are about a dozen new libraries that we have developed for the Chameleon to run in the Arduino
environment. They are all uppercase to help you differentiate them.
Ok, that’s it – the entire Arduino installation is complete! Now, let’s fire up the tool, and set the environment up a little and
try re-building the “Hello World” program.
15.2.3 Preparation to Launch the Arduino Tool for the First Time
Before you launch the Arduino tool, make sure you have the USB cable plugged into the Chameleon (you can also have
the 9V DC power adapter plugged in if you have one). The USB is needed no matter what since that’s what the Arduino
tool will use to send serial data to the Chameleon’s bootloader with.
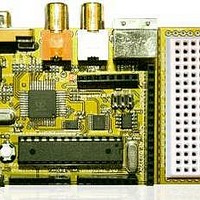
Figure 15.48 below shows the USB cable plugged into the Chameleon AVR. The FTDI chip device makes it easy to use
serial communications from the PC. Note that the Chameleons can be powered from the USB cable or an external 9V
power supply OR both, but USB cable is needed for serial communications always.
Figure 15.48 – The Mini-USB port on the Chameleon connects to the FTDI USB to Serial converter chip.
110
Related parts for Chameleon-AVR
Image
Part Number
Description
Manufacturer
Datasheet
Request
R

Part Number:
Description:
MCU, MPU & DSP Development Tools PIC24 & PROPELLER DEV SYSTEM (SBC)
Manufacturer:
Nurve Networks
Datasheet:

Part Number:
Description:
MCU, MPU & DSP Development Tools AVR8 VIDEO GAME DEV SYSTEM (SBC)
Manufacturer:
Nurve Networks

Part Number:
Description:
MCU, MPU & DSP Development Tools PIC24 VIDEO GAME DEV SYSTEM (SBC)
Manufacturer:
Nurve Networks