Chameleon-AVR Nurve Networks, Chameleon-AVR Datasheet - Page 87
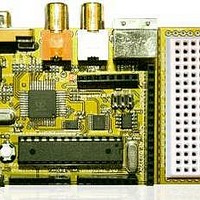
Chameleon-AVR
Manufacturer Part Number
Chameleon-AVR
Description
MCU, MPU & DSP Development Tools AVR8 & PROPELLER DEV SYSTEM (SBC)
Manufacturer
Nurve Networks
Datasheet
1.CHAMELEON-AVR.pdf
(268 pages)
Specifications of Chameleon-AVR
Processor To Be Evaluated
AVR 328P
Data Bus Width
8 bit
Interface Type
USB, VGA, PS/2, I2C, ISP, SPI
Operating Supply Voltage
3.3 V, 5 V
Lead Free Status / RoHS Status
Lead free / RoHS Compliant


Make the following changes to the default dialog, so we have the same project:
After you make these changes, you should have something that looks like Figure 15.19. Also, it’s important you use the
project name “cham_avr_work_01” since I will refer to that from time to time and this will be the directory we will copy
data to. However, in the future, you can create as many projects as you wish with whatever names you wish. Just make
sure to place them all in their own directories, so you don’t have file collisions.
Once complete, go ahead and click <Next> to move onto the section of the “Debug Platform” as shown in Figure 15.20.
AVR Studio supports all kinds of programmers, debuggers; hardware and software tools. This dialog helps you select
the programming device along with the target device you will be working with. In our case, under Debug Platform select
“AVR Simulator 2” along with “ATmega328P” under Device. The software simulator is of some use, but you will find its
capabilities limited. Moreover, it only simulates the processor not any the hardware connected to it. Thus, in the future,
you might want to purchase the AVR JTAG ICE debugger or other similar 3
Select AVR GCC – This tells the tool that we want to use C/C++ and GCC ASM.
Check “Create Folder” and uncheck “Create Initial File”.
Type in “cham_avr_work_01” under “Project Name”.
Under “Location” browse to your install directory’s “\source” sub-directory (or wherever you want to put projects),
we will put all projects in there.
Figure 15.20 – AVR Studio selection of the Debug Platform.
Figure 15.19 – Setting up the New Project dialog correctly.
© 2009 NURVE NETWORKS LLC “Exploring the Chameleon AVR 8-Bit”
rd
party tool.
87
Related parts for Chameleon-AVR
Image
Part Number
Description
Manufacturer
Datasheet
Request
R

Part Number:
Description:
MCU, MPU & DSP Development Tools PIC24 & PROPELLER DEV SYSTEM (SBC)
Manufacturer:
Nurve Networks
Datasheet:

Part Number:
Description:
MCU, MPU & DSP Development Tools AVR8 VIDEO GAME DEV SYSTEM (SBC)
Manufacturer:
Nurve Networks

Part Number:
Description:
MCU, MPU & DSP Development Tools PIC24 VIDEO GAME DEV SYSTEM (SBC)
Manufacturer:
Nurve Networks