IP-POSPHY4 Altera, IP-POSPHY4 Datasheet - Page 21
IP-POSPHY4
Manufacturer Part Number
IP-POSPHY4
Description
IP CORE - POS-PHY Level 4 SPI 4.2 Interface
Manufacturer
Altera
Type
MegaCorer
Datasheet
1.IP-POSPHY4.pdf
(144 pages)
Specifications of IP-POSPHY4
Software Application
IP CORE, Interface And Protocols, COMMUNICATION
Supported Families
Arria GX, Cyclone, HardCopy, Stratix
Core Architecture
FPGA
Core Sub-architecture
Arria, Cyclone, Stratix
Rohs Compliant
NA
Function
POS-PHY Level 4 Interface, Link-Layer/PHY Layer
License
Initial License
Lead Free Status / RoHS Status
na
Lead Free Status / RoHS Status
na


Chapter 2: Getting Started
Simulate the Design
December 2010 Altera Corporation
5. In Tool name, select a simulator tool from the list.
6. In the Test Benches dialog box, click New. The New Test Bench Settings dialog
7. In the New Test Bench Settings dialog box, enter the information described in
Table 2–2. NativeLink Test Bench Settings
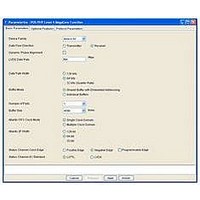
Figure 2–2. Example of New Test Bench Settings for NativeLink
8. When you have entered the required information for your new testbench, click OK
9. Click OK in the Test Benches dialog box and then click OK in the Settings dialog
Test bench name
Top-level module in test bench
Design instance name in test bench
Run for
Test bench files
In EDA Netlist Writer options, select VHDL from the list for Format for output
netlist.
In NativeLink settings, select the Compile test bench option and then click Test
Benches. The Test Benches dialog box appears.
box appears.
Table 2–2 on page 2–5
described in the table, browse to the files in your project.
Figure 2–2 on page 2–5
<variation_name> is example.
in the New Test Bench Settings dialog box.
box.
Parameter
(refer also to
shows an example of the testbench settings when the
Figure 2–2 on page
<any name>
tb
<variation name>
100 ns
<variation name>_tb.v
POS-PHY Level 4 MegaCore Function User Guide
Setting and File Name
2–5). To enter the files
2–5
Related parts for IP-POSPHY4
Image
Part Number
Description
Manufacturer
Datasheet
Request
R

Part Number:
Description:
IP CORE Renewal Of IP-POSPHY4
Manufacturer:
Altera
Datasheet:

Part Number:
Description:
IP Thermal Transfer Printer With Peel/Present Option
Manufacturer:
BRADY

Part Number:
Description:
CYCLONE II STARTER KIT EP2C20N
Manufacturer:
Altera
Datasheet:


Part Number:
Description:
CPLD, EP610 Family, ECMOS Process, 300 Gates, 16 Macro Cells, 16 Reg., 16 User I/Os, 5V Supply, 35 Speed Grade, 24DIP
Manufacturer:
Altera Corporation
Datasheet:
Part Number:
Description:
CPLD, EP610 Family, ECMOS Process, 300 Gates, 16 Macro Cells, 16 Reg., 16 User I/Os, 5V Supply, 15 Speed Grade, 24DIP
Manufacturer:
Altera Corporation
Datasheet:
Part Number:
Description:
Manufacturer:
Altera Corporation
Datasheet:
Part Number:
Description:
CPLD, EP610 Family, ECMOS Process, 300 Gates, 16 Macro Cells, 16 Reg., 16 User I/Os, 5V Supply, 30 Speed Grade, 24DIP
Manufacturer:
Altera Corporation
Datasheet:
Part Number:
Description:
High-performance, low-power erasable programmable logic devices with 8 macrocells, 10ns
Manufacturer:
Altera Corporation
Datasheet:
Part Number:
Description:
High-performance, low-power erasable programmable logic devices with 8 macrocells, 7ns
Manufacturer:
Altera Corporation
Datasheet:
Part Number:
Description:
Classic EPLD
Manufacturer:
Altera Corporation
Datasheet:
Part Number:
Description:
High-performance, low-power erasable programmable logic devices with 8 macrocells, 10ns
Manufacturer:
Altera Corporation
Datasheet:
Part Number:
Description:
Manufacturer:
Altera Corporation
Datasheet:
Part Number:
Description:
Manufacturer:
Altera Corporation
Datasheet: